
Klustron CDC Function
Klustron CDC Function
Note:
Unless specifically stated, any version number mentioned can be substituted with any released version number. For all released versions, please visit: http://doc.klustron.com/zh/Release_notes.html
Content:
The Klustron database storage nodes are compatible with the MySQL binlog dump protocol, indicating that the database engine has broad compatibility. To facilitate existing MySQL users to migrate their business data to the Klustron database, or to meet other business needs, it is necessary to extract business data from the Klustron database and synchronize it to other databases, or even to extract and generate files in other formats. Starting from version 1.2.1, Klustron provides a CDC module suitable for data synchronization needs. The Klustron CDC supports two modes: exporting data (SQL or files) from the Klustron cluster, and importing data from open-source MySQL to the Klustron cluster.
This article will guide you through the practical implementation of the functionalities mentioned above. Additionally, because Klustron supports configuring CDC tasks via XPanel as well as using REST API calls, this article will also discuss these methods.
01 Environment Preparation
The test scenario described in this article involves using CDC for bidirectional synchronization testing between MySQL and Klustron. Therefore, it is necessary to prepare a MySQL instance environment and a Klustron operating environment. Ideally, this requires four servers—one for MySQL installation and three for the Klustron environment. However, due to resource limitations, the entire test setup is implemented on three machines. Different Linux accounts and server ports are used, preventing any environment conflicts.
1.1 MySQL Server Installation and Configuration
Refer to the MySQL Community Edition installation documentation for detailed installation instructions.
MySQL Version: MySQL 8.0.34
IP: 192.168.0.155
Port: 3306
Linux: Ubuntu 20.04.2
Note: To synchronize MySQL with Klustron, it is necessary to enable binlog (already enabled by default in version 8.0) and GTID. Follow these commands to configure the settings:
root@kunlun3:~# mysql -h 192.168.0.155 -P 3306 -u root -p
mysql> SET @@GLOBAL.ENFORCE_GTID_CONSISTENCY = WARN;
mysql> SET @@GLOBAL.ENFORCE_GTID_CONSISTENCY = ON;
mysql> SET @@GLOBAL.GTID_MODE = OFF_PERMISSIVE;
mysql> SET @@GLOBAL.GTID_MODE = ON_PERMISSIVE;
mysql> SET @@GLOBAL.GTID_MODE = ON;
mysql> SET PERSIST GTID_MODE = on ;
mysql> SET PERSIST ENFORCE_GTID_CONSISTENCY  = on ;
mysql> SET PERSIST binlog_row_metadata='FULL';
mysql> SET PERSIST binlog_row_image='FULL';
Exit MySQL and restart the MySQL service to apply the changes:
systemctl restart mysqld
1.2 Klustron Installation and Configuration
Refer to the relevant documentation for detailed installation instructions.
Klustron Environment Description:
XPanel: http://192.168.0.152:40181/KunlunXPanel/#/cluster
Compute Node: 192.168.0.155, Port: 47001
Storage Node (shard1): 192.168.0.153, Port: 57007 (Primary)
Storage Node (shard2): 192.168.0.152, Port: 57005 (Primary)
Klustron is installed under the 'kl' user account.
1.3 CDC Installation and Configuration
Download the file kunlun-cdc-1.2.1.tgz (http://zettatech.tpddns.cn:14000/dailybuilds/enterprise/kunlun-cdc-1.2.1.tgz) and extract it to the home directory of the 'kl' user on the machines with IP addresses 192.168.0.152, 192.168.0.153, and 192.168.0.155 using the command tar -zxvf kunlun-cdc-1.2.1.tgz. This will create a directory named /home/kl/kunlun-cdc-1.2.1 along with its subdirectories.
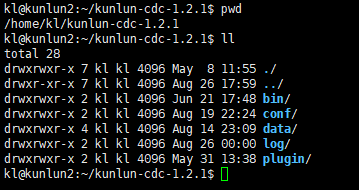
Access the configuration directory on each machine (192.168.0.152, 192.168.0.153, 192.168.0.155) as the 'kl' user and edit the configuration file kunlun_cdc.cnf:
cd /home/kl/kunlun-cdc-1.2.1/conf
vi kunlun_cdc.cnf
Modify the following parameters:
local_ip = 192.168.0.153 # Set the respective IP for each machine
http_port = 18012 # Use a consistent port across the three machines, can vary as needed
ha_group_member = 192.168.0.152:18081,192.168.0.153:18081,192.168.0.155:18081 # Form a high availability cluster for CDC, ports are customizable, in this case, 18081
server_id = 2# Assign a unique ID to each machine, does not need to be unique
Save and exit.
Enter the CDC bin directory on the three machines, which contains commands for starting and stopping the CDC service:
start_kunlun_cdc.sh stop_kunlun_cdc.sh
Execute the following commands on each machine to start the CDC service:
cd /home/kl/kunlun-cdc-1.2.1/bin
./start_kunlun_cdc.sh
ps -ef |grep cdc
If the output indicates that the CDC service has started successfully, the setup is correct.

Log in to XPanel at http:// 192.168.0.152:40181/KunlunXPanel/#/cdc/list, which will open the following page:

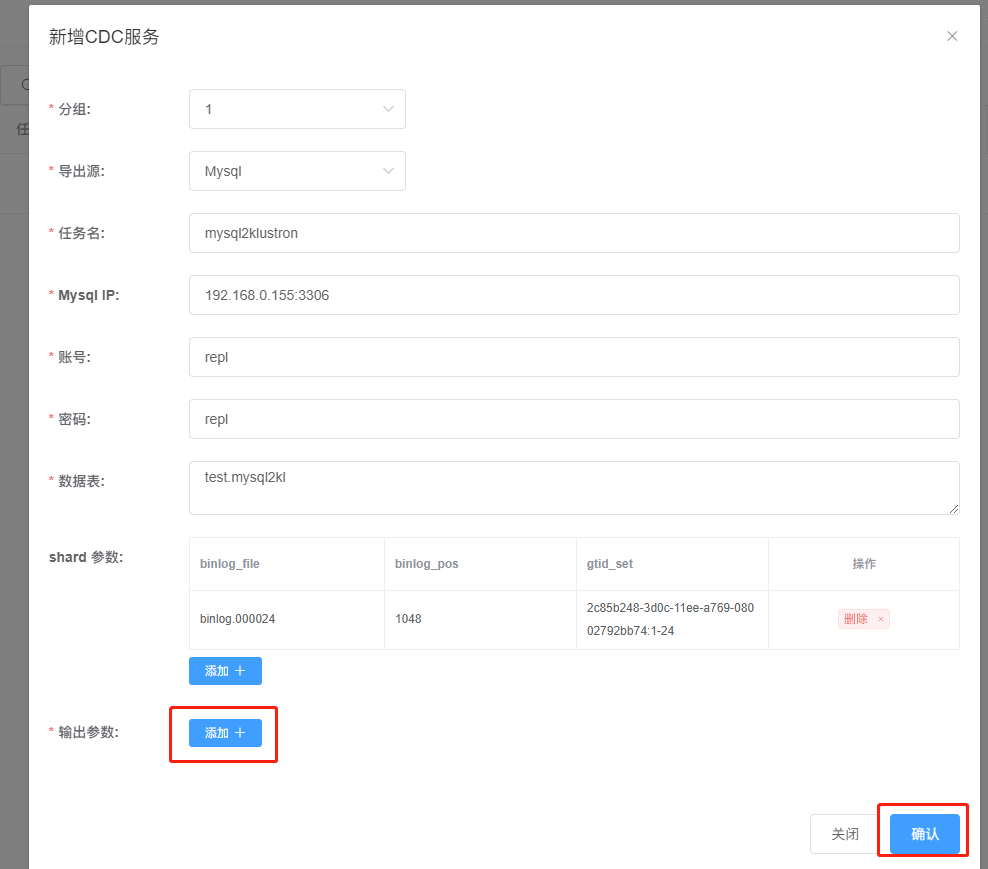
Click on "Add" to configure the "CDC Service" by entering the respective parameters.
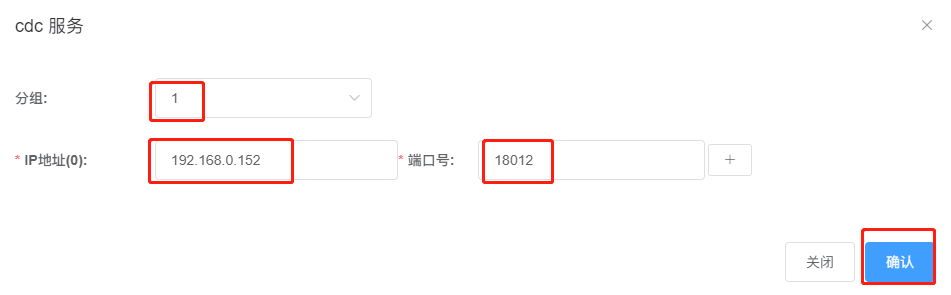
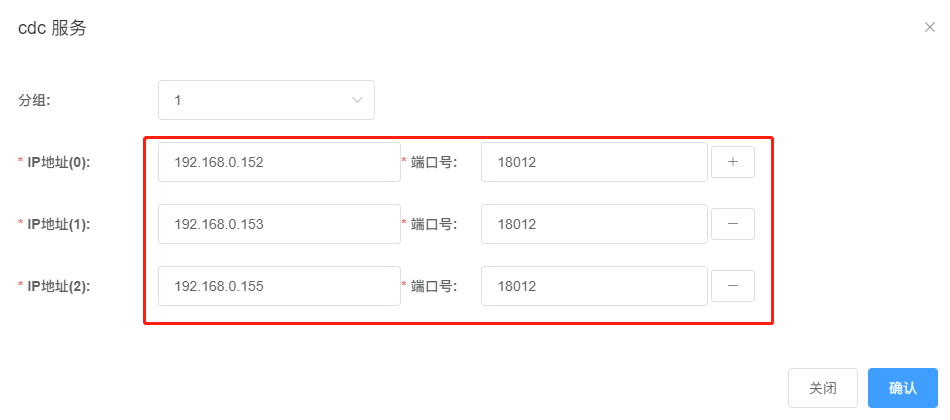
Group number can be customized; in this example, the group number is set to 1. Since the configuration involves a high-availability cluster of three CDC servers, continue by clicking the "+" sign on the right to complete the remaining two CDC service configurations and click "Confirm" to save.
After saving, the interface will display as shown:
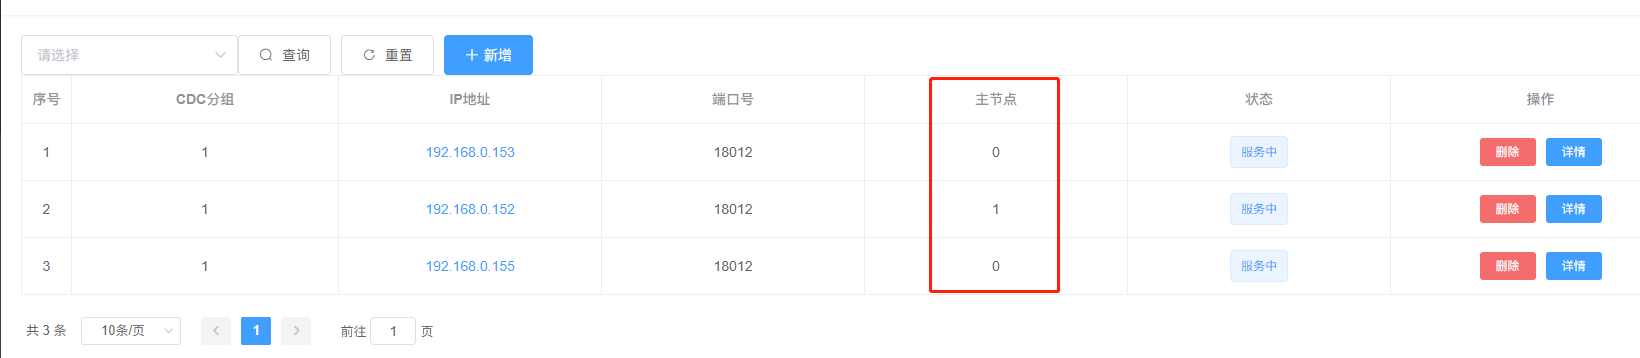
Note that 192.168.0.152 is indicated as the "Primary Node," meaning it currently hosts the CDC service. The other two nodes serve as backup nodes and will step up as the primary node in case of a failure.
Additionally, Klustron provides a REST API to obtain CDC service configuration information. Example API call (can be executed on any of the three Klustron node machines):
kl@kunlun1:~$ curl -d '
{
    "version":"1.0",
    "job_id":"",
    "job_type":"list_cdc_conf",
    "timestamp":"1435749309",
    "user_name":"test"
}
' -X POST http://192.168.0.152:18012/kunlun_cdc
The output is as follows:

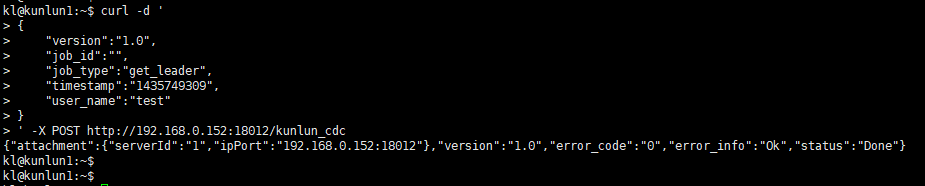
To find out which node is currently the primary node in the CDC cluster through the REST API, use the following call:
kl@kunlun1:~$ curl -d '
{
    "version":"1.0",
    "job_id":"",
    "job_type":"get_leader",
    "timestamp":"1435749309",
    "user_name":"test"
}
' -X POST http://192.168.0.152:18012/kunlun_cdc
The output is as follows:
02 CDC Testing
2.1 Synchronizing Data from MySQL to Klustron
First, set up the corresponding databases, users, and tables in MySQL with the following commands:
root@kunlun3:~# mysql -h 192.168.0.155 -P 3306 -u root -p
mysql> CREATE USER 'repl'@'%' IDENTIFIED WITH mysql_native_password BY 'repl';
mysql> GRANT REPLICATION SLAVE ON *.* TO 'repl'@'%';
mysql> create database test ;
mysql> create user 'test'@'%' identified by 'test';
mysql> grant all on test.* to 'test'@'%';
mysql> flush privileges;
mysql> exit;
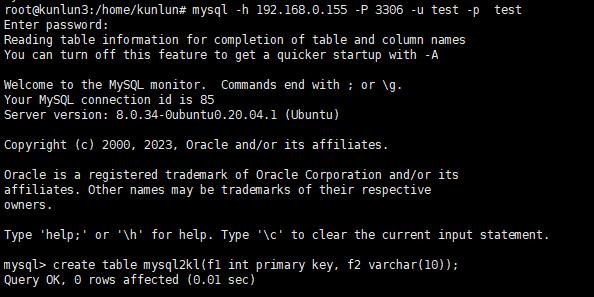
root@kunlun3:~# mysql -h 192.168.0.155 -P 3306 -u test -p test
mysql> create table mysql2kl (f1 int primary key, f2 varchar(10));
Connect to a Klustron compute node, and set up the corresponding user, schema, and table with these commands:
kl@kunlun3:~$ psql -h 192.168.0.155 -p 47001 -U adc postgres
create user test with password 'test';
grant create on database postgres to test ;
exit
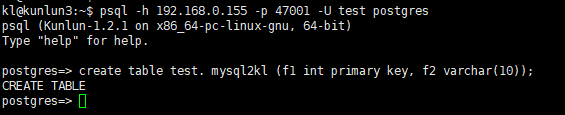
kl@kunlun3:~$ psql -h 192.168.0.155 -p 47001 -U test postgres
create schema test ;
create table test. mysql2kl (f1 int primary key, f2 varchar(10));
Note: It is crucial that the target database table has a primary key to ensure SQL operations are not duplicated. Otherwise, if a new CDC master node takes over, it may re-execute all operations that the previous master node processed in its last few seconds before disconnecting. This could lead to duplicated rows being inserted, deleted, or updated, causing data discrepancies and potentially hindering further data synchronization.
Open XPanel: http://192.168.0.152:40181/KunlunXPanel/#/cdc/worker and add a CDC task for data synchronization from MySQL to Klustron:
Click "+Add" and enter the following parameters:
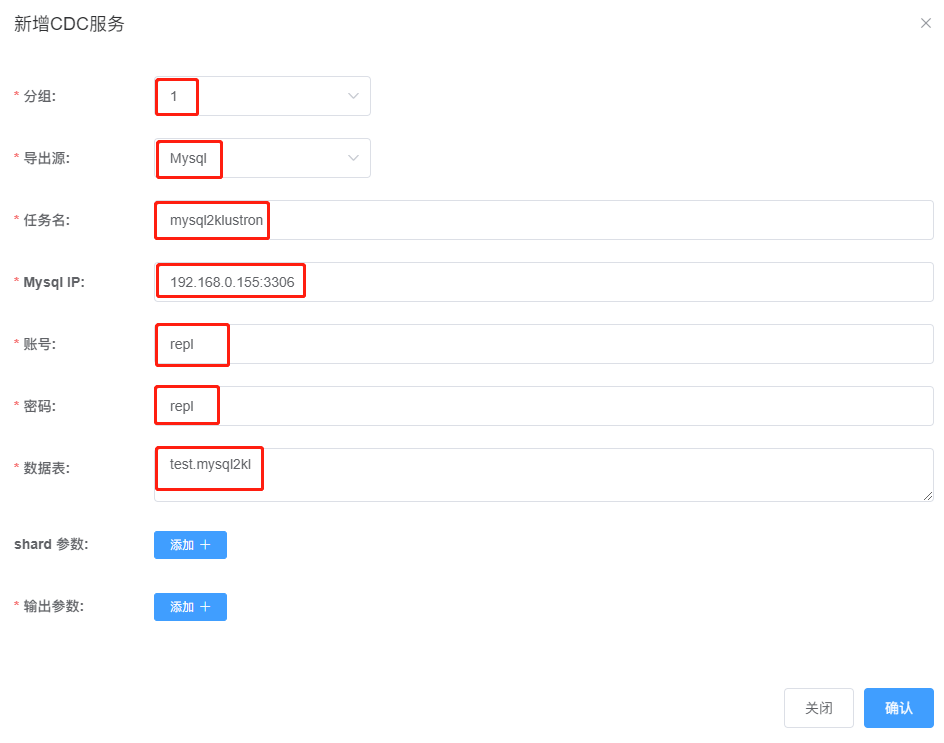
Then, click the "Add +" button next to "Shard Parameters" to open the following dialog:
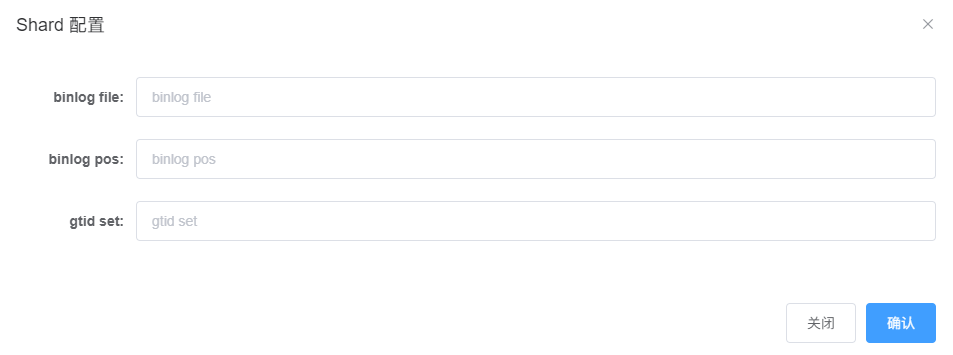
Here, connect to MySQL to obtain the current values for these parameters with this command:
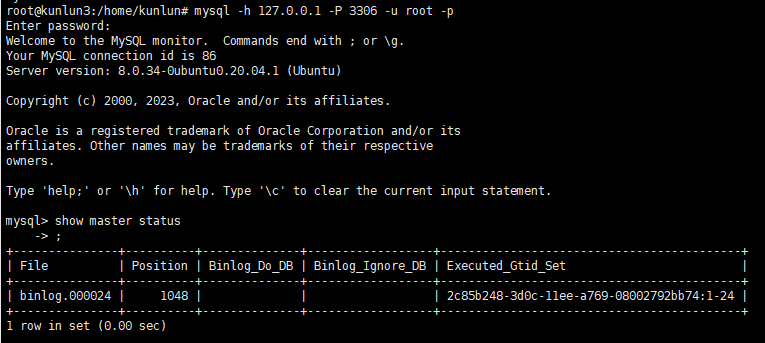
root@kunlun3:~# mysql -h 127.0.0.1 -P 3306 -u root -p
mysql> show master status ;
The output is as follows:
Fill in the 'file', 'position', and 'executed_gtid_set' fields in the previously mentioned shard configuration dialog as shown:
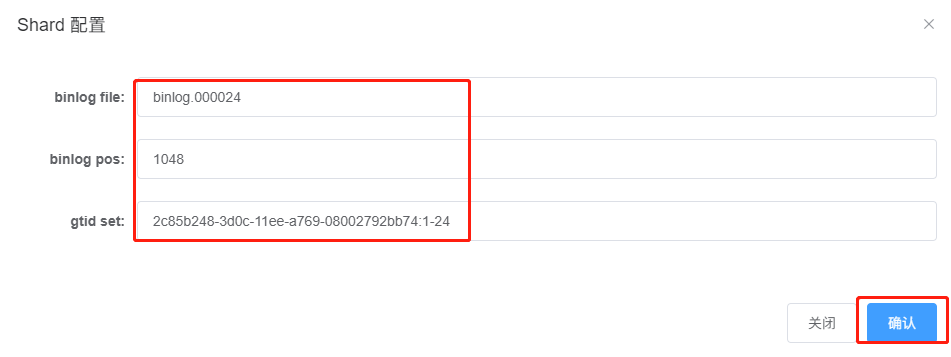
Click "Confirm" to save the configuration details and continue setting up the "Output Parameters"
Click "+Add" to open the following dialog:
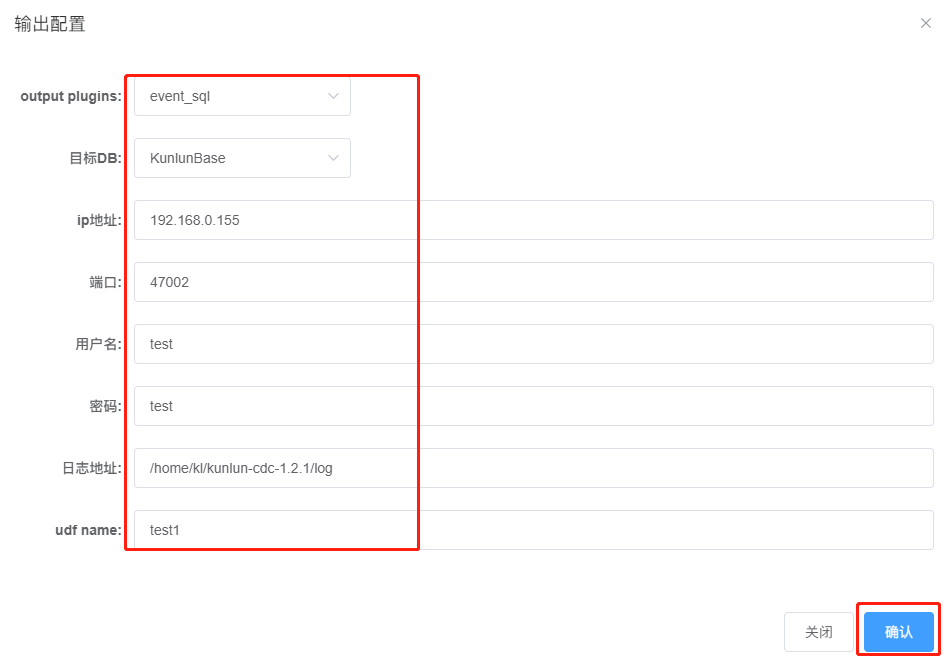
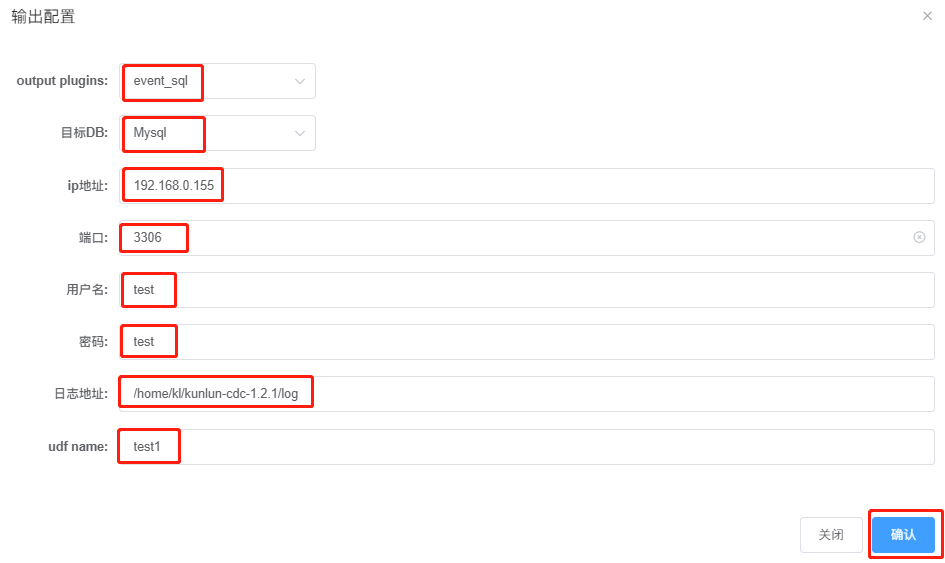
Fill out the following parameters:
Output plugins: Select "event_sql" for data synchronization from MySQL to Klustron.
Target DB: Choose KunlunBase.
IP Address: This is the IP of the target Klustron cluster, here it's 192.168.0.155, the compute node's IP.
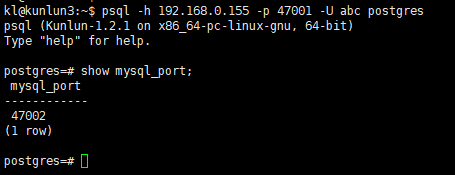
Port: Note that this is not the PostgreSQL protocol port, 47001, but must be the MySQL protocol service port, which is typically one number higher than the PostgreSQL port, i.e., 47002. You can also confirm the MySQL protocol service port with this command:
psql -h 192.168.0.155 -p 47001 -U abc postgres
show mysql_port;
Username/Password: These are the credentials of the user owning the tables to be synchronized.
Log Address: Specify the location for the logs produced during the execution of this CDC task.
udf name: In this case, it has no specific significance. The input string here will be part of the log filename, which can be found under the "Log Address:" during the CDC task execution to understand how log filenames are generated.
After entering all parameters, click "Confirm" to save the settings. The configuration window will now display as follows:
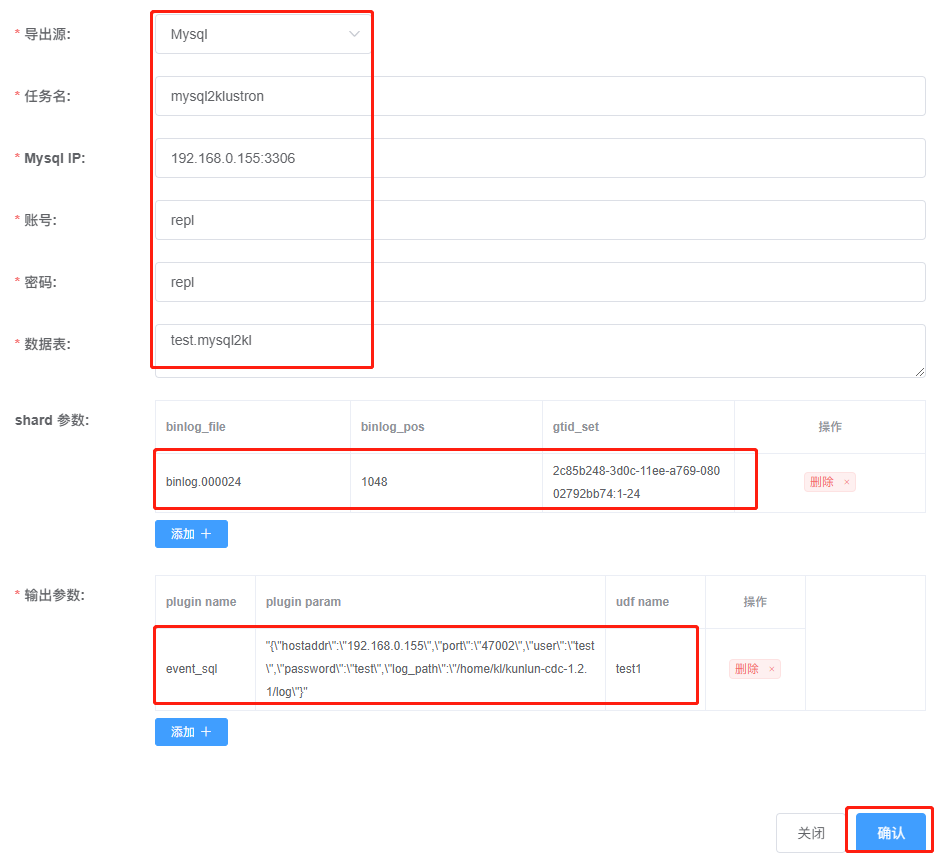
Click "Confirm" again, and XPanel will submit a synchronization task from MySQL to Klustron, as shown in the following interface:
The creation of the synchronization task from MySQL to Klustron can also be accomplished via REST API. This can be done from any machine that can connect to 192.168.0.152 by executing the following command:
kl@kunlun3:~$curl -d '
{
    "version":"1.0",
    "job_id":"",
    "job_type":"add_dump_table",
    "timestamp":"1435749309",
    "user_name":"test",
    "paras":{
        "meta_db":"192.168.0.155:3306",    --- IP:port for dumping from MySQL
        "meta_user":"repl",                --- MySQL account with replication privileges
        "meta_passwd":"repl",              --- Password for the MySQL account
        "cluster_name":" mysql2klustron ",
        "dump_tables":" mysql2kl ",
        "is_kunlun":"0",
        "shard_params":[{
            "binlog_file":"binlog.000024",
            "binlog_pos":"1048",
            "gtid_set":" 2c85b248-3d0c-11ee-a769-08002792bb74:1-24 "
        }],
        "output_plugins":[
            {
                "plugin_name":"event_file",     --- Captures the binlog and writes it to a specified file
                "plugin_param":"/home/kl/kunlun-cdc-1.2.1/log/event.log",  -- Path and file where the captured binlog is stored
                "udf_name":"test1"      --- No special meaning in this example
            },
            {
                "plugin_name":"event_sql",     "plugin_param":"{\"hostaddr\":\"192.168.0.155\",\"port\":\"47002\",\"user\":\"test\",\"password\":\"test\",\"log_path\":\"/home/kl/kunlun-cdc-1.2.1/log\"}",
                "udf_name":"test2"
            }
        ]
    }
} ' -X POST http://192.168.0.152:18012/kunlun_cdc
Note: This API call, compared to the previous XPanel configuration, includes the use of an event_file plugin, indicating that the CDC task can output to multiple targets and support multiple types of output simultaneously.
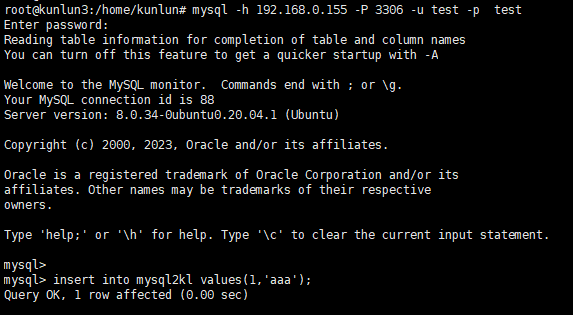
If the synchronization task is operating normally, we can proceed to test data synchronization. Connect to the MySQL service and insert a record into the mysql2kl table:
root@kunlun3:~#mysql -h 192.168.0.155 -P 3306 -u test -p test
insert into mysql2kl values(1,'aaa');
Next, connect to Klustron and check the synchronization status of the target table:
kl@kunlun3:~$ psql -h 192.168.0.155 -p 47001 -U test postgres
postgres=> select * from mysql2kl;
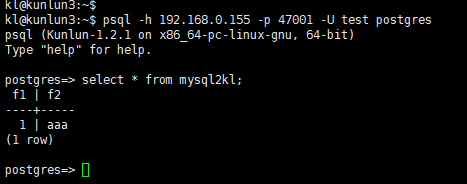
As seen, the target database's table contains the record previously inserted in MySQL, indicating that the synchronization task is functioning properly. Return to the MySQL instance and update the record as follows:
update mysql2kl set f2='xxx' where f1=1;

Switch back to the Klustron cluster and check the mysql2kl table:
Select * from mysql2kl;
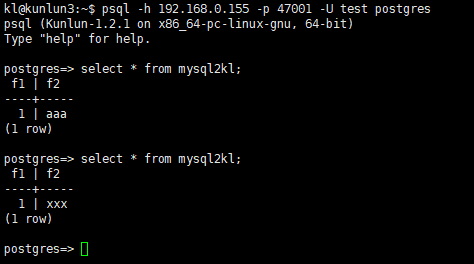
The field records are successfully synchronized and updated.
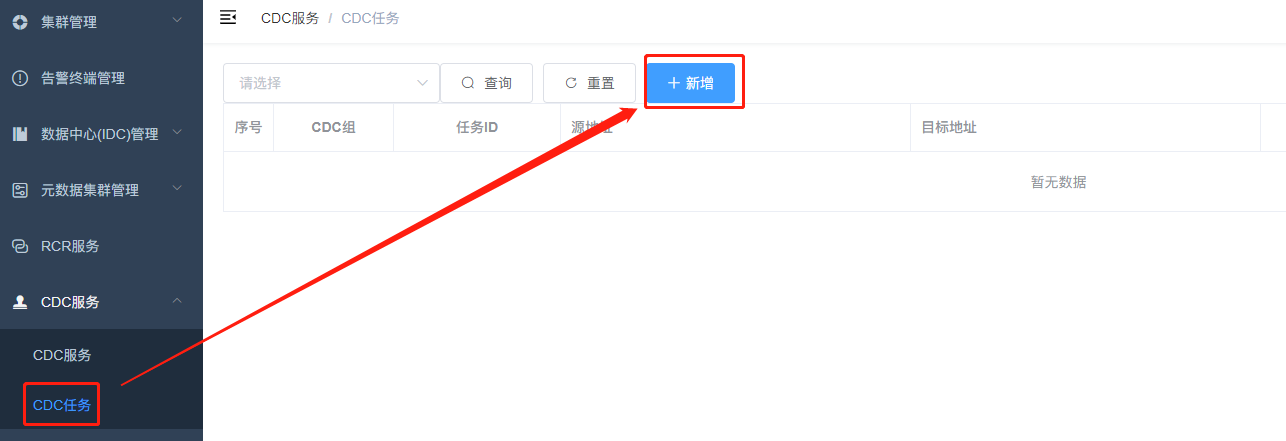
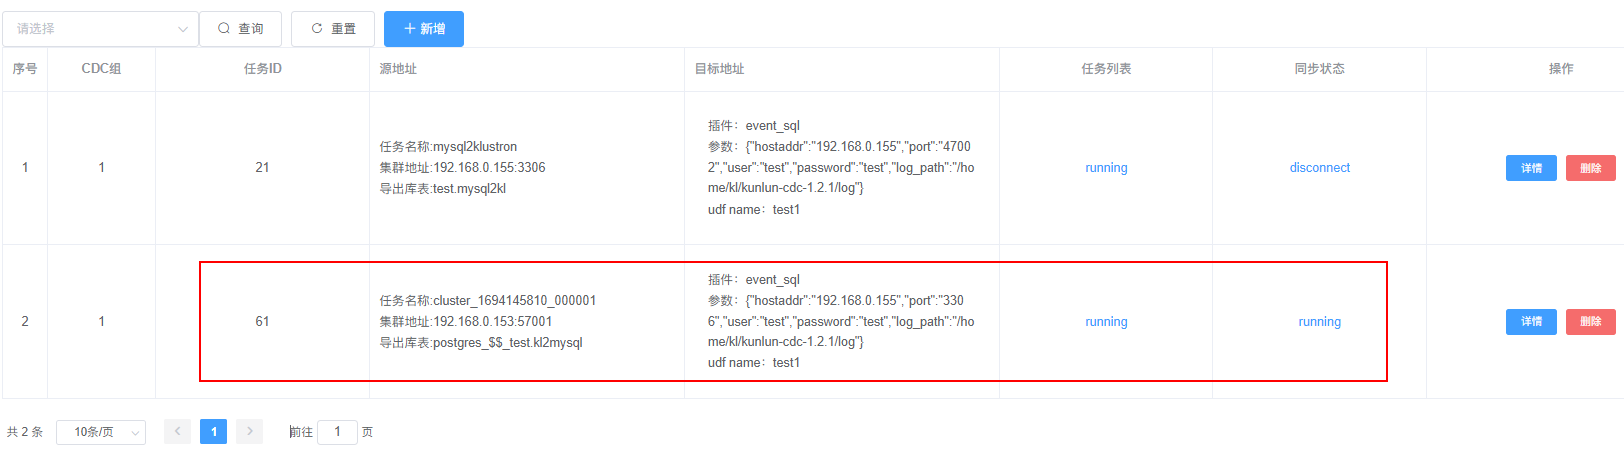
During the operation of the CDC task, detailed execution logs for each task can also be viewed in the XPanel interface. Return to the main XPanel screen and click on "CDC Tasks" in the left navigation menu as shown:
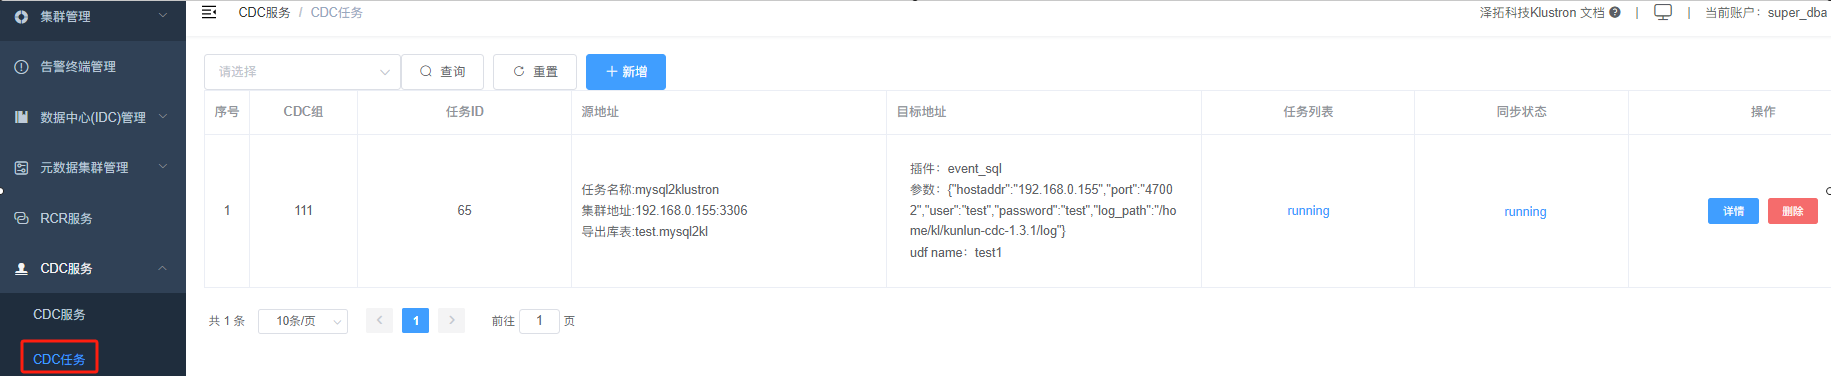
The CDC task list on the right will have a "Details" button for each synchronization task. Clicking this button will pop up a window showing detailed information about the synchronization task:
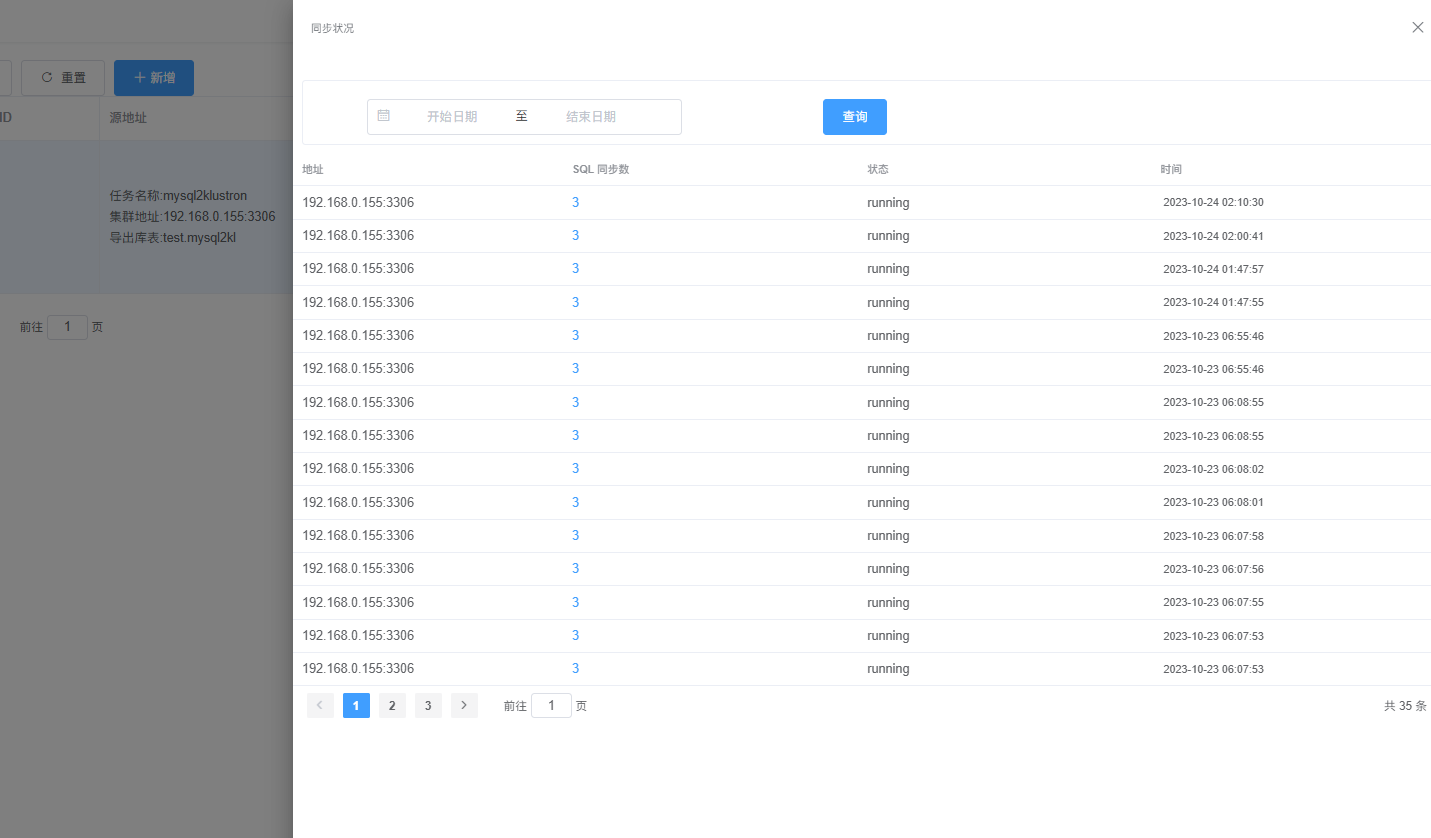
Depending on the need, you can customize the input of different "Start Dates" and "End Dates" to view the execution logs for specific periods.
2.2 Synchronizing Data from Klustron to MySQL
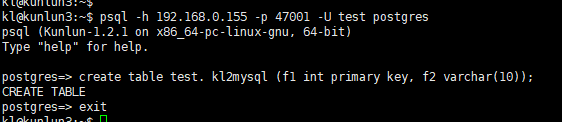
Connect to a Klustron compute node and establish the source table with the following commands:
kl@kunlun3:~$ psql -h 192.168.0.155 -p 47001 -U test postgres
create table test. kl2mysql (f1 int primary key, f2 varchar(10));
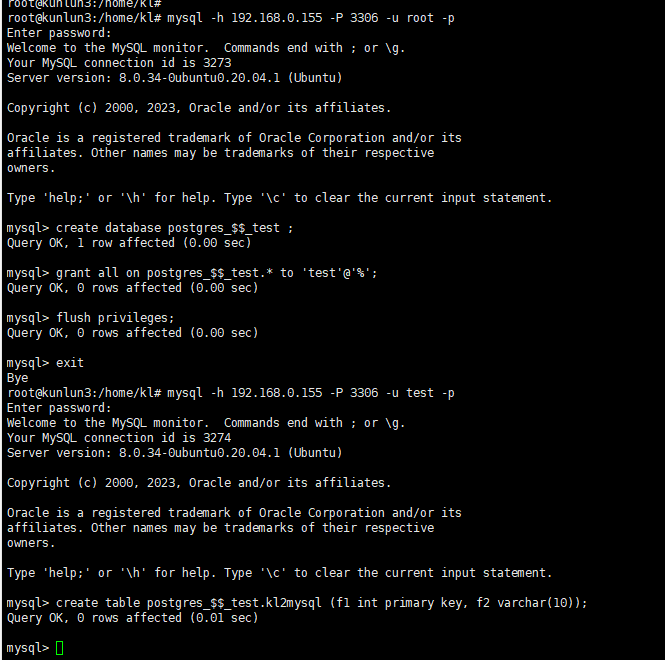
Next, create the corresponding table in the target MySQL database:
root@kunlun3:/home/kl# mysql -h 192.168.0.155 -P 3306 -u root -p
mysql> create database postgres_$$_test ;
mysql> grant all on postgres_$$_test.* to 'test'@'%';
mysql> flush privileges;
mysql> exit
root@kunlun3:/home/kl# mysql -h 192.168.0.155 -P 3306 -u test -p
mysql> create table postgres_$$_test.kl2mysql (f1 int primary key, f2 varchar(10));
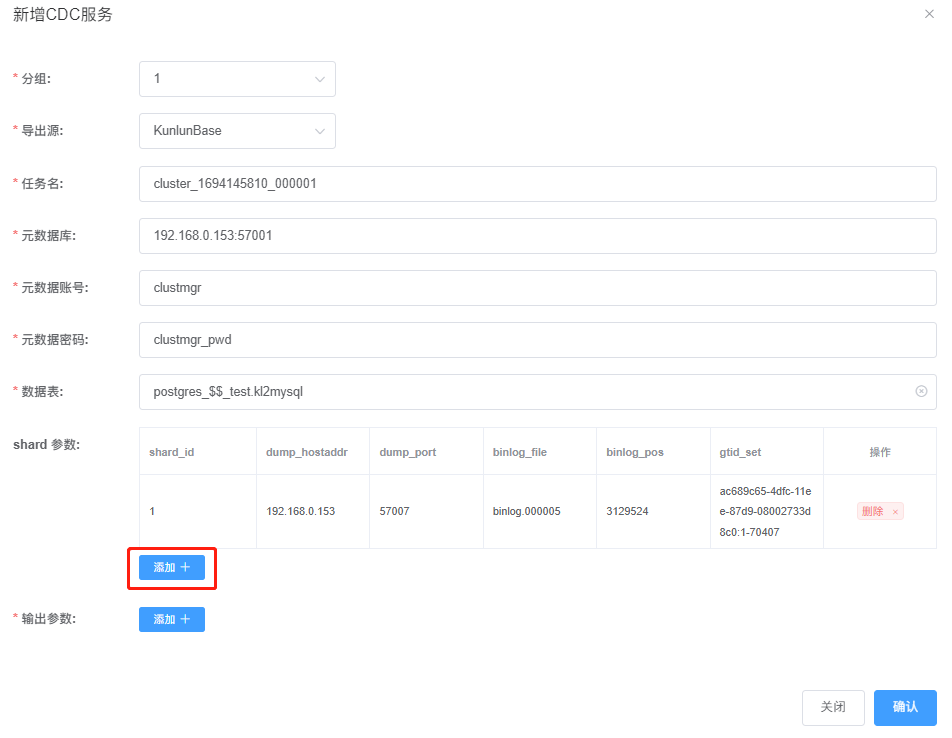
Open XPanel: http://192.168.0.152:40181/KunlunXPanel/#/cdc/worker and add a CDC task for data synchronization from Klustron to MySQL:
Click "+Add" and enter the following parameters:
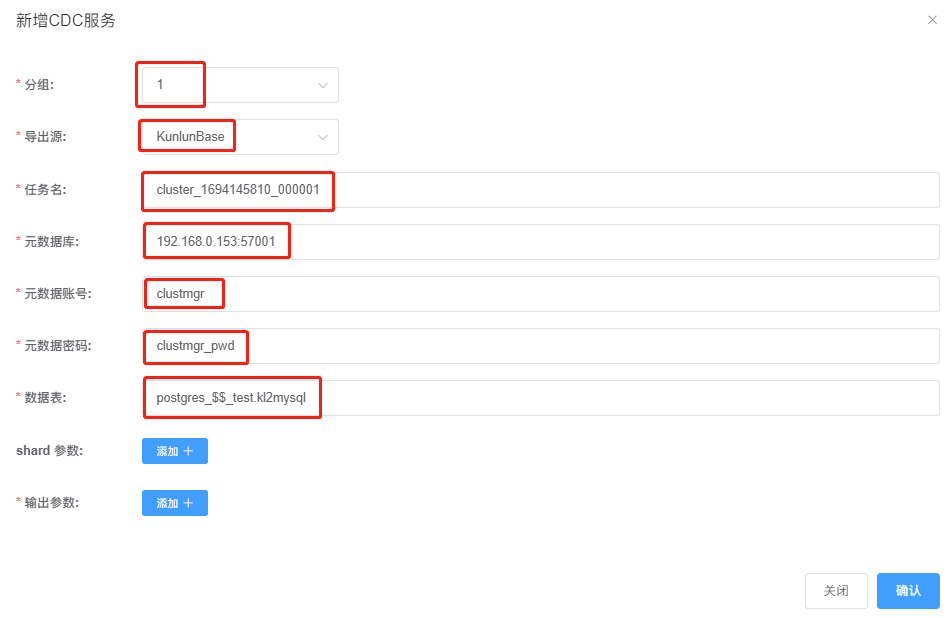
Explanations:
Task Name: Check the name of Klustron cluster 'cluster1'; it must not be filled in arbitrarily.
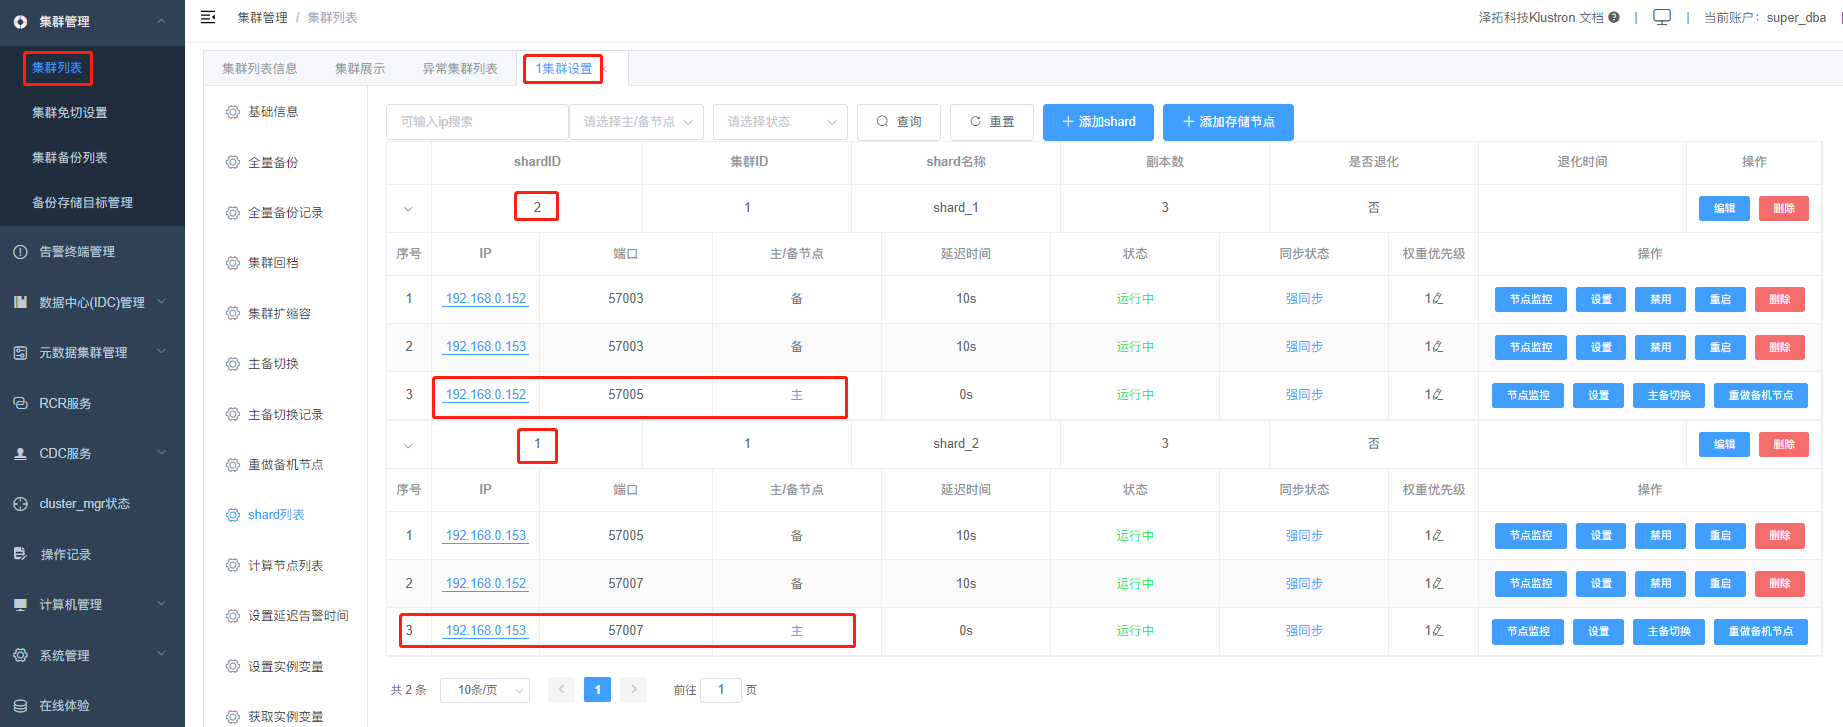
Meta Database: Klustron's meta-database is a three-node MGR; check in XPanel which one is the primary node of the MGR in the Klustron cluster environment and enter the primary node information here.
Data Tables: The format of the data tables must follow
<database name>_$$_<schema name>.<table name>.If multiple tables are to be synchronized, separate them with a comma.
Next, click "+Add" next to "Shard Parameters:" to open the following dialog:
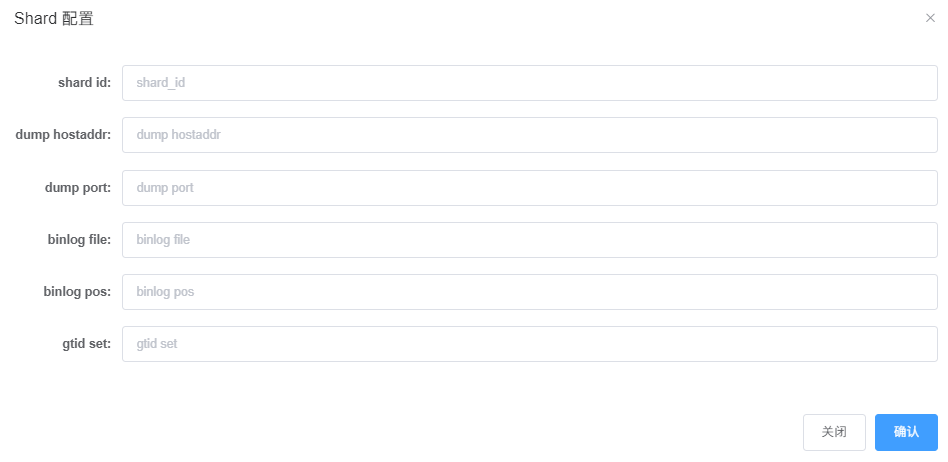
Here, connect to the MySQL shards on the storage nodes and obtain the binlog information for each shard with the following commands:
Shard Information:
Shard 1:
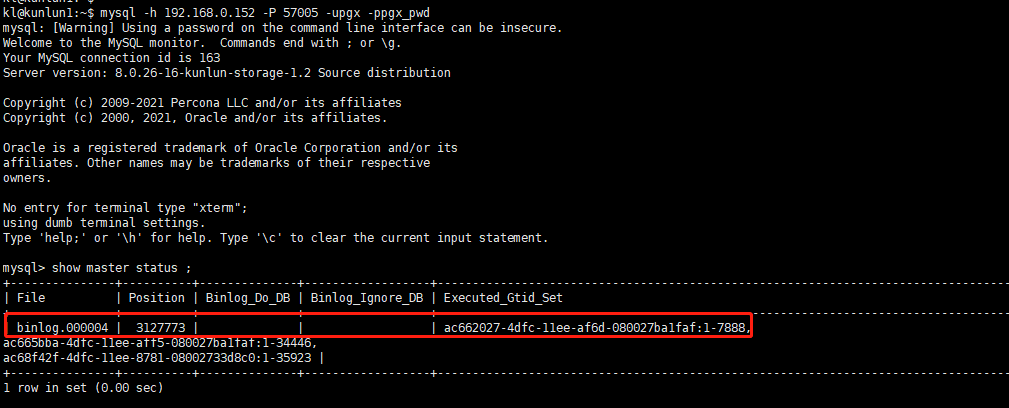
kl@kunlun2:~$ mysql -h 192.168.0.153 -P 57007 -upgx -ppgx_pwd
mysql> show master status ;
The output will be as follows:
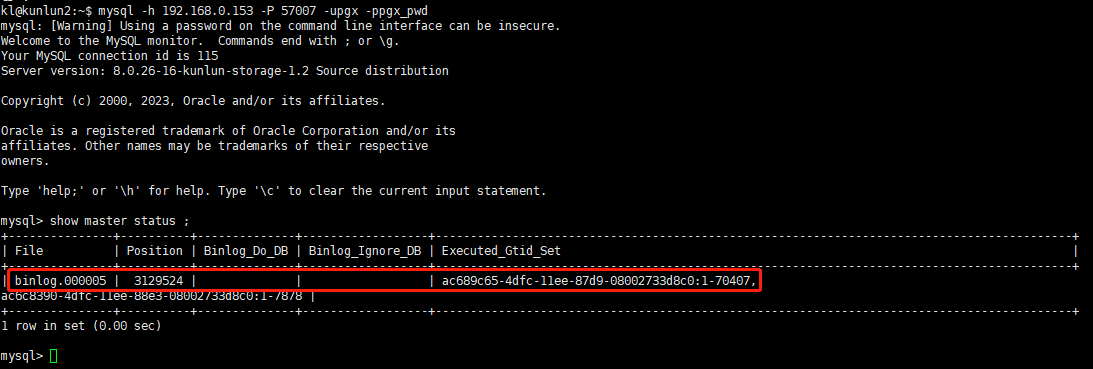
Fill in the information such as file, position, and executed_gtid_set from the above output into the previously mentioned shard configuration dialog as shown:
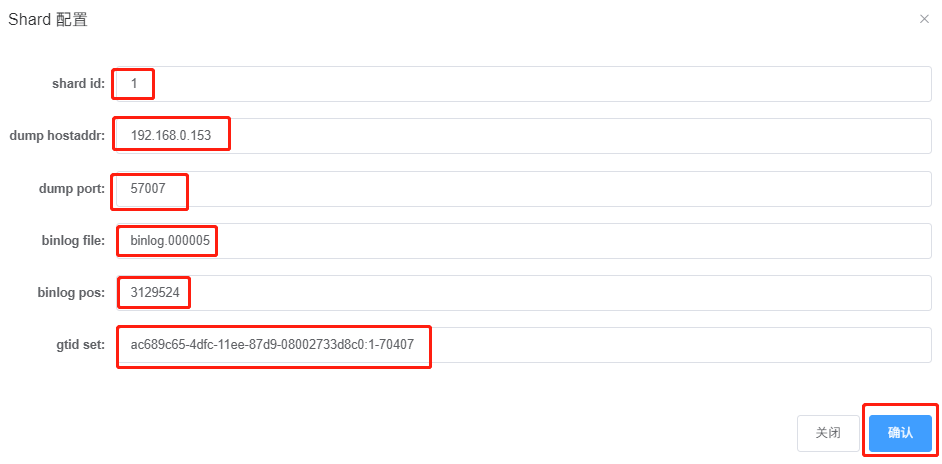
Click "Confirm" to complete the configuration for the first shard, displayed as follows:
Click "Add" to configure information for Shard 2:
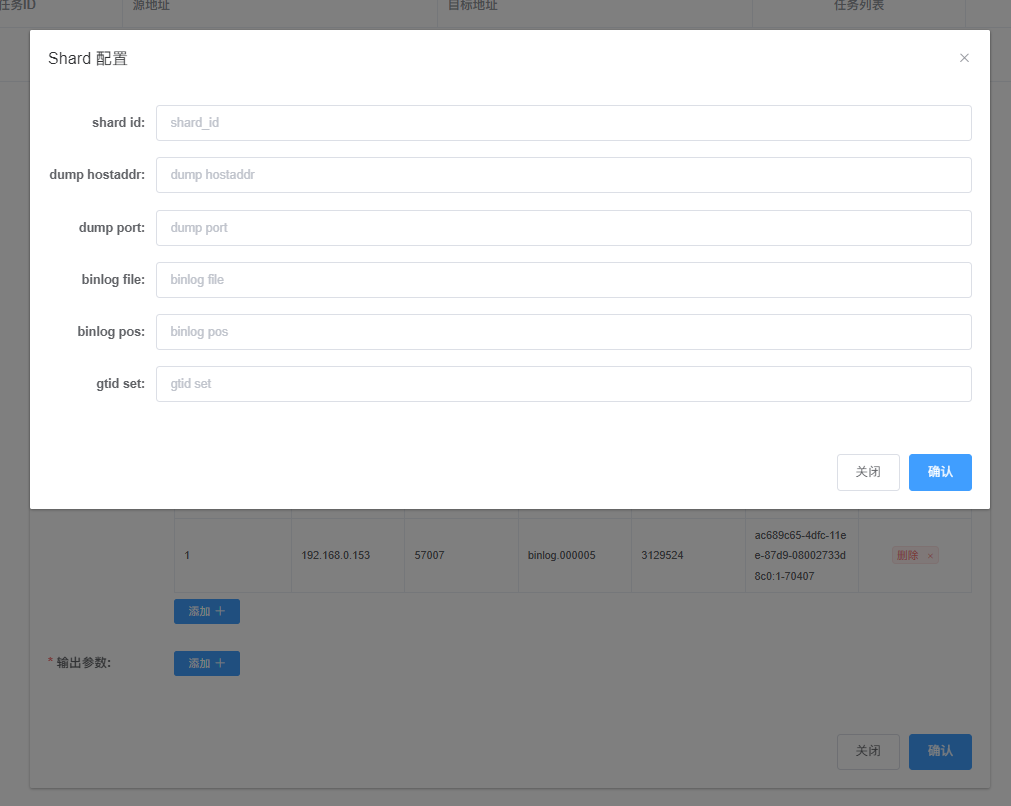
Shard 2:
kl@kunlun1:~$ mysql -h 192.168.0.152 -P 57005 -upgx -ppgx_pwd
mysql> show master status ;
The output will be as follows:
Enter the details like file, position, and executed_gtid_set from the output into the shard configuration dialog as shown:
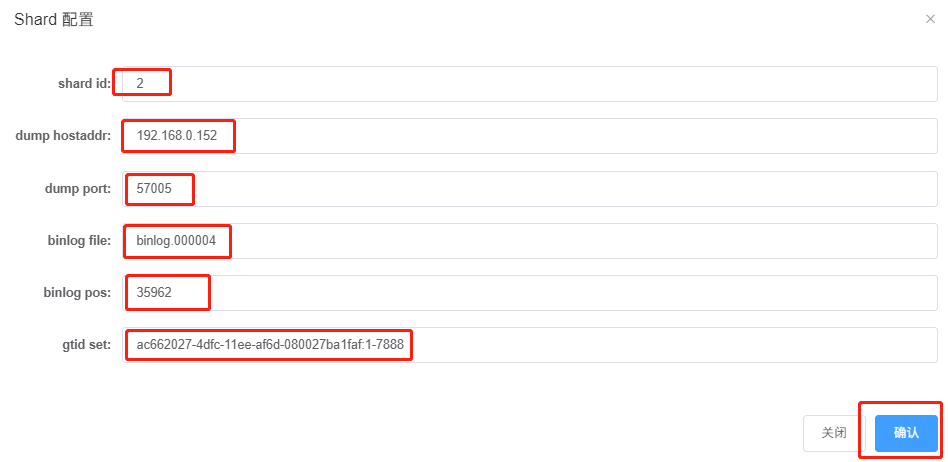
Click "Confirm" to save, displayed as follows:
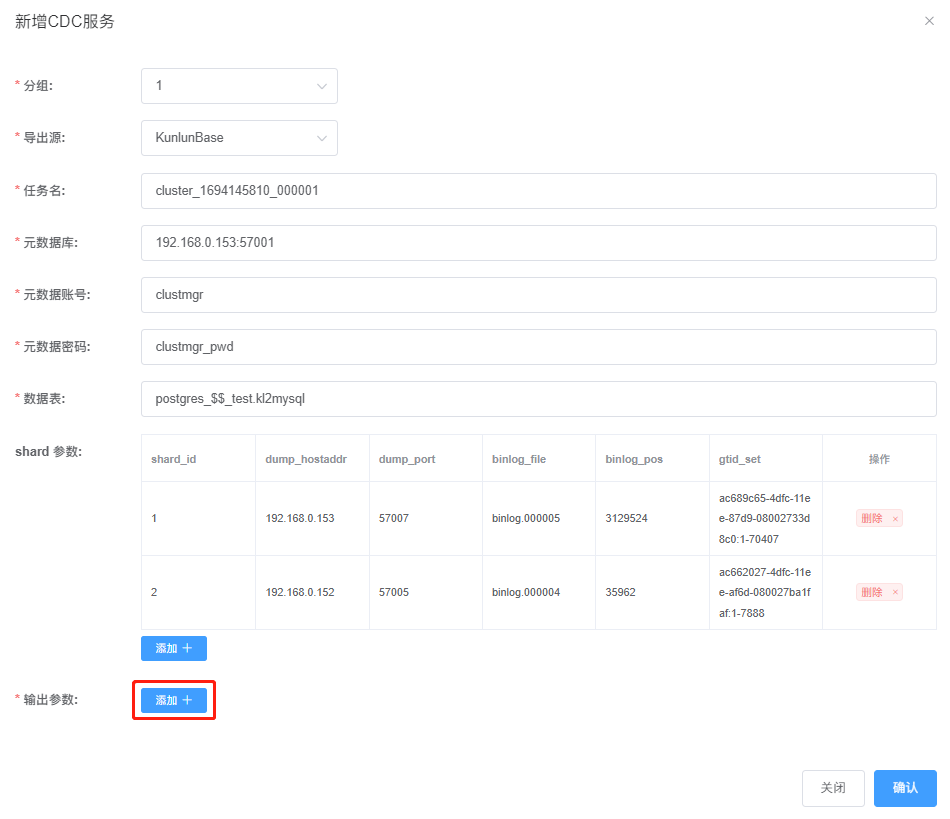
Click "Add" to complete the output parameter configuration:
Click "Confirm" to finalize the CDC parameter configuration, displayed as follows:
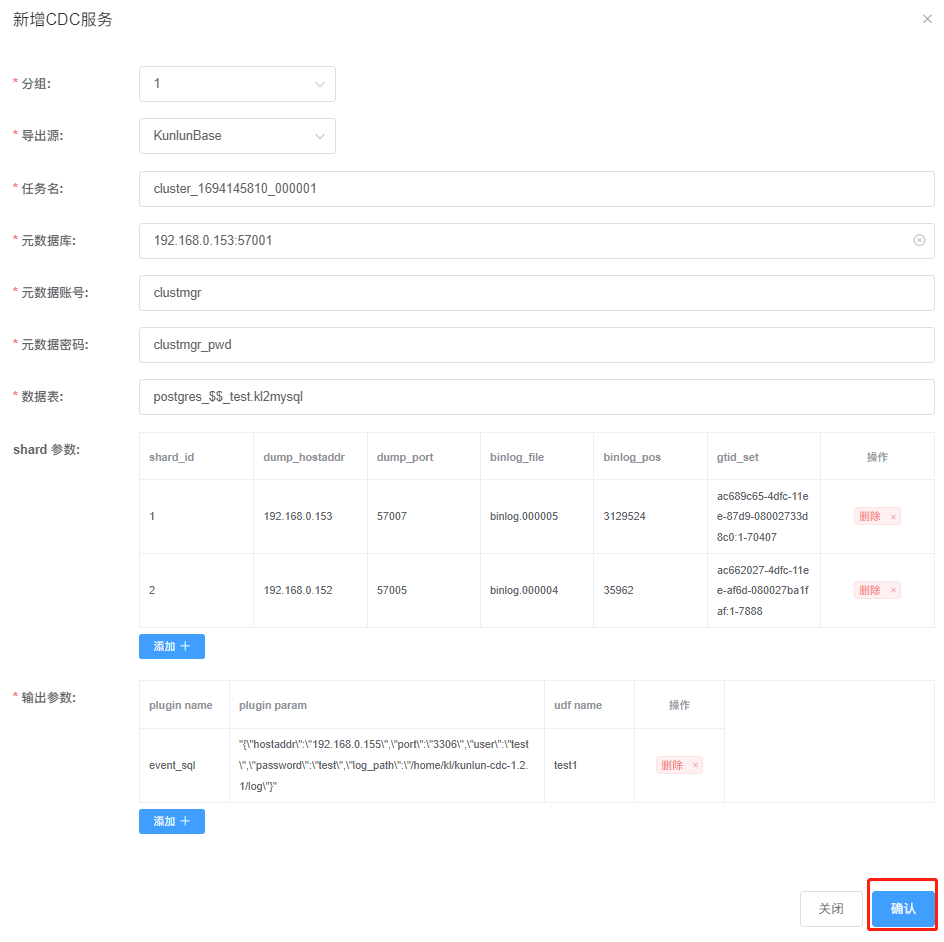
After verifying, click "Confirm" to complete the CDC task reporting, displayed as follows:
The creation of the synchronization task from Klustron to MySQL can also be accomplished via REST API. This can be done from any machine that can connect to 192.168.0.152 by executing the following command:
curl -d '
{
    "version":"1.0",
    "job_id":"",
    "job_type":"add_dump_table",
    "timestamp":"1435749309",
    "user_name":"test",
    "paras":{
        "meta_db":"192.168.0.153:57001",
        "meta_user":"clustmgr",
        "meta_passwd":"clustmgr_pwd",
        "cluster_name":"cluster_1694145810_000001",
        "dump_tables":"postgres_$$_test.kl2mysql",
        "shard_params":[
            {
                "shard_id":"1",
                "dump_hostaddr":"192.168.0.153",
                "dump_port":"57007",
                "binlog_file":"binlog.000005",
                "binlog_pos":"3129524",
                "gtid_set":"ac689c65-4dfc-11ee-87d9-08002733d8c0:1-70407"
            },{
                "shard_id":"2",
                "dump_hostaddr":"192.168.0.152",
                "dump_port":"57005",
                "binlog_file":"binlog.000004",
                "binlog_pos":"3127773",
                "gtid_set":"ac662027-4dfc-11ee-af6d-080027ba1faf:1-7888"
            }
        ],
        "output_plugins":[
     {
                "plugin_name":"event_file",
                "plugin_param":"/home/kl/kunlun-cdc-1.2.1/log/event.log",
                "udf_name":"test1"
            },
     {
                "plugin_name":"event_sql",
                "plugin_param":"{\"hostaddr\":\"192.168.0.155\",\"port\":\"3306\",\"user\":\"test\",\"password\":\"test\",\"log_path\":\"/home/kl/kunlun-cdc-1.2.1/log\", \"is_kunlun\": \"0\"}",
                "udf_name":"test1"
            }
     ]
    }
}' -X POST http://192.168.0.153:18012/kunlun_cdc
Note: This API call, compared to the previous XPanel configuration, includes the use of an event_file plugin, indicating that the CDC task can output to multiple targets and support multiple types of output simultaneously.
If the synchronization task is operating normally, we can proceed to test data synchronization. Connect to a Klustron cluster compute instance and insert a record into the kl2mysql table:
kl@kunlun3:~$ psql -h 192.168.0.155 -p 47001 -U test postgres
postgres=> insert into test.kl2mysql values (1,'aaa');
postgres=> select * from test.kl2mysql;insert into mysql2kl values(1,'aaa');
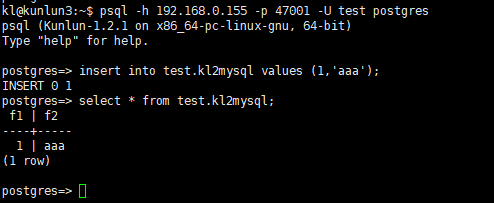
Next, connect to MySQL and check the synchronization status of the target table:
root@kunlun3:/home/kl# mysql -h 192.168.0.155 -P 3306 -u test -p
mysql> select * from postgres_$$_test.kl2mysql ;
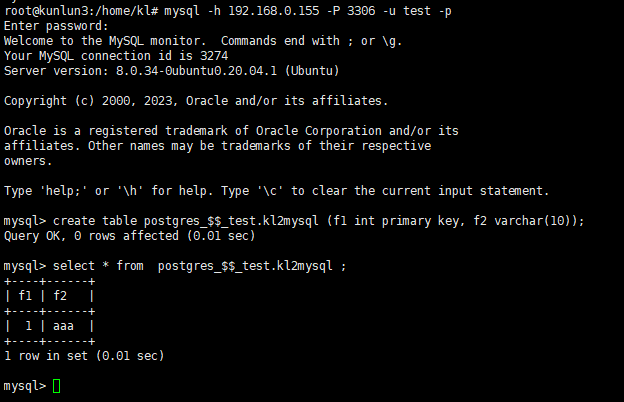
As seen, the target database's table contains the record previously inserted in Klustron, indicating that the synchronization task is functioning properly.
2.3 Additional CDC-related API Descriptions and Usage Examples
After creating some CDC tasks, if you want to obtain information on all tasks via a REST API, you can do so with the following command:
kl@kunlun3:~$ curl -d '
{
    "version":"1.0",
    "job_id":"",
    "job_type":"list_dump_jobs",
    "timestamp":"1435749309",
    "user_name":"test"
}
' -X POST http://192.168.0.152:18012/kunlun_cdc

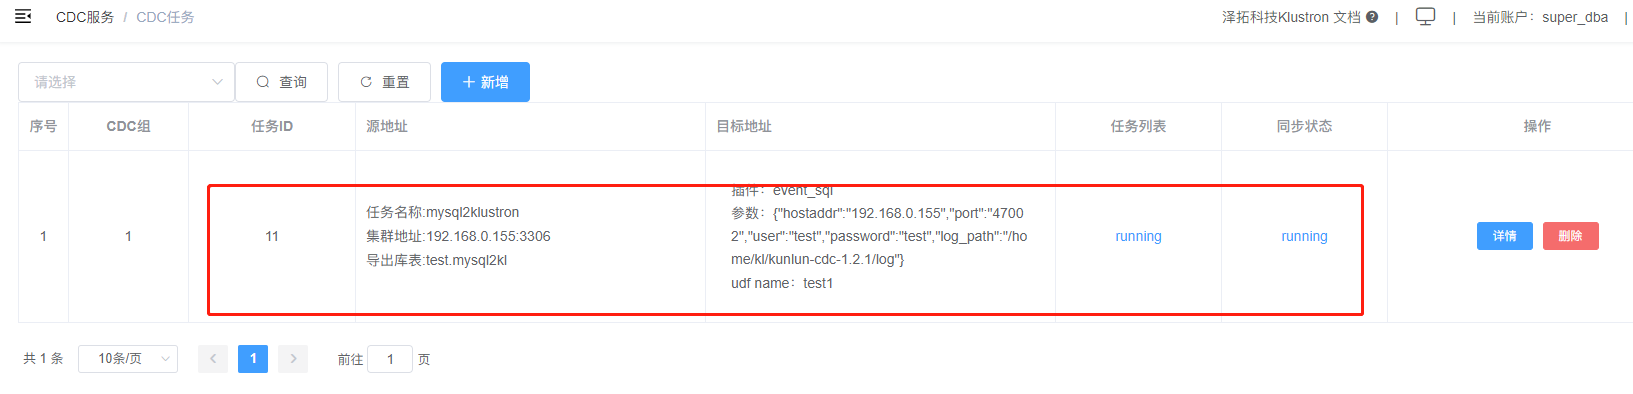
To check the status of a specific CDC task through REST API, use the following command:
kl@kunlun3:~$ curl -d '
{
    "version":"1.0",
    "job_id":"11",           --- job_id can be obtained from the list_dump_jobs call or viewed on XPanel
    "job_type":"get_job_state",
    "timestamp":"1435749309",
    "user_name":"repl",
    "paras":{
        "meta_db":"192.168.0.155:3306",
        "cluster_name":"mysql2klustron",
        "dump_tables":"test.mysql2kl "
    }
}
' -X POST http://192.168.0.152:18012/kunlun_cdc

03 About Plugins
3.1 About Default Plugins
The event_file plugin directly converts CDC captured data into JSON and writes it into a file. Developers can refer to the output of the event_file plugin when developing custom plugins.
The input parameter for the event_file plugin is the JSON content specifically written to the file. When adding a dump task, the parameters are entered in the output_plugins field, as follows:
"plugin_name":"event_file", -- Plugin name
"plugin_param":"/xx/event.log", -- Indicates that the JSON content is written to this event.log file
"udf_name":"test1" -- Extension field
The event_sql plugin supports converting CDC captured data into SQL and writing it to the target database, which can be either a Klustron cluster or open-source MySQL. By default, it writes to the Klustron cluster; if targeting open-source MySQL, add is_kunlun=0 in the plugin_param. The input parameters for the event_sql plugin when adding a dump task are also entered in the output_plugins field, as follows:
"plugin_name":"event_sql", --- Plugin name
"plugin_param":"{"hostaddr":"172.0.0.2","port":"24002","user":"abc","password":"abc","log_path":"../log"}",--- Input parameters for the event_sql plugin
"udf_name":"test2" --- Extension field
Special Note: If using event_sql to write source data to a Klustron node, configure the MySQL port of the Klustron compute node in plugin_param, not the PostgreSQL port.
3.2 Custom Plugin Development and Mounting Methods
Download the Klustron CDC software from the Klustron official website. Within the software package, locate the header file
dispatch_event.hin the include subdirectory, which is required for plugin development.Inherit the
CDispatchEventclass and implement three virtual function interfaces: init, execute, and close. Detailed instructions for using each function are provided indispatch_event.h.Compile the code into a .so file on a Linux operating system and place it in the plugin directory of the kunlun_cdc installation package.
Add the newly developed plugin name under the
plugin_sotag in thekunlun_cdc.cnffile located in the conf directory of the kunlun_cdc installation package.
For example, if the developed plugin .so is named event_test.so, add the following content under the plugin_so tag in the kunlun_cdc.cnf file:
plugin_so = event_file,event_sql,event_test
Special Note: Separate plugin names with commas.
- After modifying the configuration file, it is necessary to restart all CDC processes in the Klustron CDC cluster for the changes to take effect.
Since plugins are developed by users and typically require input parameters, enter the required parameters for the plugin when adding a dump task under the output_plugins tag.