
Klustron Initiates Data Backup Encryption
Klustron Initiates Data Backup Encryption
Note:
Unless specifically stated otherwise, the version numbers mentioned in the text can be substituted with any released version number. For a list of all released versions, please visit: http://doc.klustron.com/zh/Release_notes.html
Objective of this Article:
This document is written with the assumption that the user is already familiar with how to create a cluster in the Klustron database and understands how to prepare a backup storage target (the type of backup target configured in this context is HDFS). In the following content, we will create a cluster database with backup encryption enabled, add a backup storage target, perform a full physical backup of an existing cluster, verify that the backup information is encrypted, then restore the complete backup set to another cluster, detailing the process and steps involved. The main testing processes in this article are completed through the XPanel console.
All tests are conducted via the XPanel console and PostgreSQL client to connect to the database cluster. The XPanel service is installed on a server with the IP address 192.168.56.112. To access it, open a browser on a device that can reach 192.168.56.112 and navigate to: http://192.168.56.112:18080/KunlunXPanel/#/login?redirect=%2Fdashboard
The default login username and password are: super_dba/super_dba. You are required to change the super_dba password upon your first login.
Once logged in, the homepage is displayed as follows:
01 Creating a Cluster
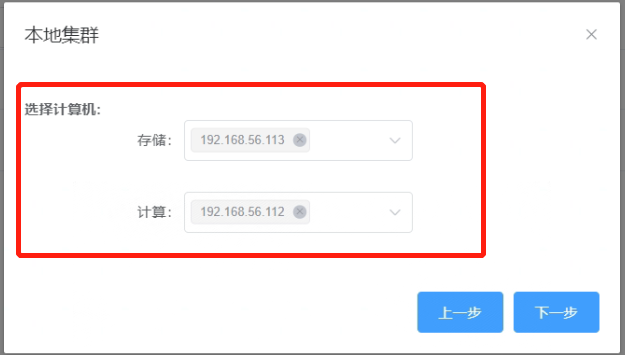
Create a cluster named “cluster1”. The IP address for the compute node of this cluster is: 192.168.56.112, with a service port of: 47001. The cluster will have one storage shard, with the primary node IP: 192.168.56.113, and a service port of: 57003.
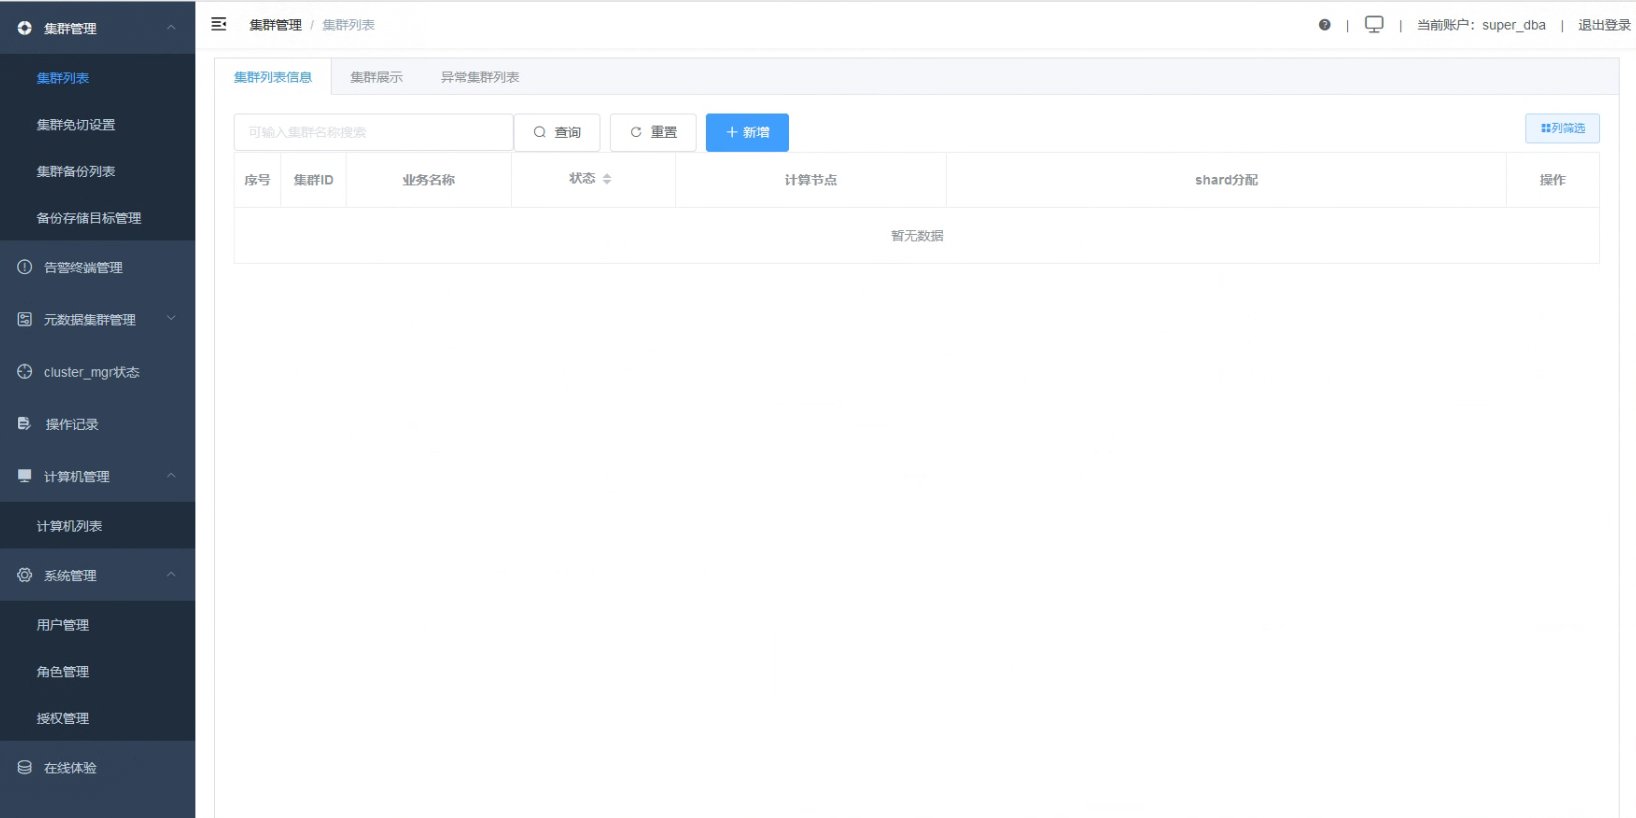
1.1 Click on “Cluster Management”, then “Cluster List”. In the cluster list interface, click the “Create” button.

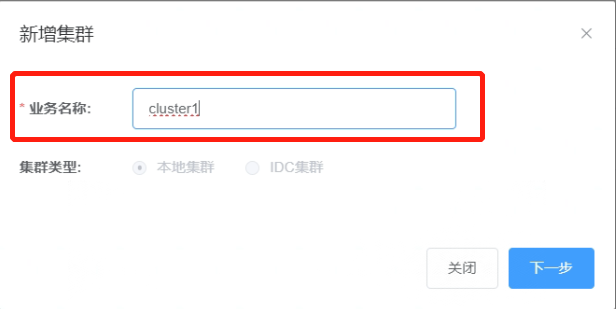
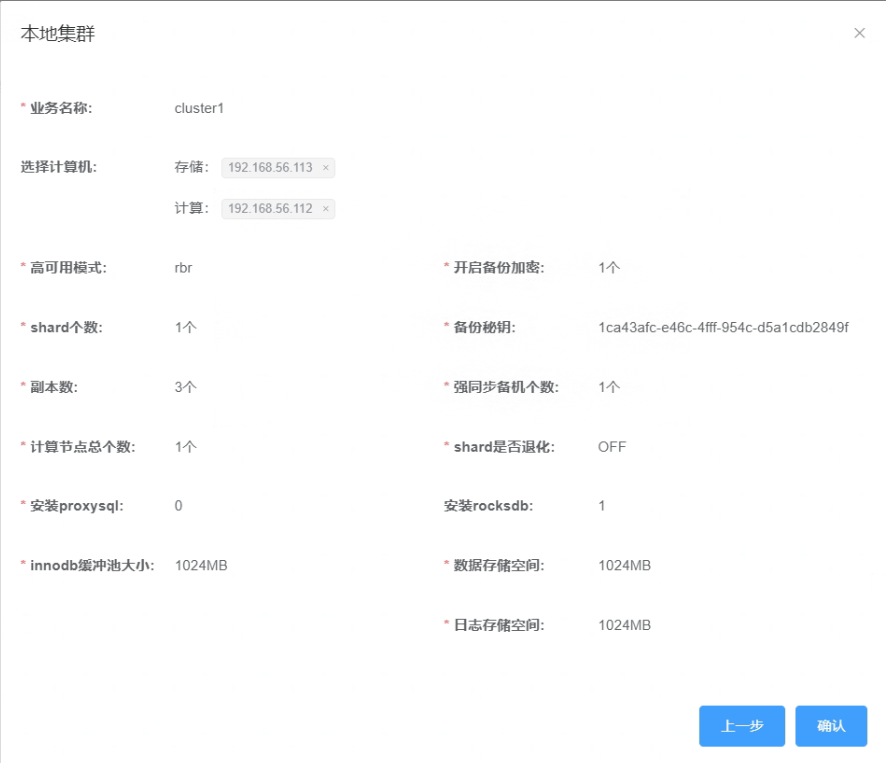
1.2 Add a new cluster, specifying the business name.
1.3 Select the storage nodes and compute nodes.
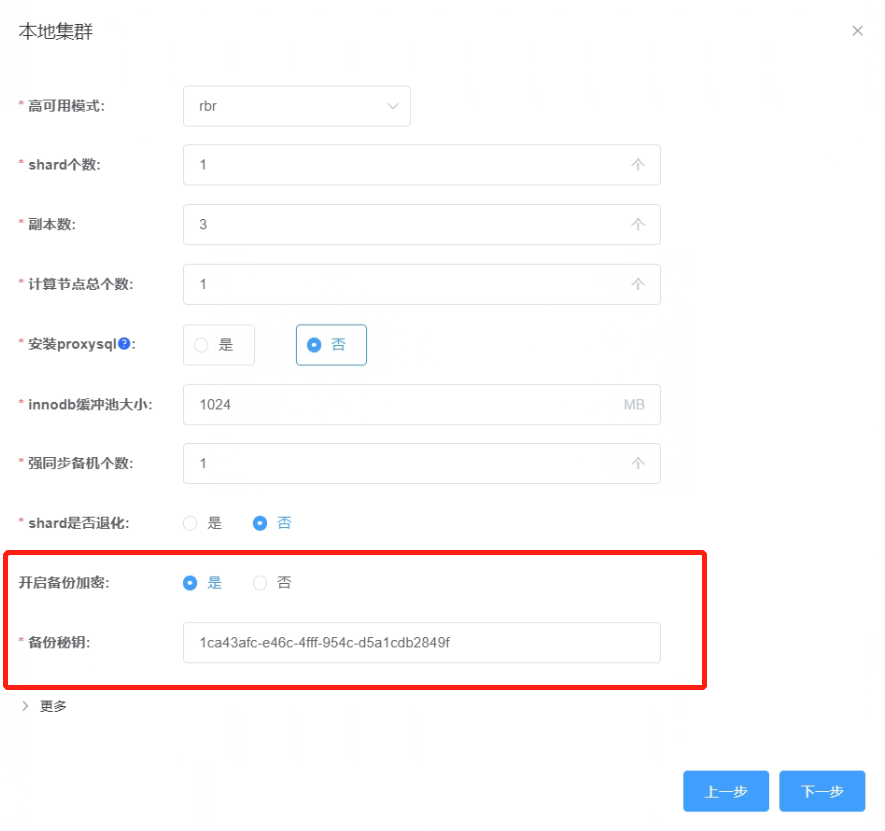
1.4 Enable backup encryption for the newly created cluster.
1.5 Overview information for the new cluster.
1.6 Click “Confirm” to check the completion status of the cluster creation task.
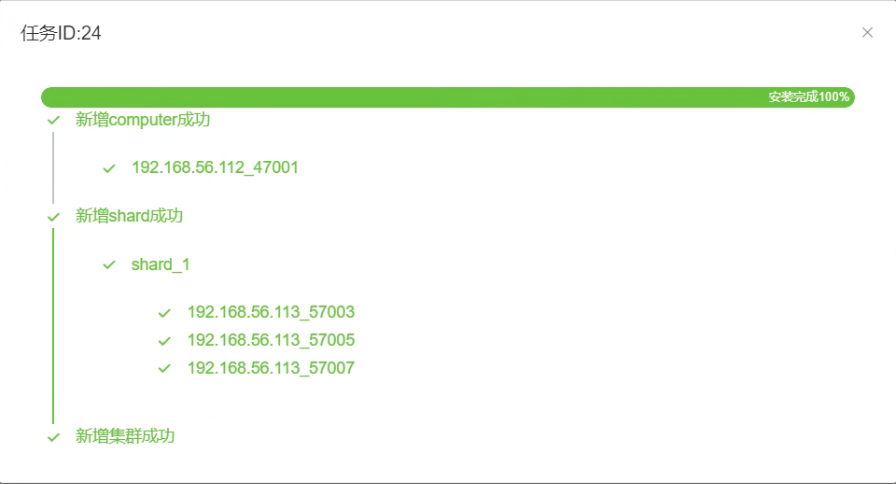
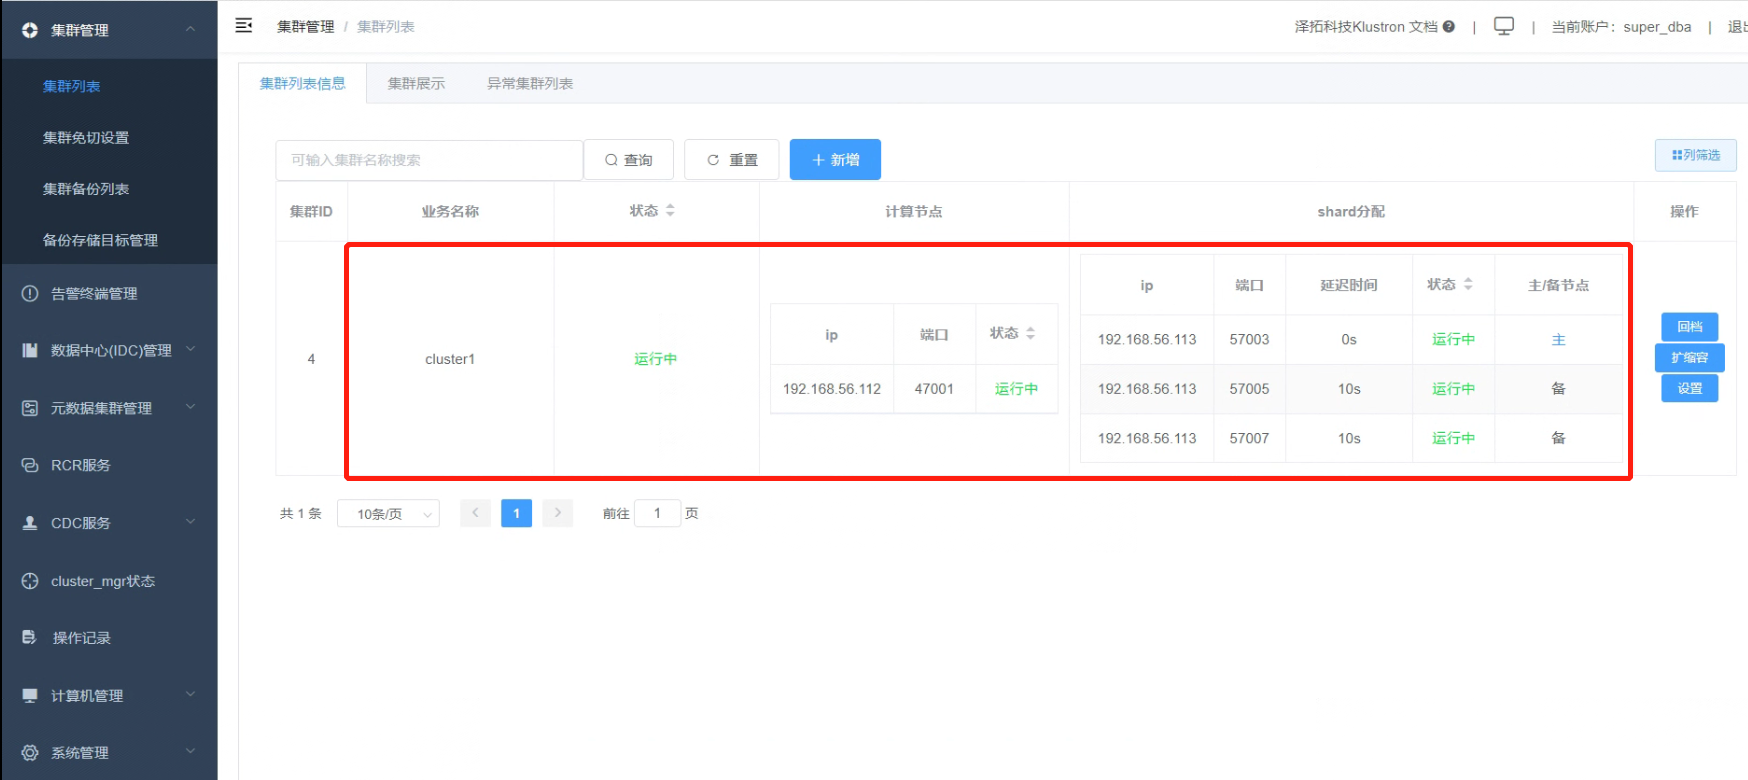
1.7 Once all statuses show “Running”, the cluster creation is complete.
02 Adding a Backup Storage Target
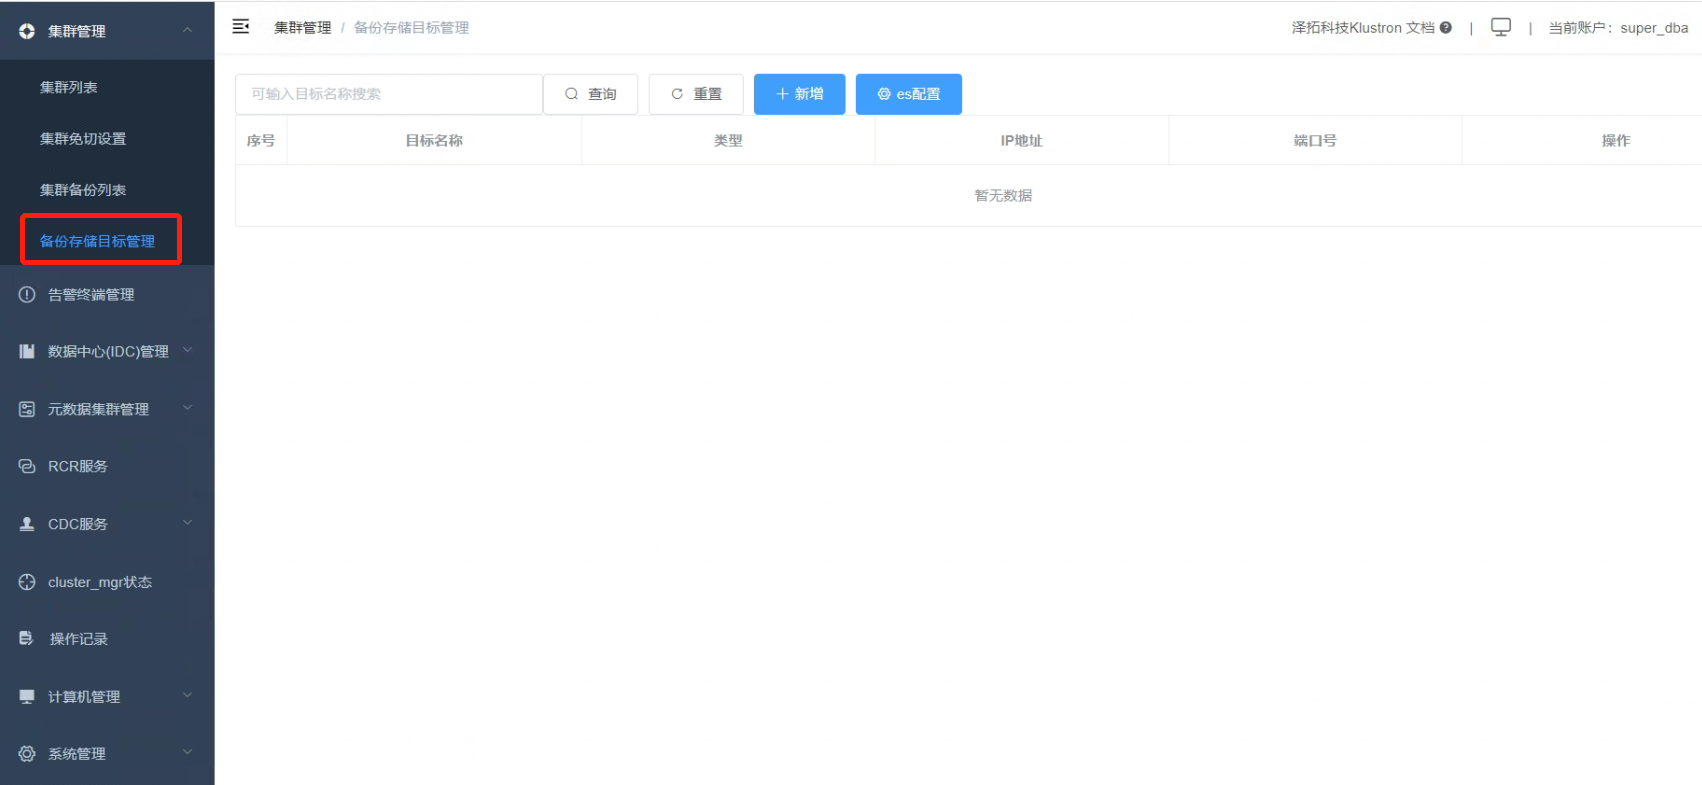
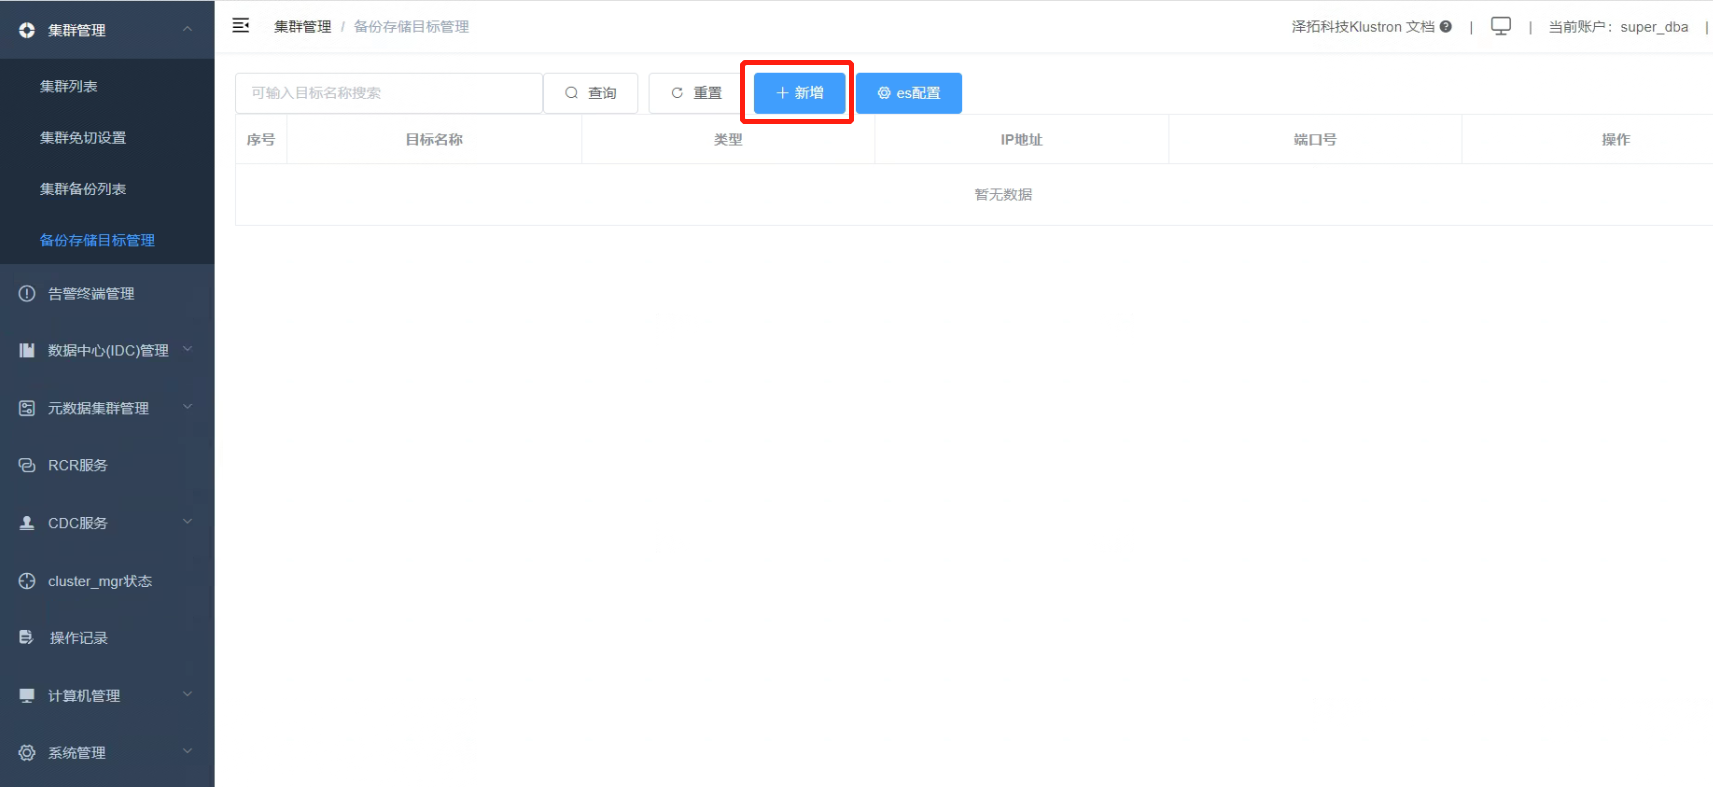
2.1 Click on “Backup Storage Target Management”.
2.2 Click “Add”.
2.3 Enter the relevant parameters (in this case, the HDFS service IP address is: 192.168.56.115, port: 9000).
Click “Confirm”.
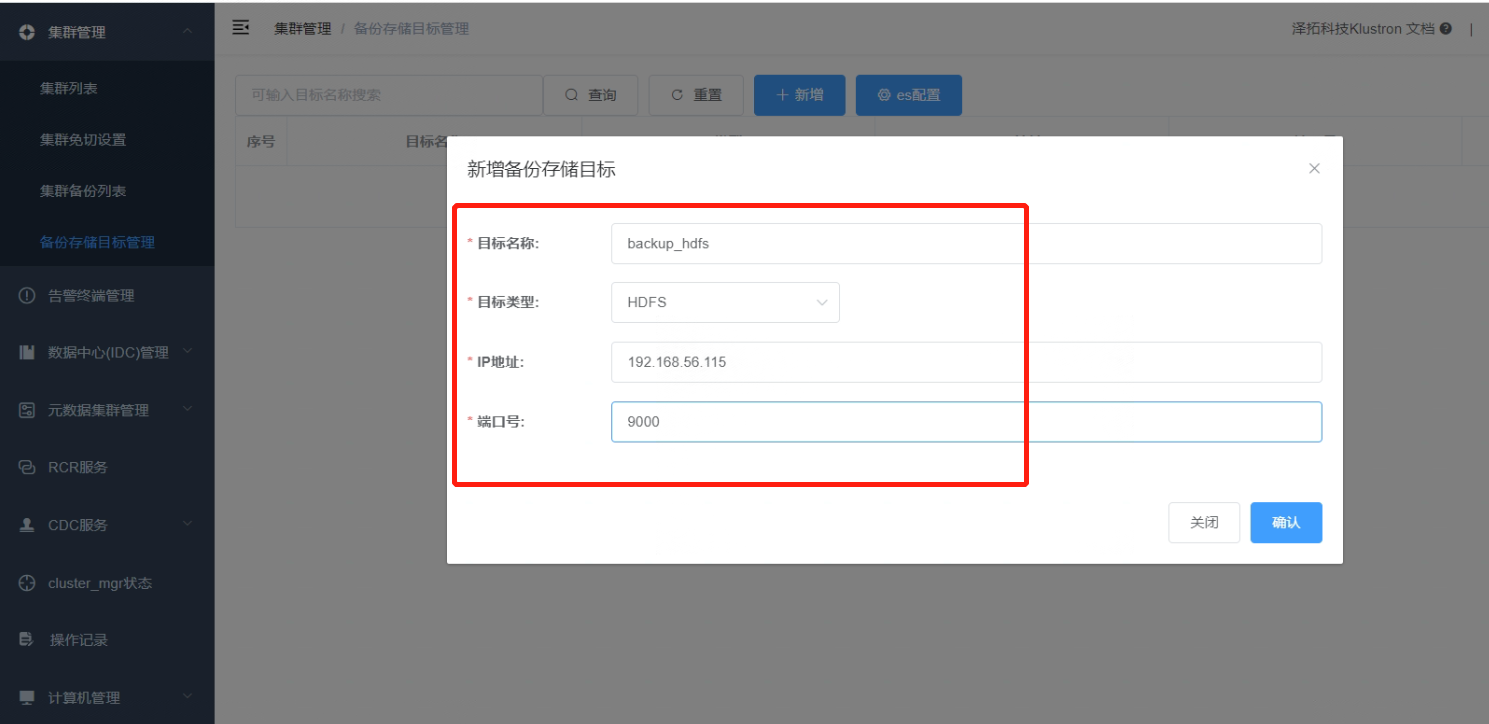
2.4 Adding the backup storage target is complete.

03 Preparing Test Data
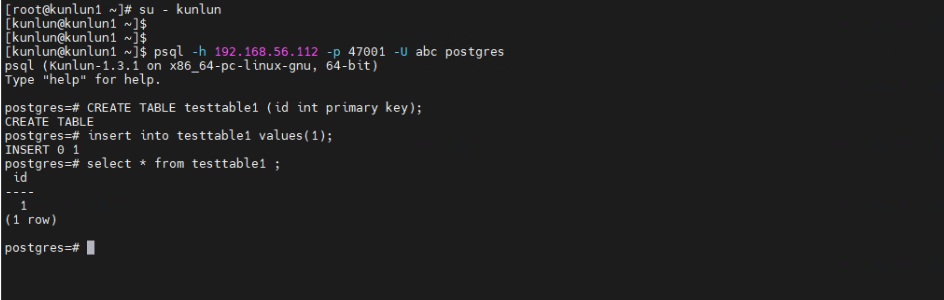
3.1 Open an SSH terminal window connected to 192.168.56.112. Log in as the kunlun user to the host, then connect to the cluster using the PostgreSQL client. Create a test table and insert test data.
Relevant commands:
[kunlun@kunlun1 ~]$ id
[kunlun@kunlun1 ~]$ source /kunlun/env.sh
[kunlun@kunlun1 ~]$ psql -h 192.168.56.112 -p 47001 -U abc postgres
postgres=# CREATE TABLE testtable1 (id int primary key);
postgres=# insert into testtable1 values(1);
postgres=# select * from testtable1 ;
Output information is displayed as follows:
04 Full Database Backup for Cluster "cluster1"
4.1 In the browser window, navigate to the “Cluster List” where you will find a “Settings” button next to “cluster1”.
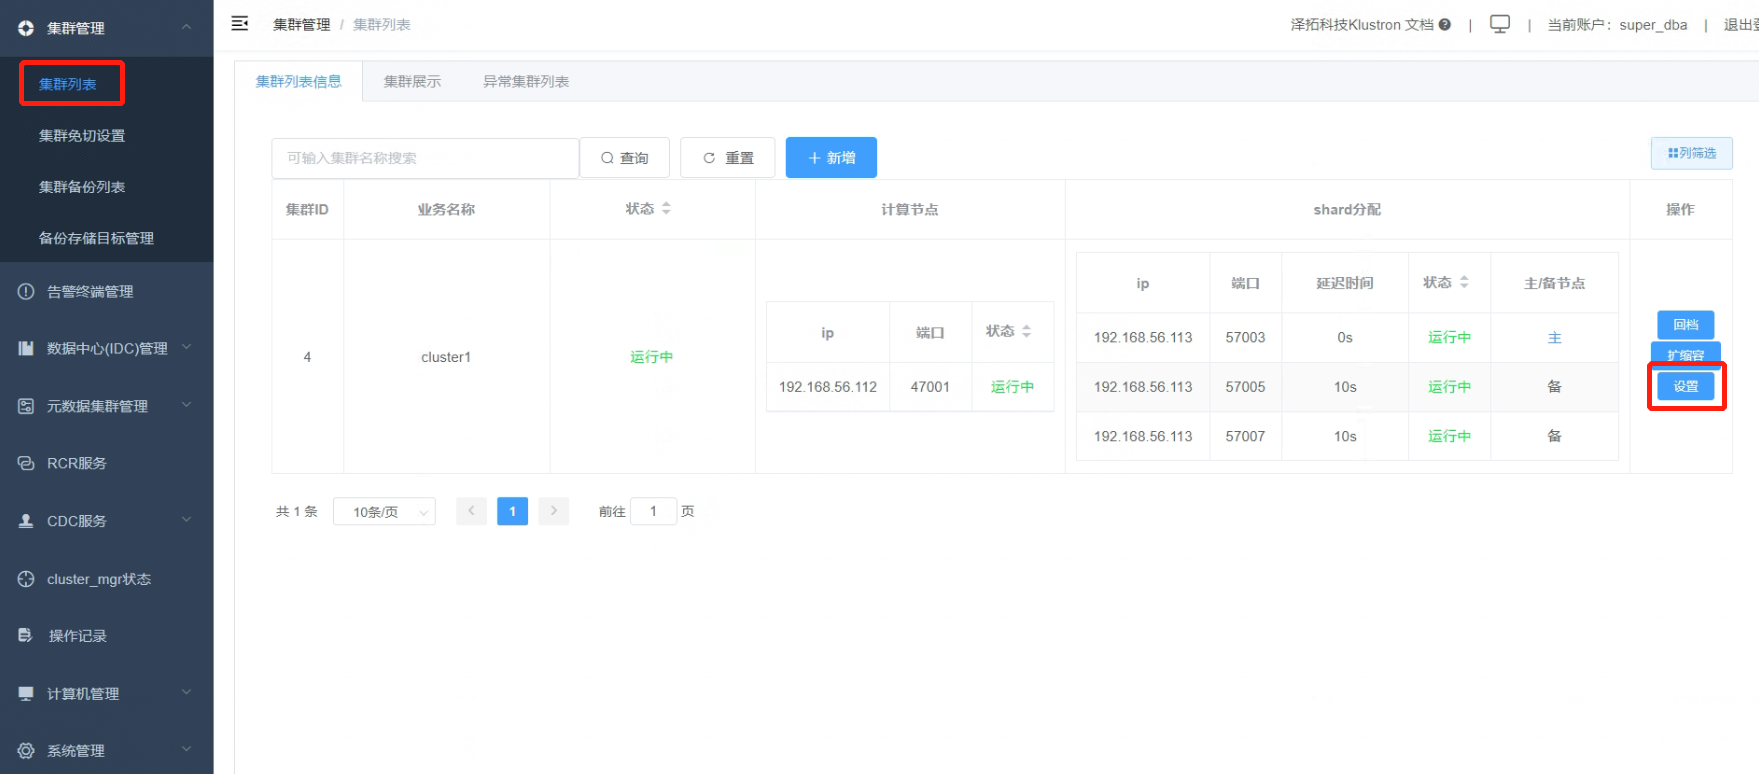
4.2 Click the “Settings” button.
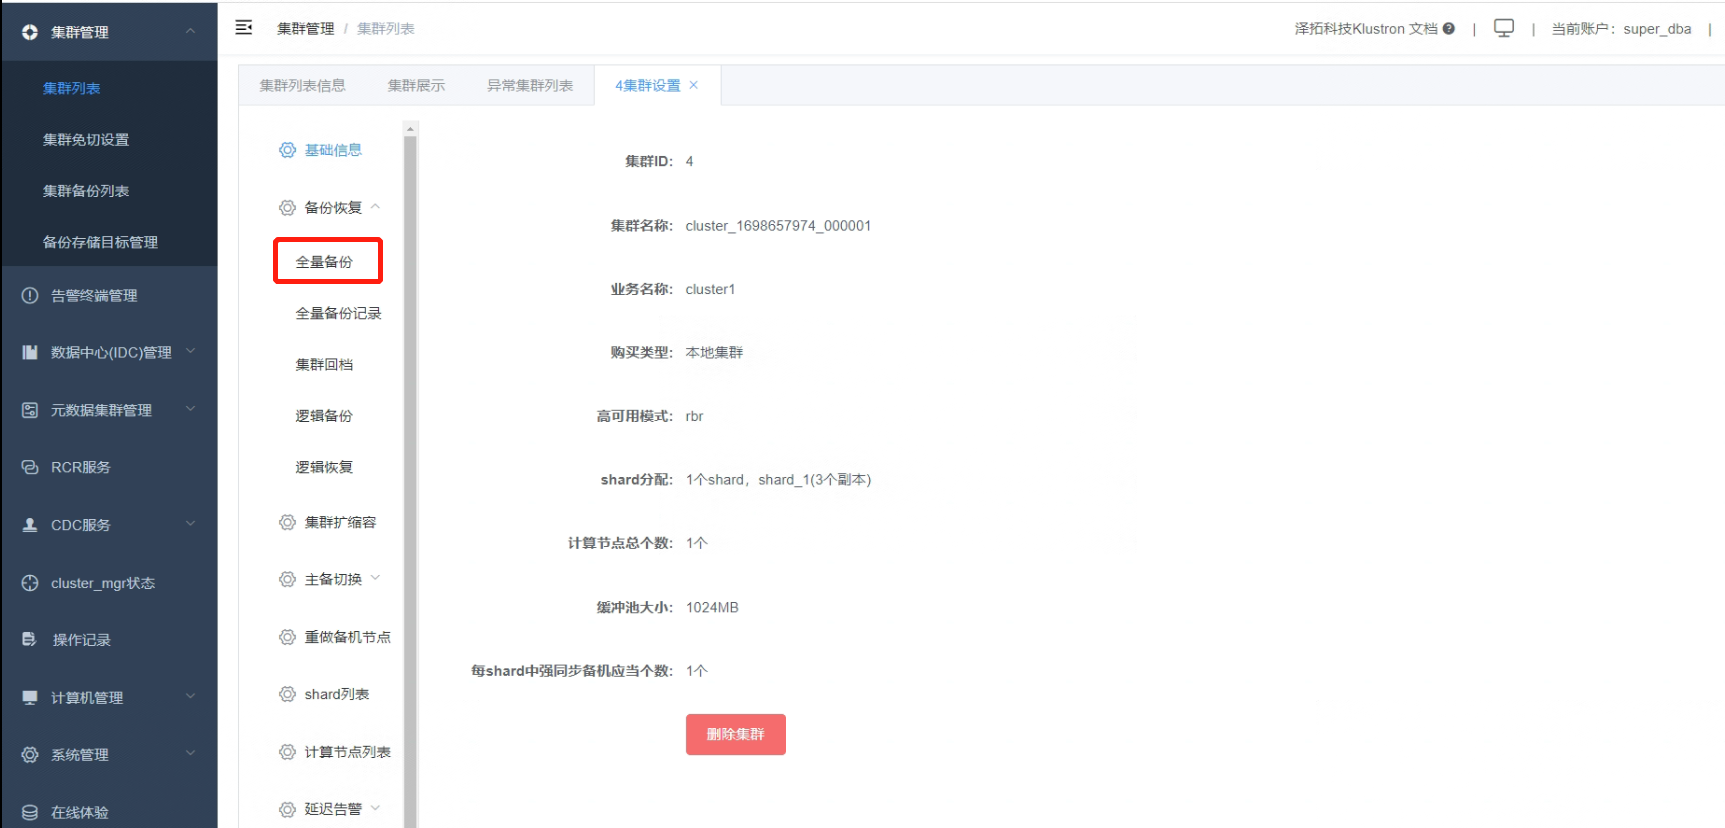
4.3 Click on “Full Backup”.
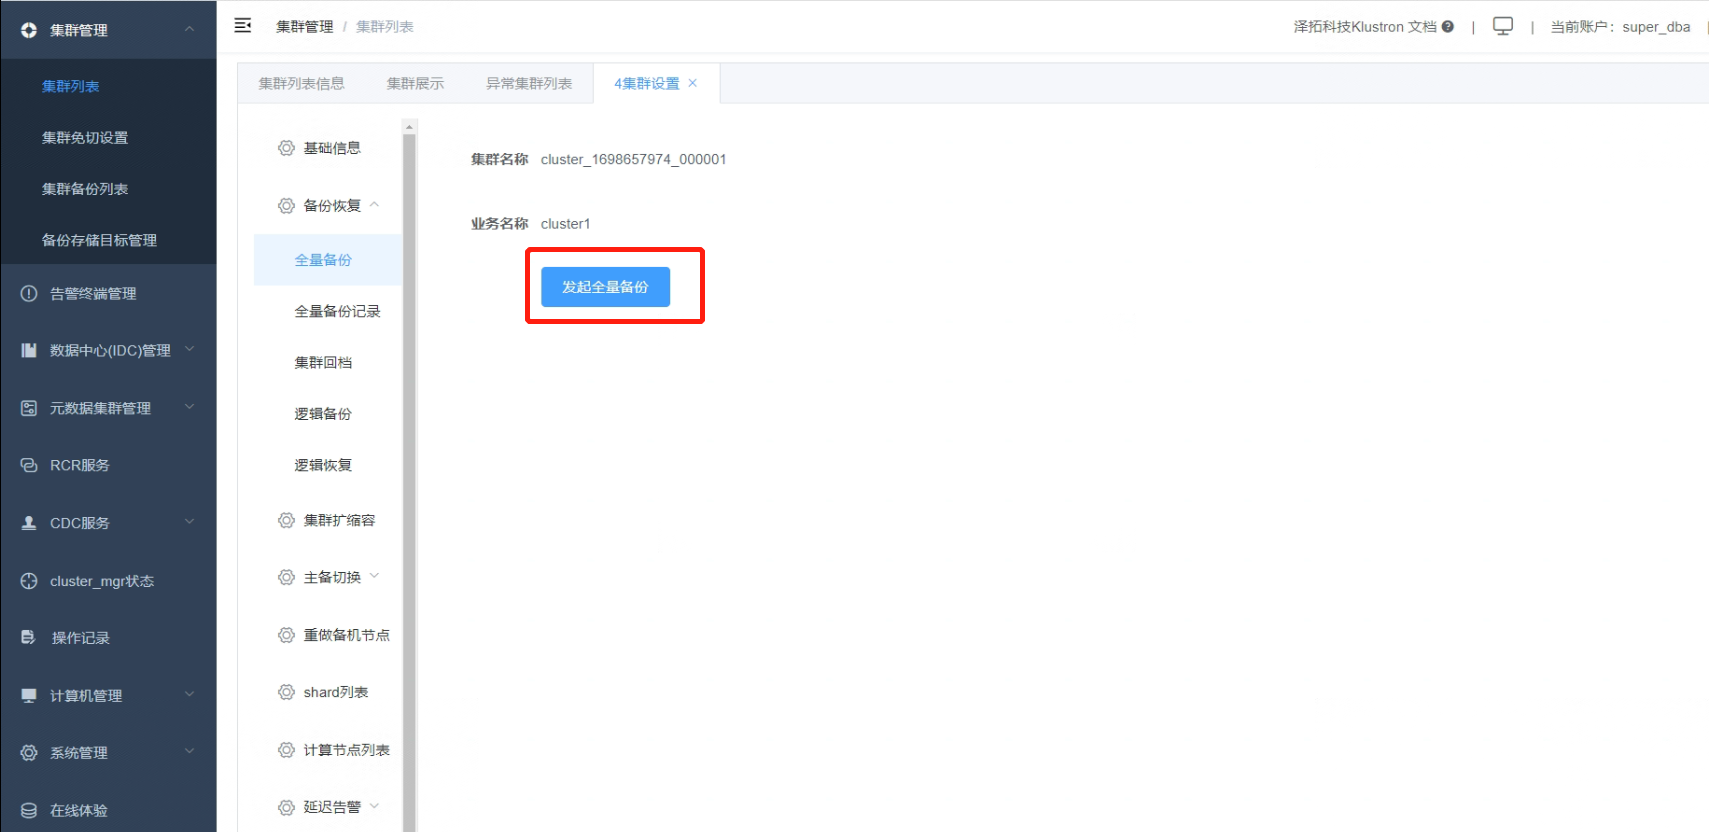
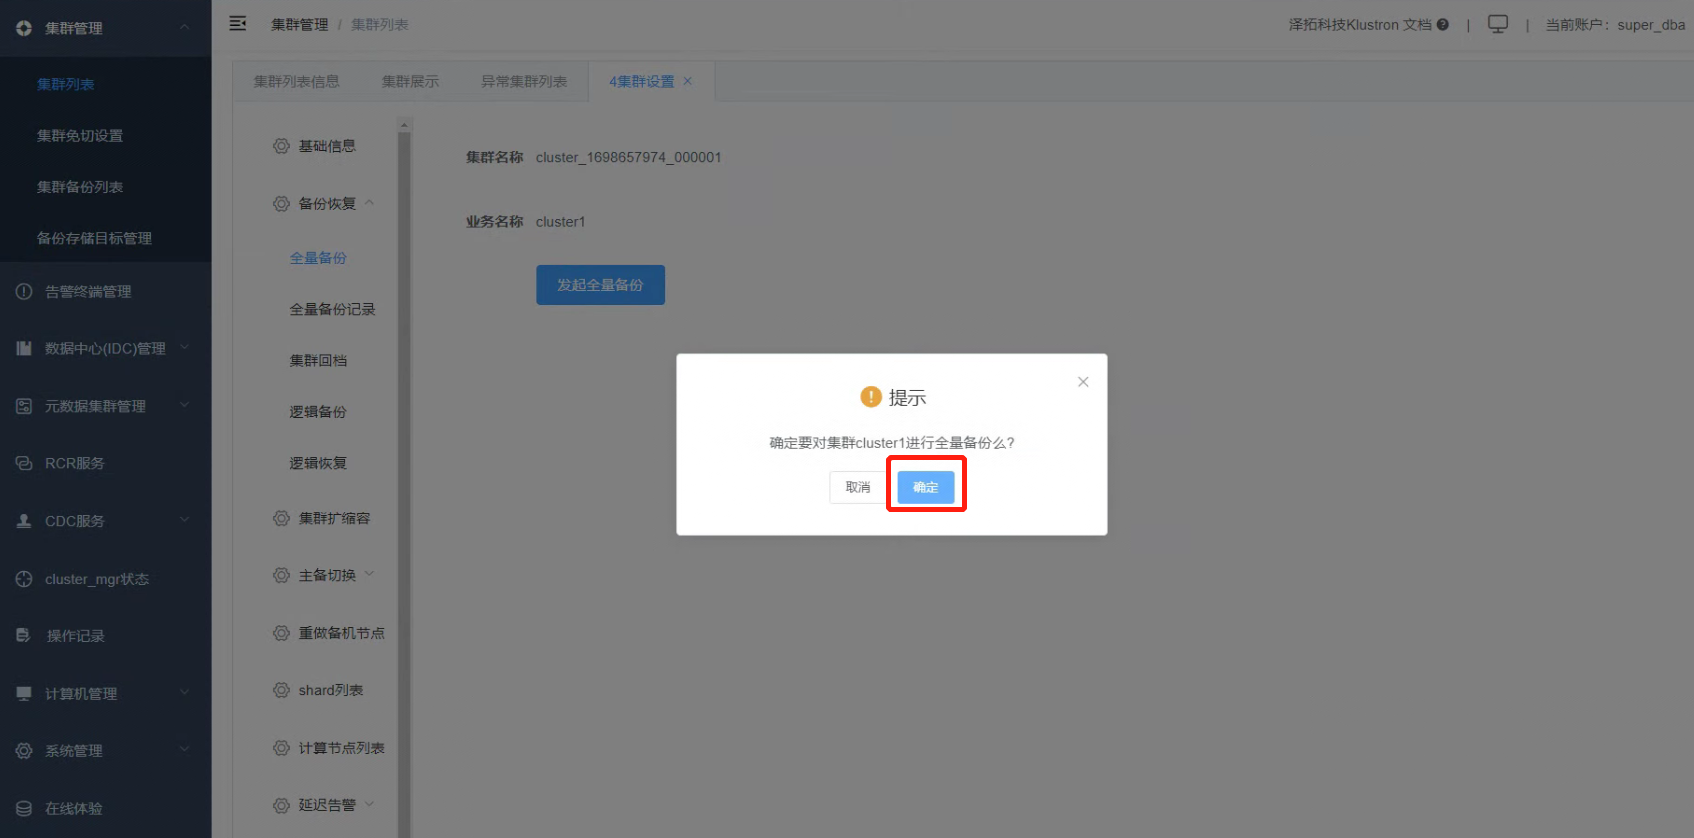
4.4 Click on “Initiate Full Backup”.
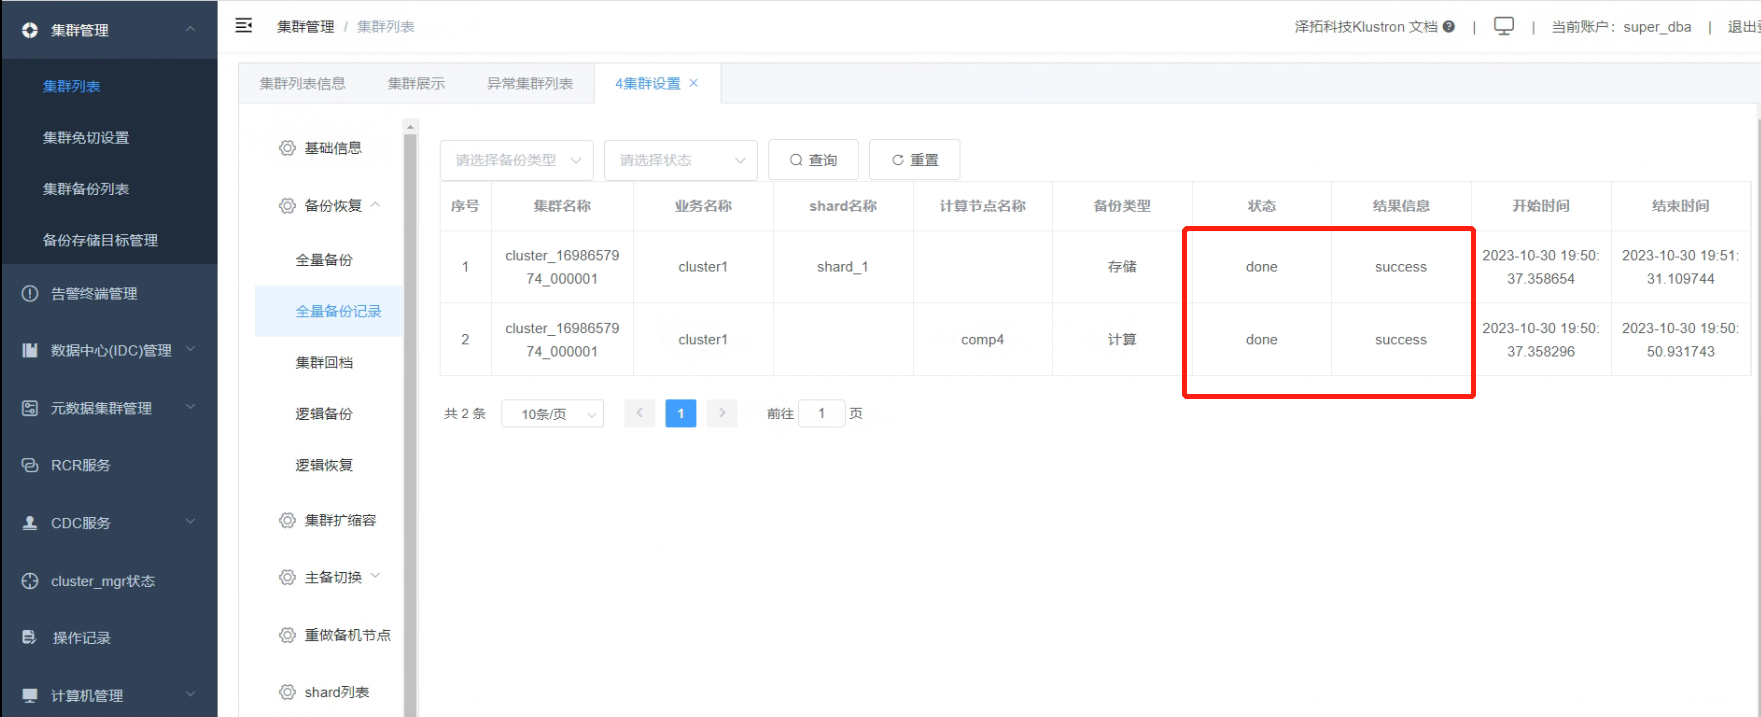
4.5 Click on “Full Backup Record” to view the ongoing backup status.
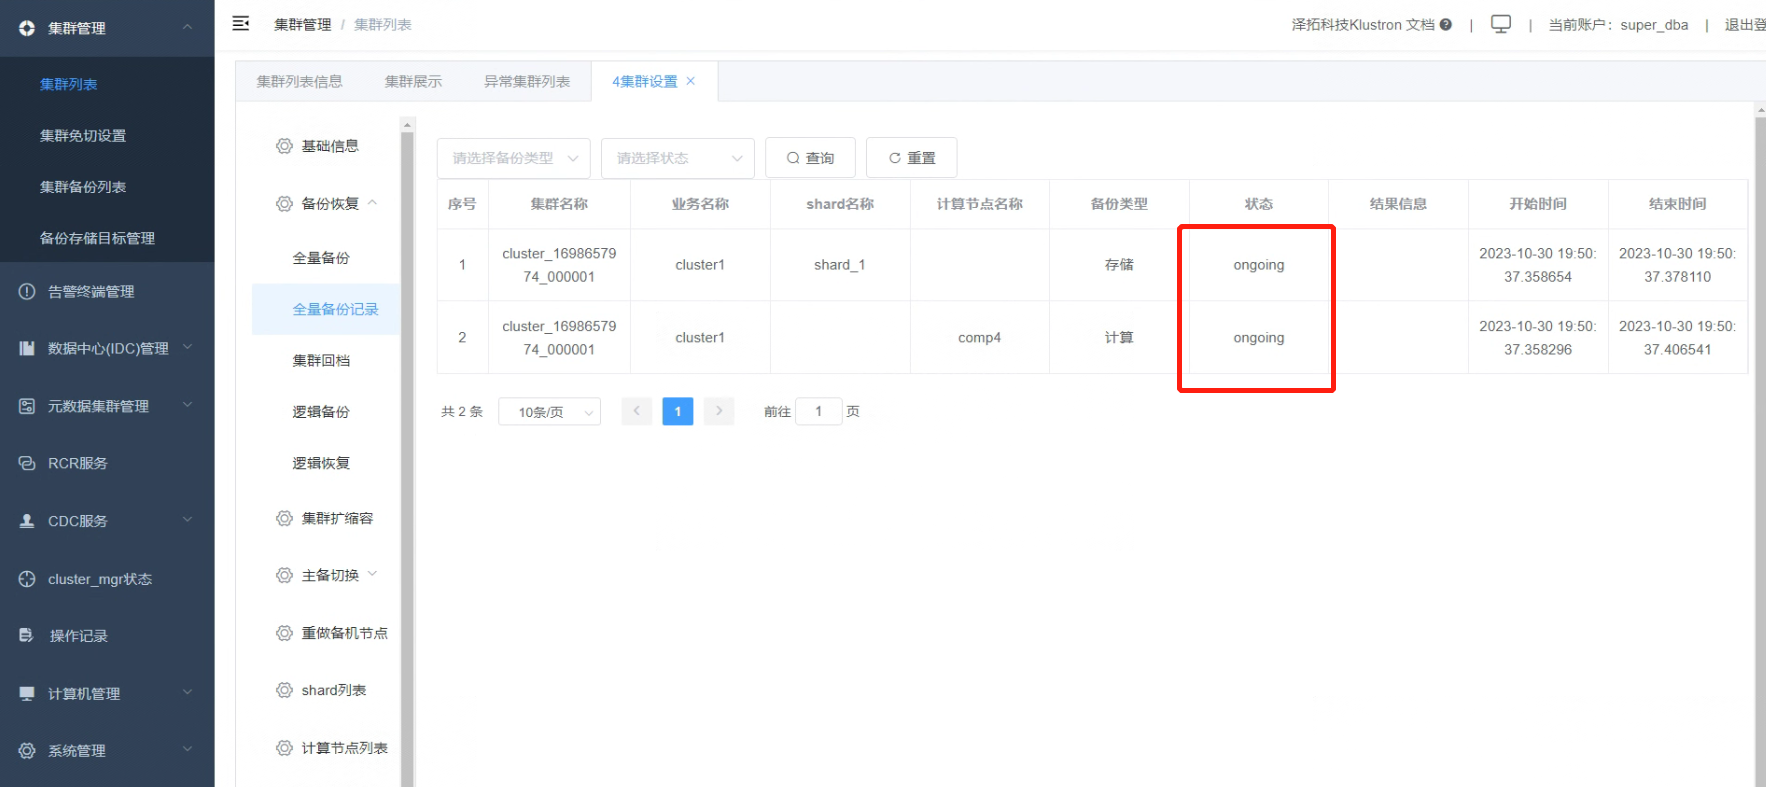
Below is the final status information, which varies in duration depending on the database size and the entire cluster scale.
05 Verifying that Backup Information is Encrypted
5.1 On the HDFS server, check the backup files, which should be named with an 'encrypt' suffix.
[root@hdfs ~]# su - kunlun
[kunlun@hdfs ~]$ hdfs dfs -ls /kunlun/backup/xtrabackup/cluster_1698657974_000001/shard_1

5.2 Copy the backup file from HDFS to the Linux operating system.
[kunlun@hdfs ~]$ hadoop fs -get hdfs://192.168.56.115:9000/kunlun/backup/xtrabackup/cluster_1698657974_000001/shard_1/_xtrabackup_coldfile_I192#168#56#113_P57005_D2023#10#30_T19#51#19_.tgz.encrypt /home/kunlun
[kunlun@hdfs ~]$ pwd
/home/kunlun
[kunlun@hdfs ~]$ ls

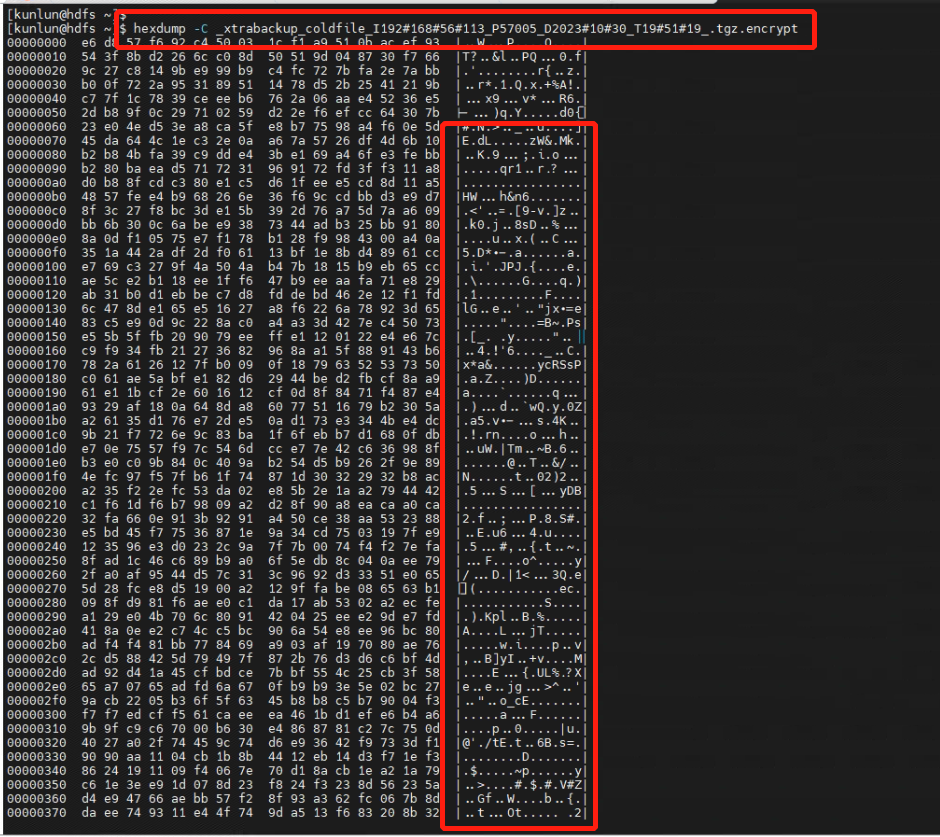
5.3 Directly inspect the encrypted database backup file from the operating system level. The data in the backup file is encrypted, making it impossible to retrieve the file's data information.
[kunlun@hdfs~]$hexdump -C _xtrabackup_coldfile_I192#168#56#113_P57005_D2023#10#30_T19#51#19_.tgz.encrypt
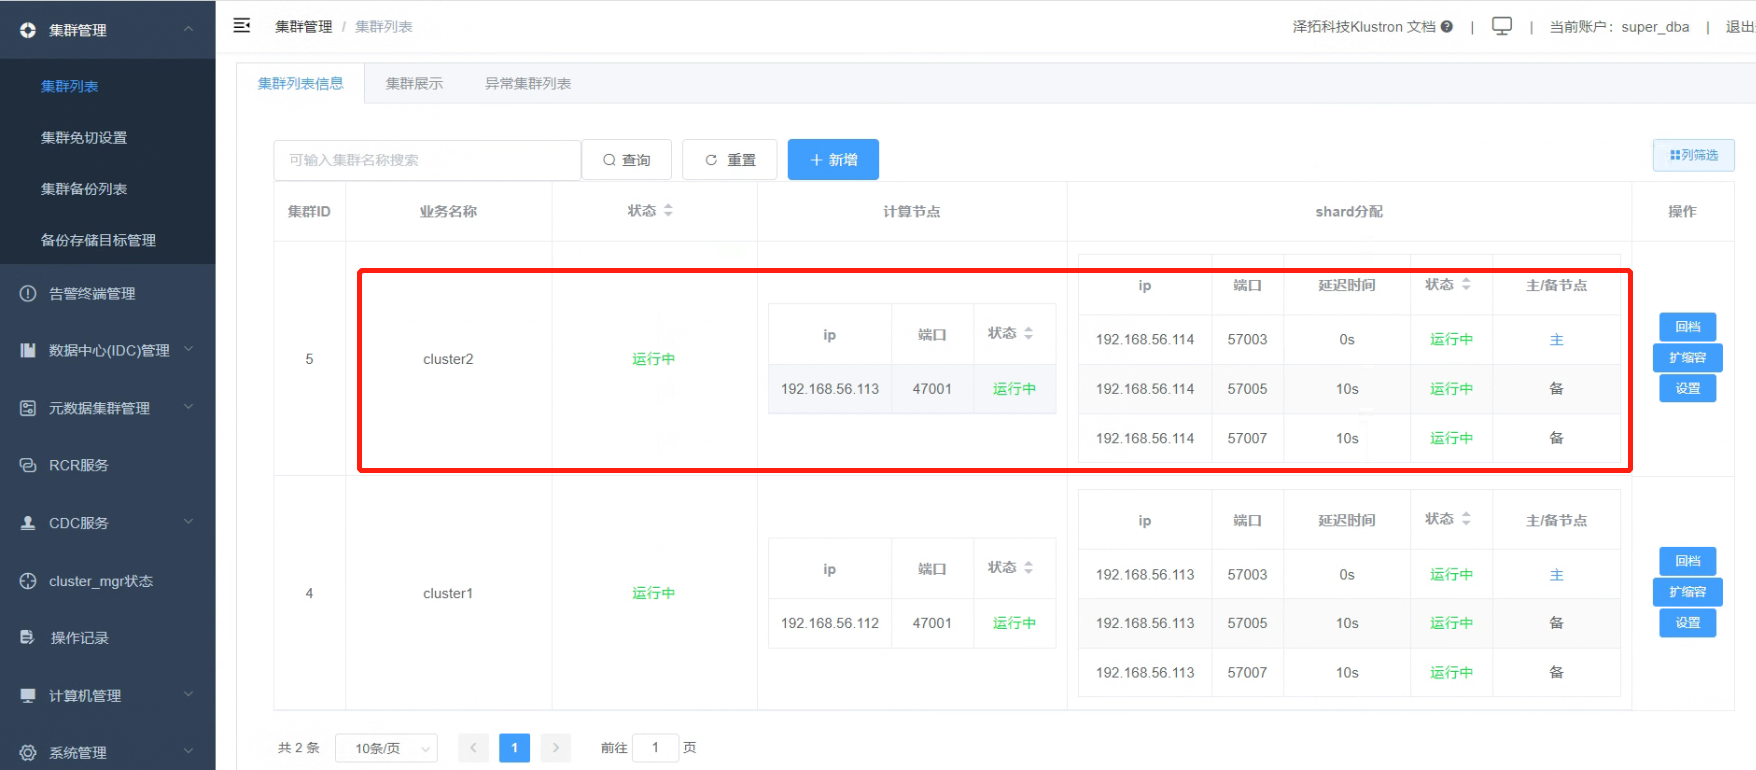
06 Creating Another Cluster, "cluster2", with the Same Configuration as "cluster1"
6.1 The compute node IP for this cluster is 192.168.56.113, with a service port of 47001. It has one storage shard, with the primary node IP being 192.168.56.114 and a service port of 57003.
07 Performing a Cluster Recovery (Rollback) Operation
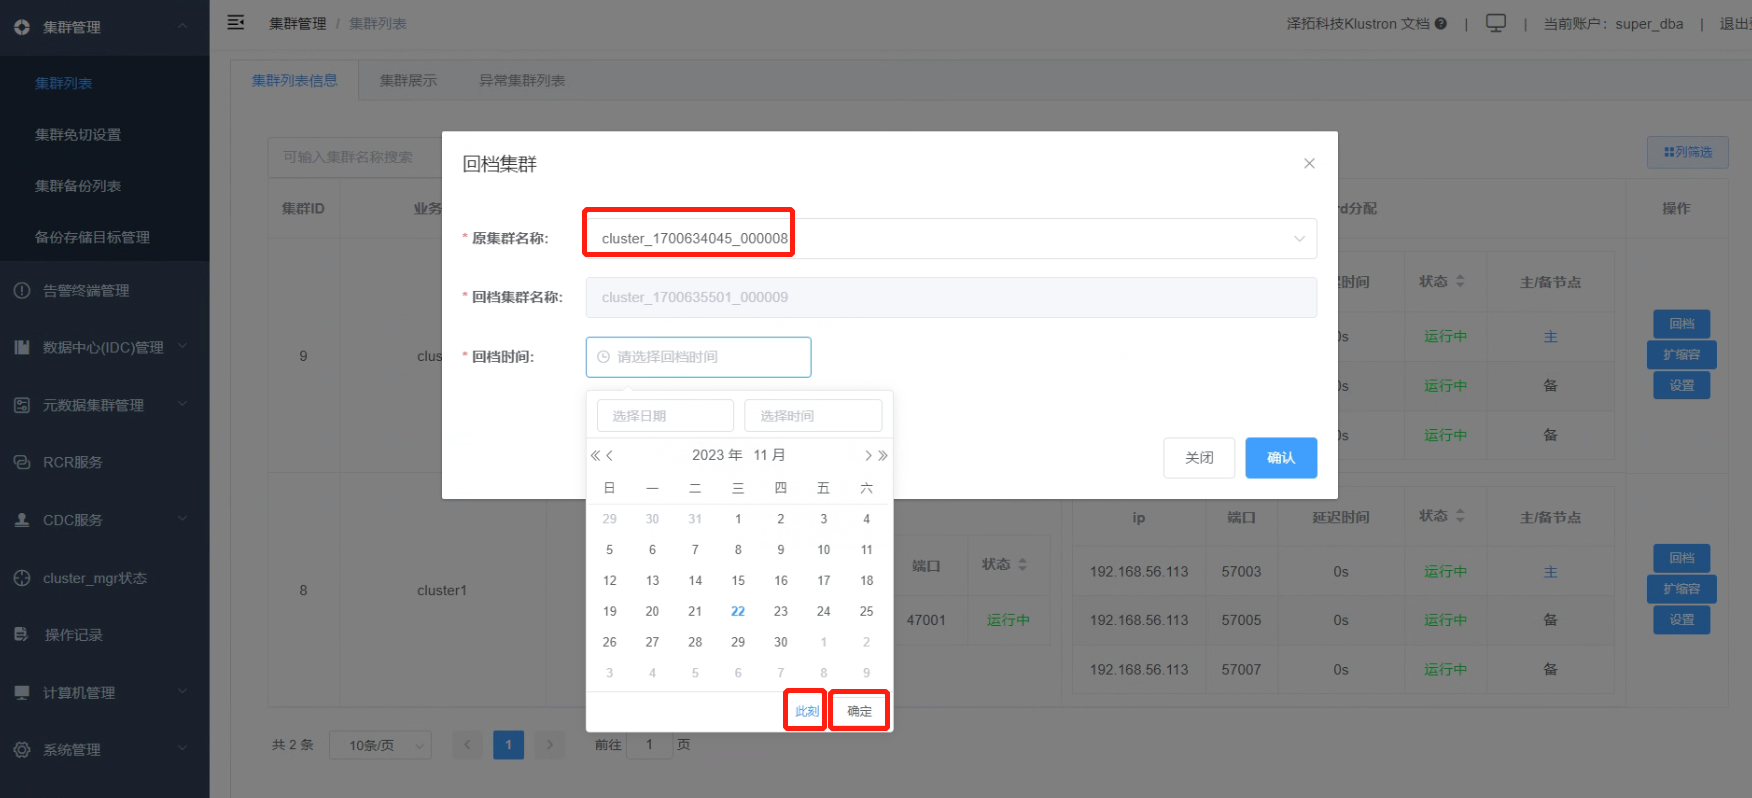
7.1 On the right side of the "cluster2", there is a “Rollback” button.
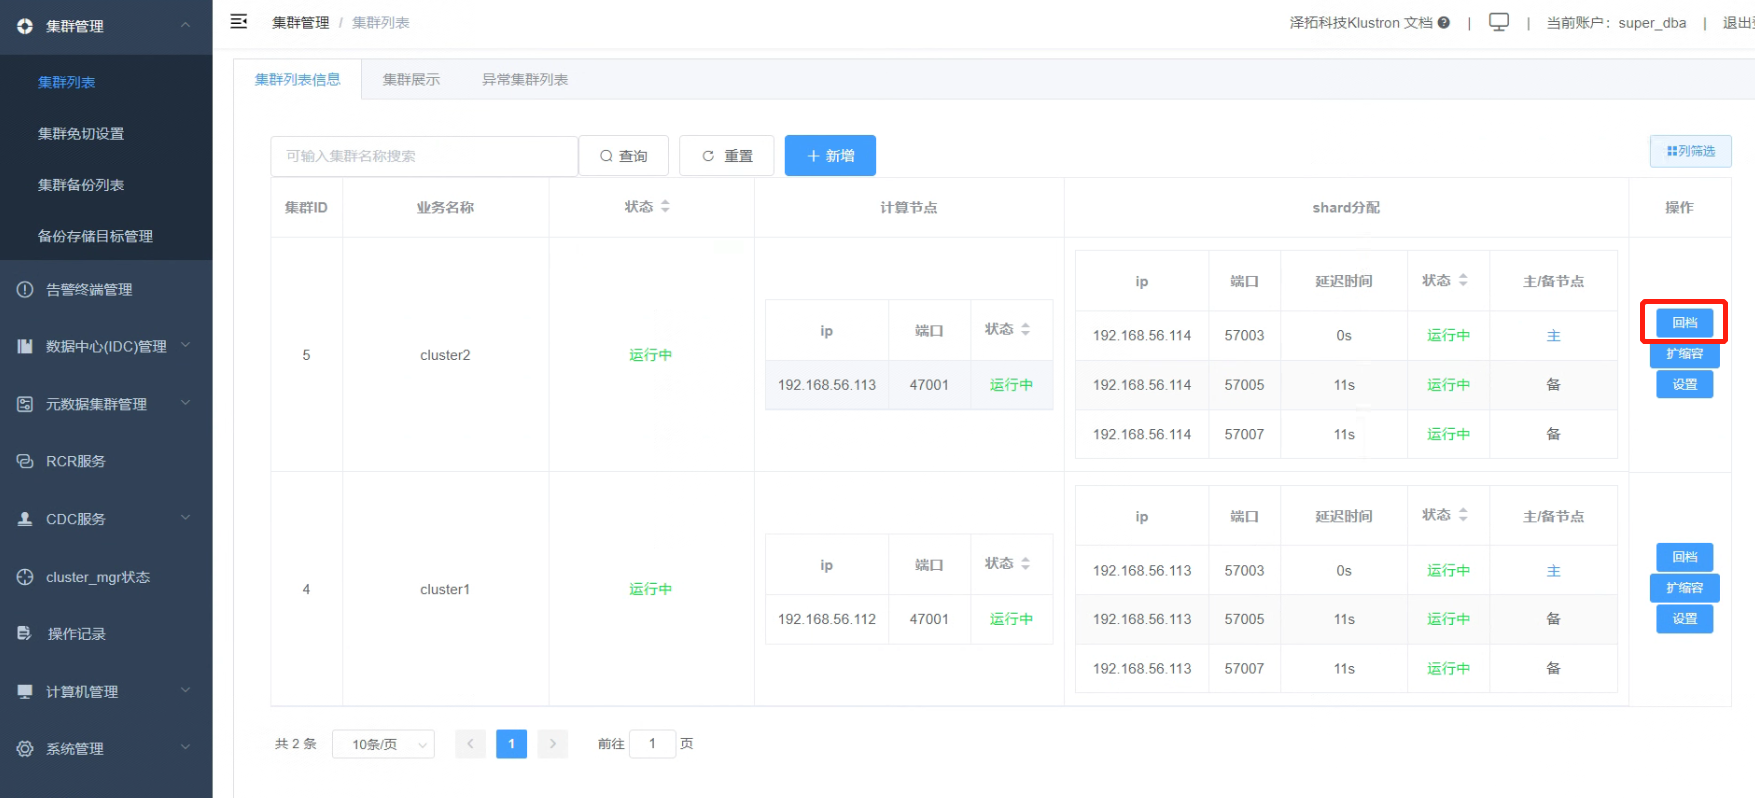
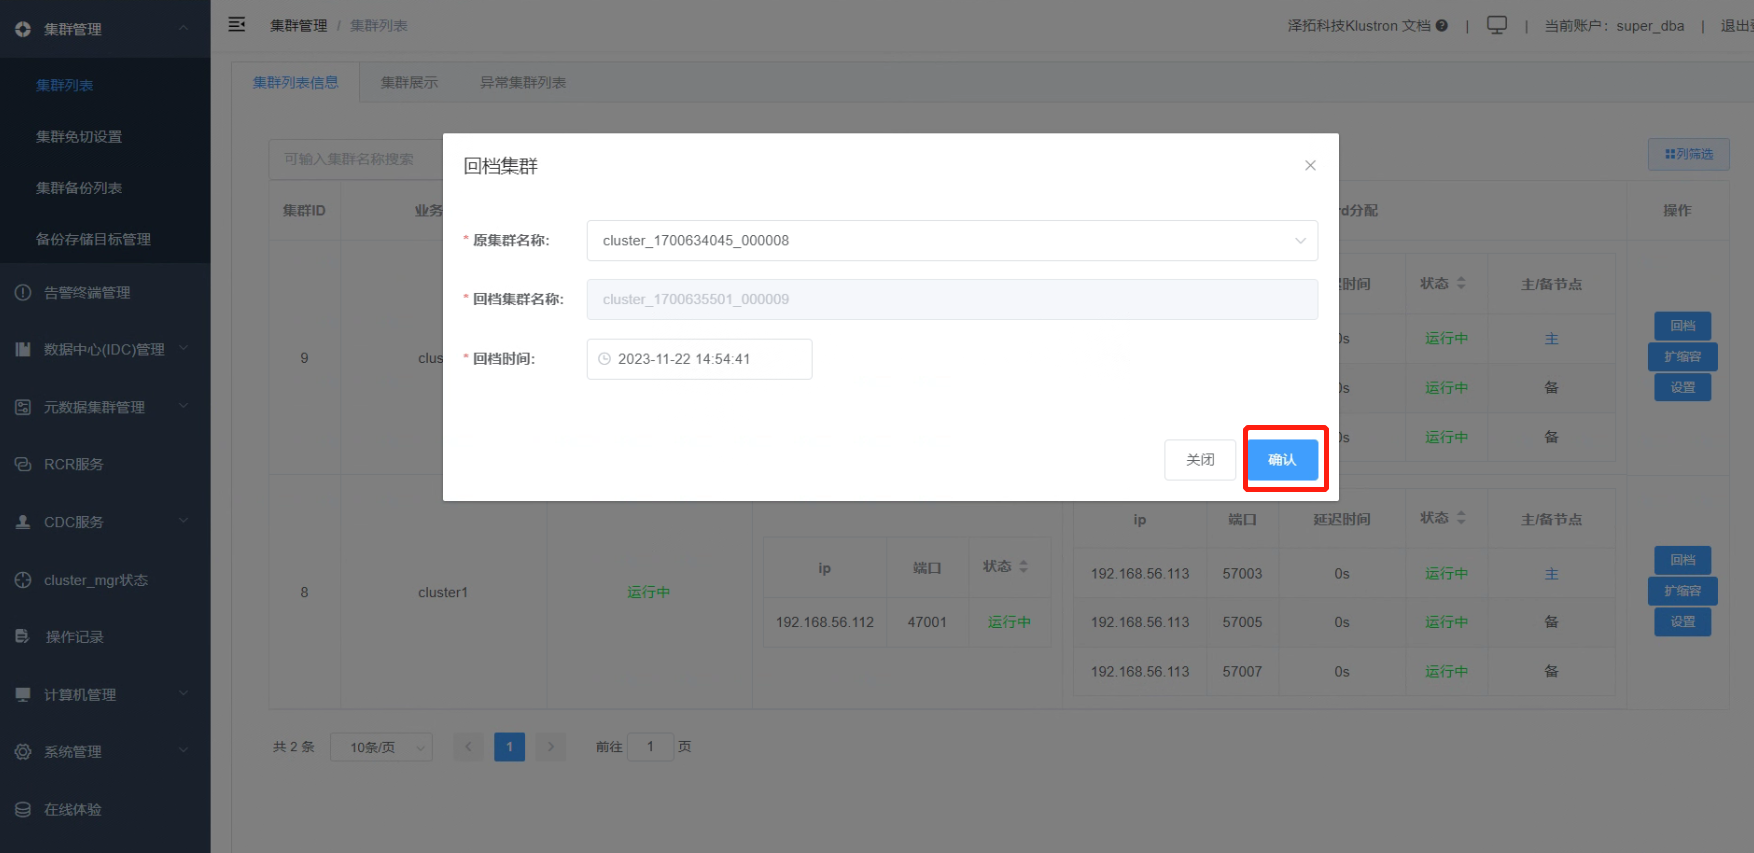
7.2 Click the “Rollback” button. In the “Original Cluster Name” dropdown list, choose the source cluster; here, the only option is “cluser_1700634045_000008”. For “Rollback Time”, directly select “This Moment” and confirm.
After verifying the details, click “Confirm”.
Note: When choosing a rollback time, make sure it falls between any previous full backup time and the current time.
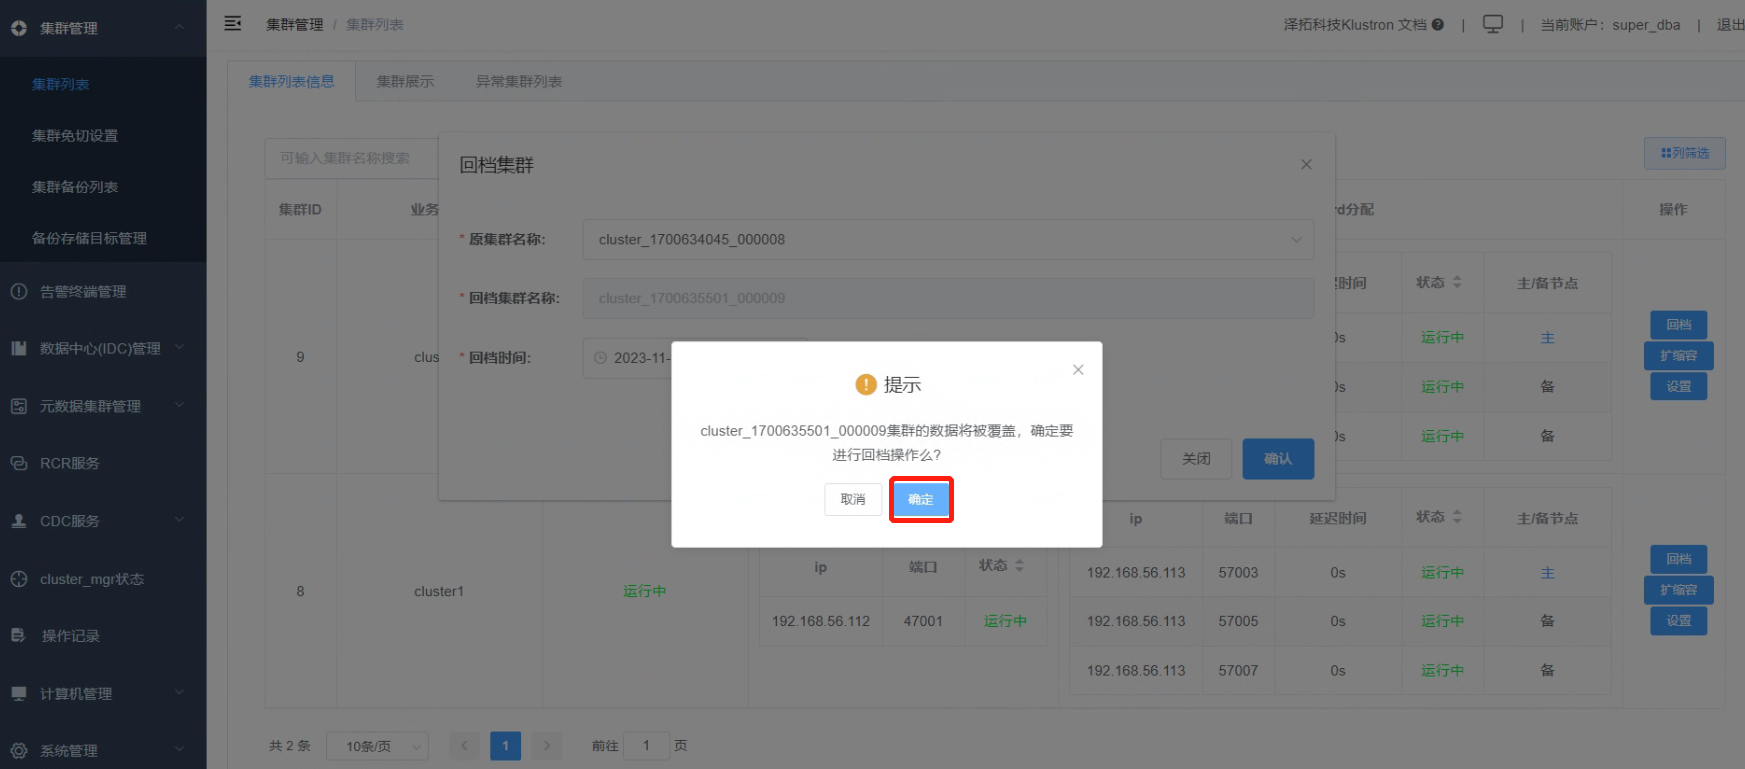
7.3 A pop-up will appear, indicating that executing the rollback will overwrite the data in "cluster2" (internal ID: cluster_1700635501_000009). Click “Confirm” to initiate the full database recovery (rollback).
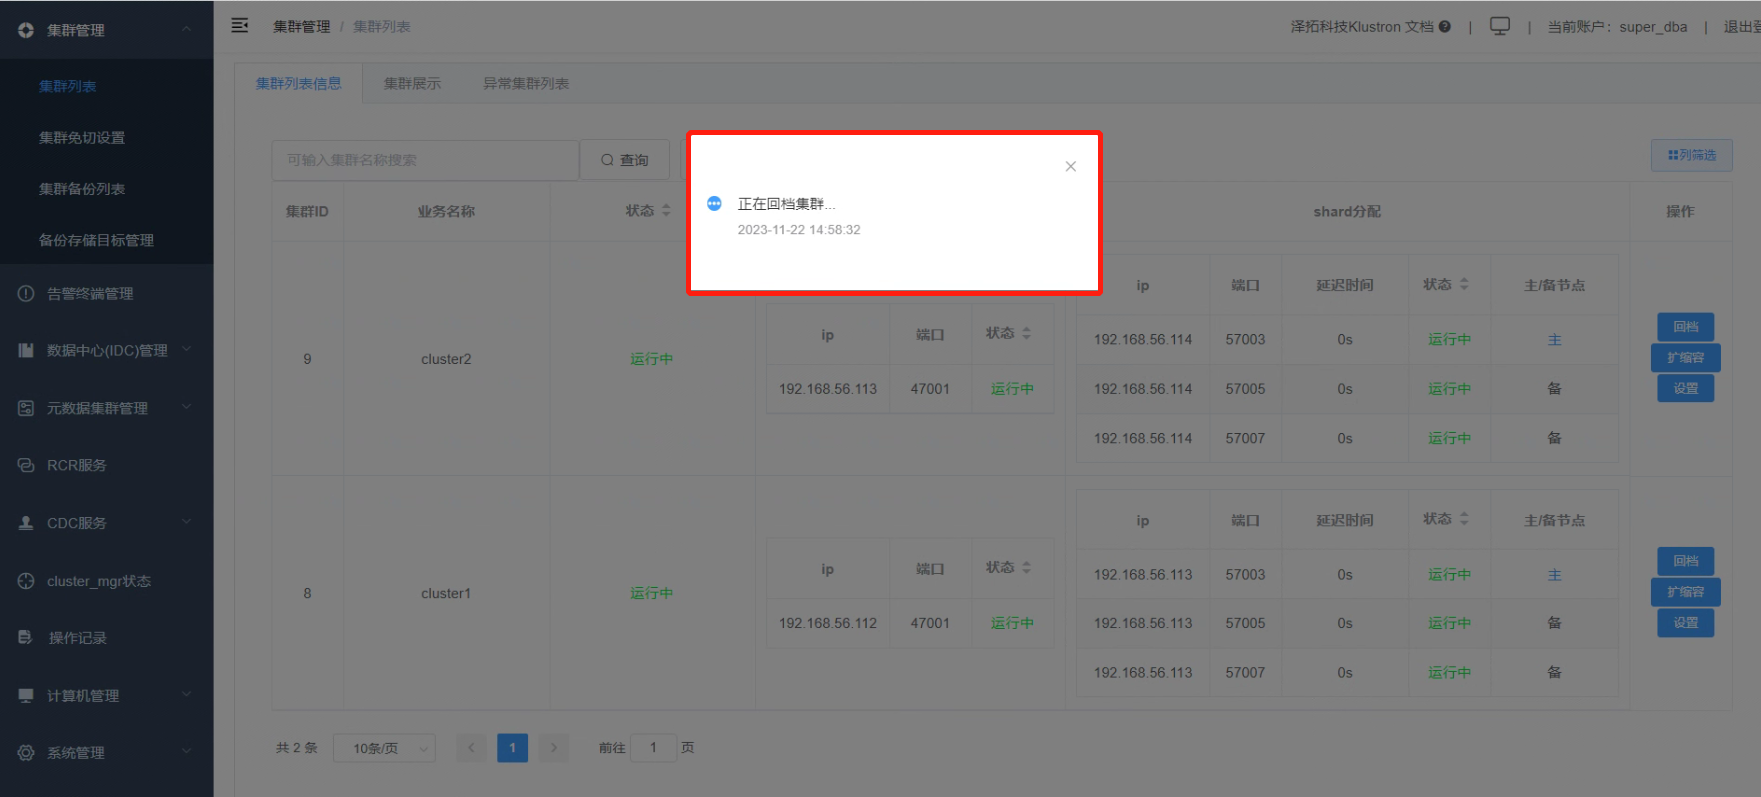
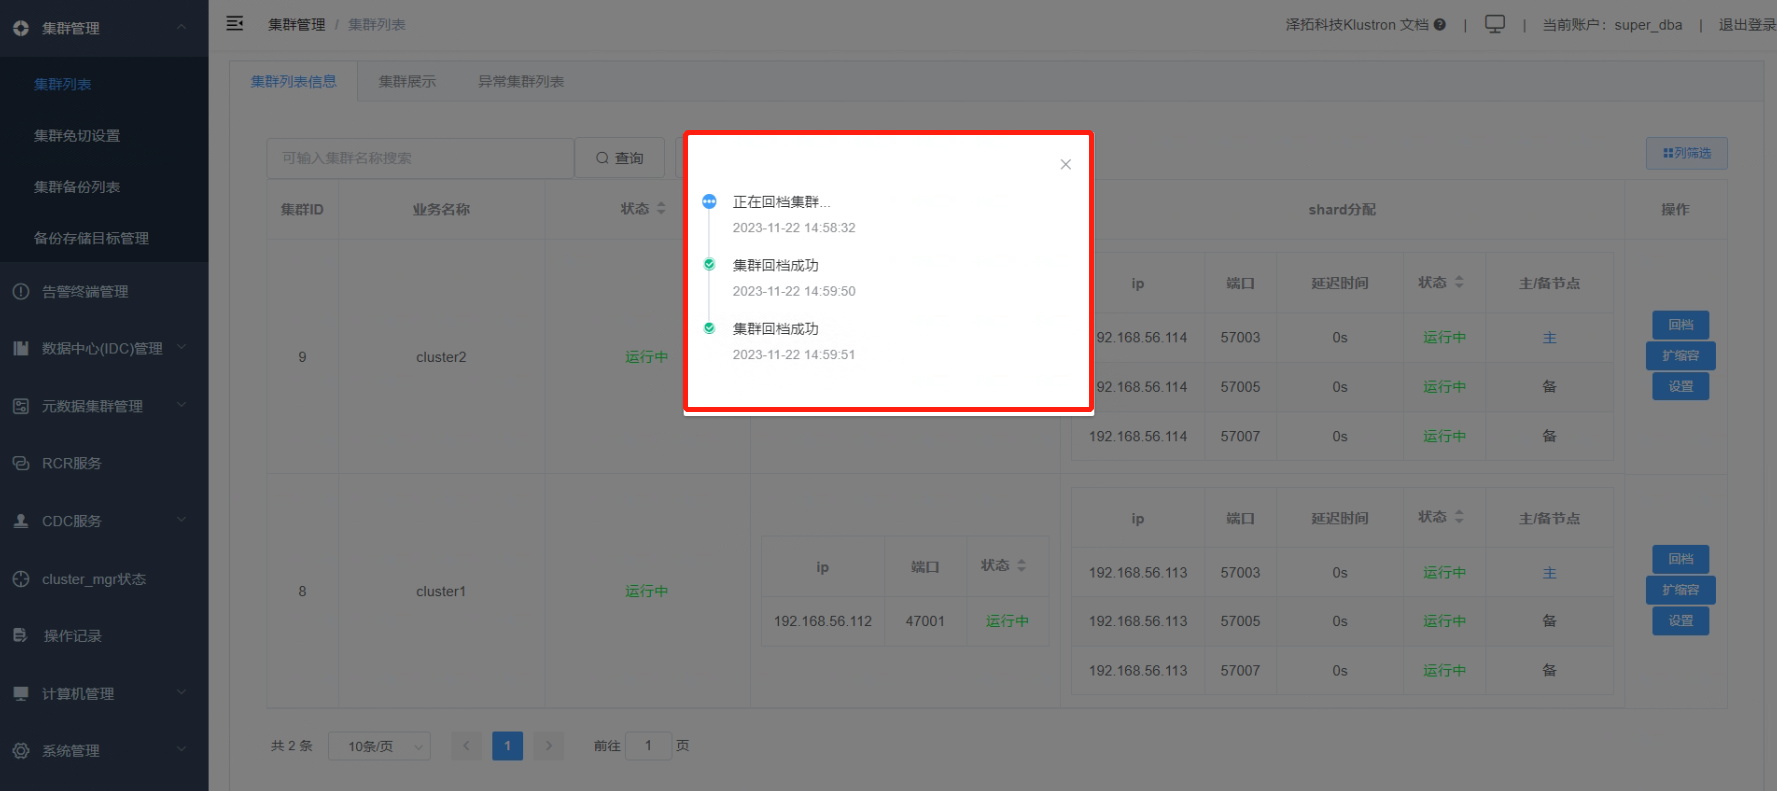
7.4 A notification will pop up, indicating that the rollback process is underway.
7.5 Upon successful cluster recovery (rollback), the following message will be displayed.
08 Data Recovery Check
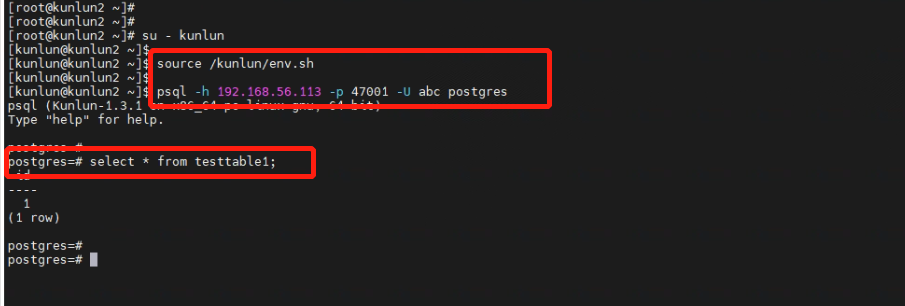
8.1 Open an SSH terminal window connected to cluster2 (compute node IP: 192.168.56.113). Log in as the kunlun user and connect to the cluster using the PostgreSQL client. Execute the data query command:
[kunlun@kunlun2 ~]$ id
[kunlun@kunlun2 ~]$ source /kunlun/env.sh
[kunlun@kunlun2 ~]$ psql -h 192.168.56.113 -p 47001 -U abc postgres
postgres=#select * from testtable1;
The output is as follows:
This concludes the process of backing up and recovering data with encryption enabled in the cluster.