
Klustron Cluster Operations and Maintenance
Klustron Cluster Operations and Maintenance
01 Starting and Stopping Cluster Components
1.1 Starting and Stopping Compute Nodes
To check the compute node processes:
ps -ef|grep $port # $port refers to the compute node's port number
Example:
ps -ef|grep 23001
Navigate to the scripts directory located at the same level as the bin directory in the compute node's installation directory:
cd /$install_dir/instance_binaries/computer/$port/kunlun-server-$version/scripts

# $install_dir refers to the compute node installation directory
# $port refers to the compute node port number
# $version refers to the compute node version, e.g., 1.2.1
Example:
cd /data/ha/kunlun/instance_binaries/computer/23001/kunlun-server-1.2.1/scripts
To start:
python2 start_pg.py --port=$port
Example:
python2 start_pg.py --port=23001
To stop:
python2 stop_pg.py --port=$port
Example:
python2 stop_pg.py --port=23001
1.2 Starting and Stopping Storage Nodes
To check the storage node processes:
ps -ef|grep $port # $port refers to the storage node's port number
Example:
ps -ef|grep 33503
Navigate to the scripts directory located at the same level as the bin directory in the storage node's installation directory:
cd/$install_dir/instance_binaries/storage/$port/kunlun-storage-$version/dba_tools

# $install_dir refers to the storage node installation directory
# $port refers to the storage node port number
# $version refers to the storage node version, e.g., 1.2.1
Example:
cd /data/ha/kunlun/instance_binaries/storage/33503/kunlun-storage-1.2.1/dba_tools
To start:
./startmysql.sh $port
Example:
./startmysql.sh 33503
To stop:
./stopmysql.sh $port
Example:
./stopmysql.sh 33503
1.3 Starting and Stopping the cluster_mgr Node
To check the cluster_mgr process:
ps -ef|grep cluster_mgr
Navigate to the bin directory located at the same level as the conf directory in the cluster_mgr installation directory:
cd /$install_dir/kunlun-cluster-manager-$version/conf/cluster_mgr.cnf

# $install_dir refers to the cluster_mgr installation directory
# $version refers to the version number of the cluster_mgr, e.g., 1.2.1
Example:
cd /data/ha/kunlun/kunlun-cluster-manager-1.2.1/bin
To start:
./start_cluster_mgr.sh
To stop:
./stop_cluster_mgr.sh
1.4 Starting and Stopping the node_mgr Node
To check the node_mgr process:
ps -ef|grep node_mgr
Navigate to the bin directory located at the same level as the conf directory in the node_mgr installation directory:
cd /$install_dir/kunlun-node-manager-$version/conf/

# $install_dir refers to the node_mgr installation directory
# $version refers to the version number of the node_mgr, e.g., 1.2.1
Example:
cd /data/ha/kunlun/kunlun-node-manager-1.2.1/bin
To start:
./start_node_mgr.sh
To stop:
./stop_node_mgr.sh
1.5 Starting and Stopping Metadata Nodes
Tips: The start and stop procedures for the metadata cluster are the same as those for storage nodes, but be sure to adjust the corresponding installation directory and port number.
1.6 Starting and Stopping XPanel
To check the XPanel process:
sudo docker ps -a
Tips: To check the status of the XPanel process: Exited indicates the process is stopped, Up indicates the process is running.
To start:
sudo docker container start $xpanel_service_name

# # $xpanel_service_name refers to the XPanel service name, which is formed as xpanel_$xpanel_service_port, for example, xpanel_10024
Example:
sudo docker container start xpanel_10024
To stop:
sudo docker container stop $xpanel_service_name
Example:
sudo docker container stop xpanel_10024
1.7 Scaling Machine Nodes
Expanding Machine Nodes
The function of an expanding machine node, determined by the configuration parameter nodetype, specifies the machine's role. This string-type parameter currently has four possible values: 'none', 'storage', 'server', 'both'. These indicate whether the machine will deploy no nodes, storage nodes, compute nodes, or both storage and compute nodes, respectively, with the default value being 'both'.
Edit a new JSON file, such as add_node.json, in the central control machine directory /data1/softwares/setuptools-36.5.0/cloudnative/cluster. An example configuration is as follows:
{
    "machines":[
        {
            "ip":"192.168.0.132",
            "basedir":"/data1/kunlun",
            "user":"kunlun"
        },
        {
            "ip":"192.168.0.134",
            "basedir":"/data1/kunlun",
            "user":"kunlun"
        }
    ],
    "meta":{
	    "group_seeds": "192.168.0.110:6001,192.168.0.111:6002,192.168.0.100:6003"
    },
    "node_manager": {
           "nodes": [
		{
 		"ip": "192.168.0.132"
		},
		{
 		"ip": "192.168.0.134"
		}
	    ]
    }
}
In the above configuration example, machines indicates the machines to be added for expansion; meta shows the current metadata cluster IP and port; node_manager refers to the component executing commands from cluster_mgr, which needs to be deployed on each machine.
Before expanding the machines, the new machines must follow the preparatory steps described in Sections 3.2.1 "Pre-Deployment Preparation - All Machines" and the first step of Section 3.2.2 "Configuring SSH Trust Between Central Control Machine and Other Machines".
Executing Machine Expansion
On the original cluster's central control machine, the kunlun user executes:
cd /data1/softwares/setuptools-36.5.0/cloudnative/cluster
sudo python2 setup_cluster_manager.py --config=add_node.json --action=install
bash -e clustermgr/install.sh
After the expansion is complete, the newly added machines can be viewed in XPanel under "Computer Management" -> "Computer List", as shown in the screenshot below within the red frame.
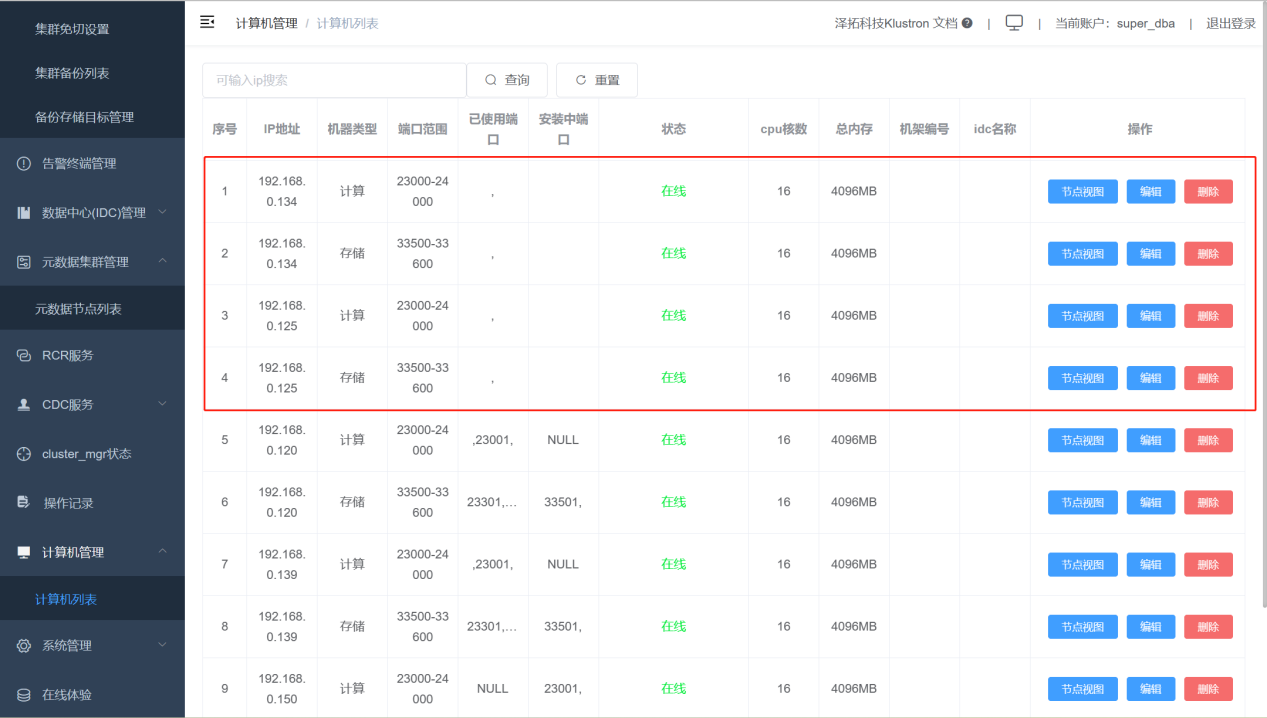
Shrinking Machine Nodes
1.8 Destroying All Clusters
High Risk Warning!!! Only proceed to destroy all clusters after triple confirmation, as this operation is irreversible!!!
To execute the destruction of all clusters on the central control machine:
cd /data1/softwares/setuptools-36.5.0/cloudnative/cluster
python setup_cluster_manager.py --autostart --config=$config_file --product_version=$version --action=clean
bash /data1/softwares/setuptools-36.5.0/cloudnative/cluster/clustermgr/clean.sh

# $config_file refers to the Klurton Cluster topology file, ending in .json.
# $version refers to the current cluster version number, e.g., 1.2.1
Example:
python setup_cluster_manager.py --autostart --config=cluster_and_node_mgr.json --product_version=1.2.1 --action=clean
bash /data1/softwares/setuptools-36.5.0/cloudnative/cluster/clustermgr/clean.sh
2.2 Log Directory and Configuration File Directory
2.1 Log Directory
Tips: The port numbers of various modules in the Klustron cluster can be viewed on XPanel.
Compute Node kunlun-server
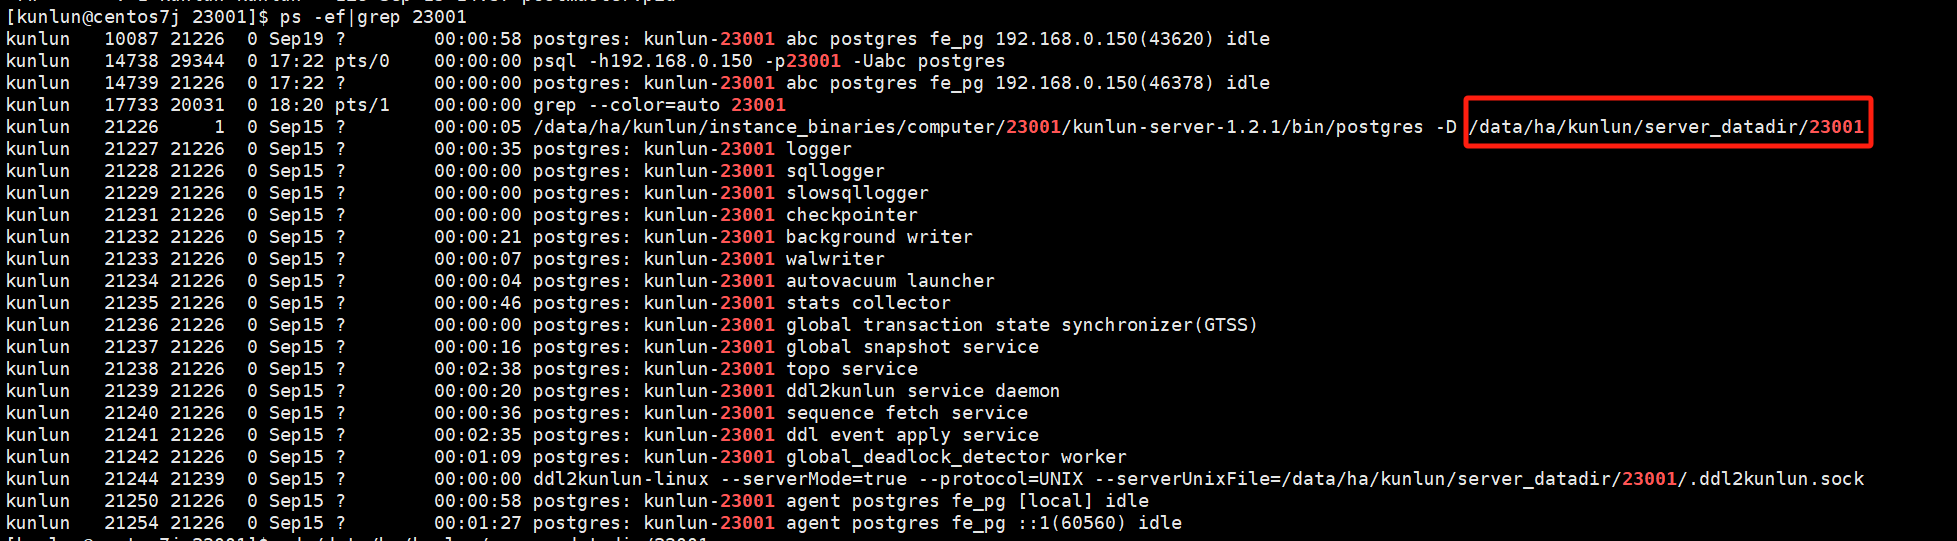
To view the log directory of the compute node kunlun-server, use the following command:
ps -ef|grep 23001

# Example uses compute node port number 23001
Example:
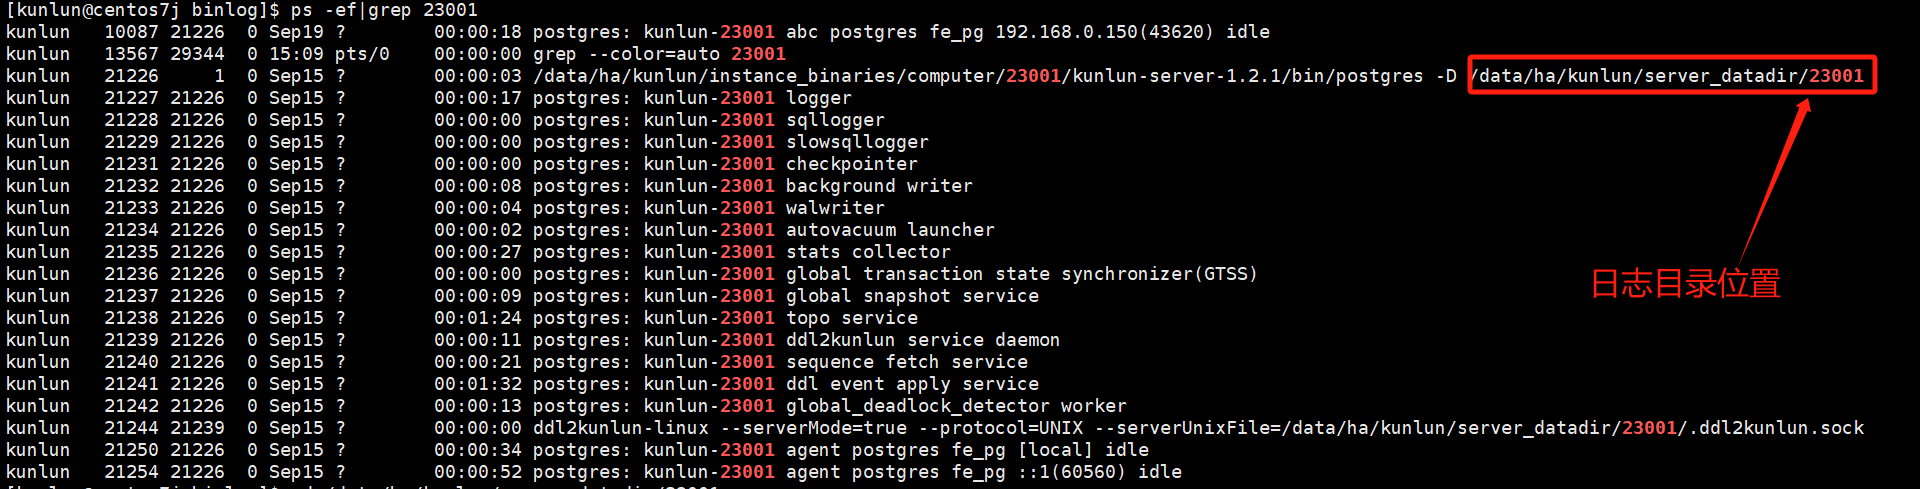
cd /data/ha/kunlun/server_datadir/23001/log
Example:
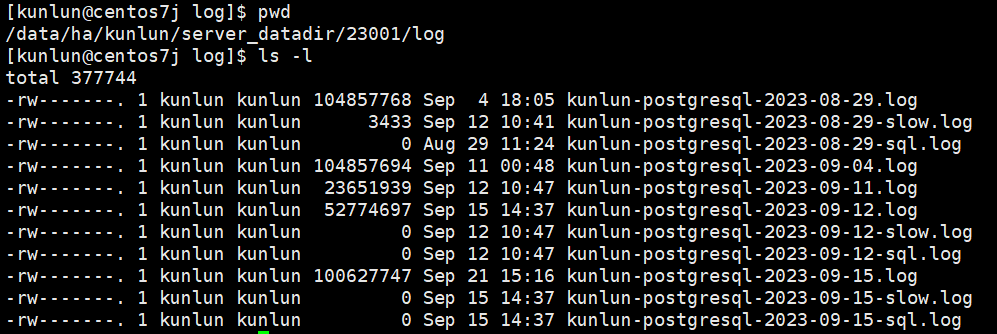
Types of Log Files:
kunlun-postgresql-*.logrecords the operation log files of the compute node, documenting SQL statements received, logs from the compute node program itself, and messages like ERROR, WARNING, etc.kunlun-postgresql-*-slow.logrecords slow SQL logs on the compute node. Slow SQL is controlled by the log_min_duration_statement variable, which has a default threshold of 10 seconds. SQL queries exceeding 10 seconds are logged here.kunlun-postgresql-*-sql.logrecords SQL statements sent from the compute node to the storage node, controlled by the enable_sql_log variable, which is off by default.
Storage Node storage-server
To view the log directory of the storage-server node, use the command:
ps -ef|grep 33501

# Example uses storage node port number 33501

cd /data/ha/kunlun/storage_logdir/33501
Example:
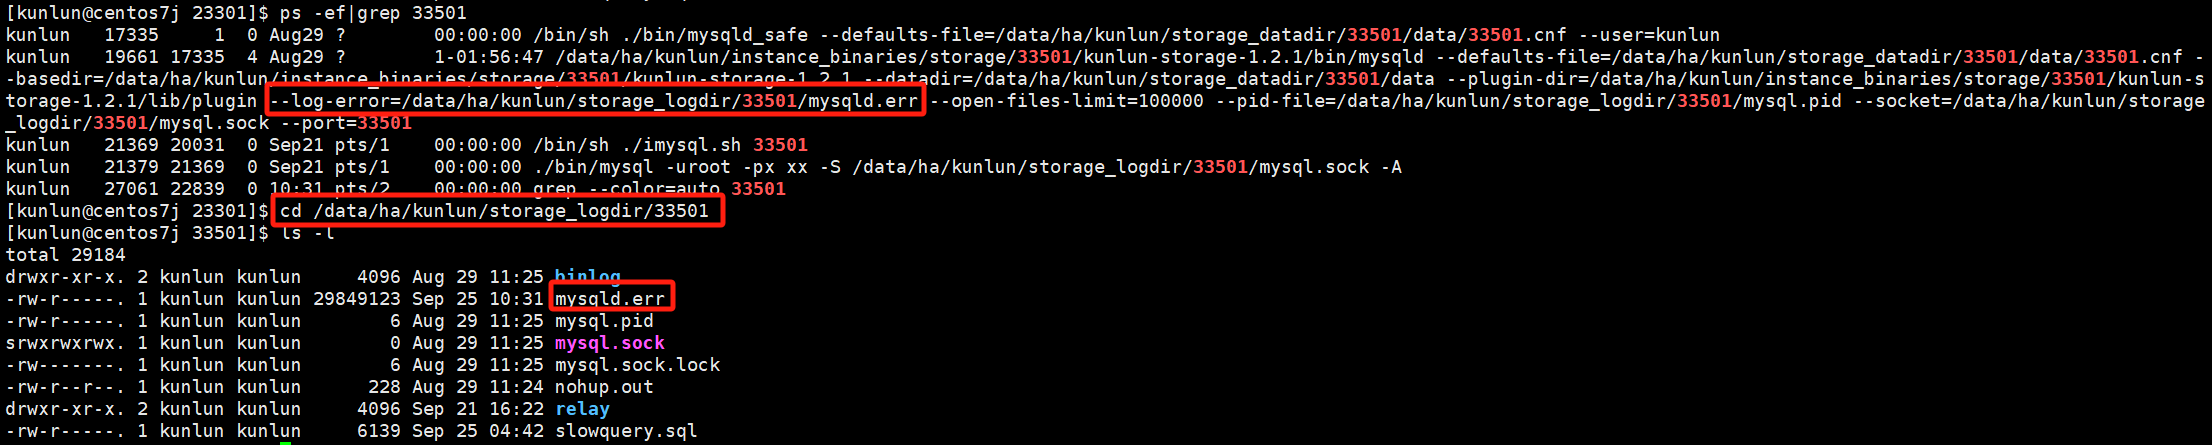
The main log to check is mysqld.err, which records operational information, warnings, and errors for the storage node.
cluster_mgr Node
To view the log directory for the cluster_mgr node, use the command:
ps -ef|grep cluster_mgr
Log directory is at the same level as the conf directory:
cd /data/ha/kunlun/kunlun-cluster-manager-1.2.1/log
Example:
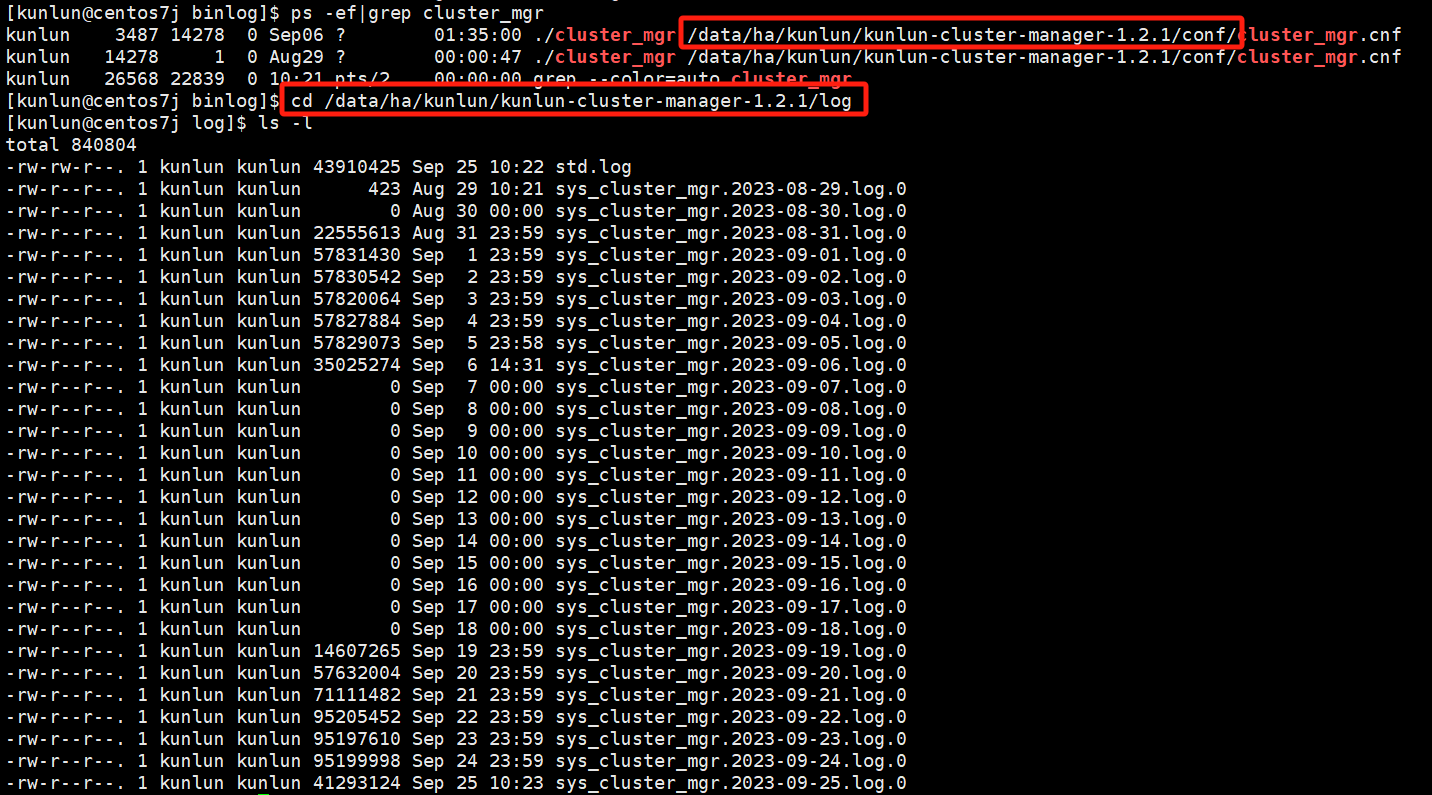
The main logs to check are sys_cluster_mgr*.log.*, which record tasks printed during operation, management scheduling, errors, etc.
Metadata Cluster
To view the log directory for the metadata node, use the command:
ps -ef|grep 23301

# Example uses metadata node port number 23301

cd /data/ha/kunlun/storage_logdir/23301/
Example:

The main log to check is mysqld.err, which records operational information, warnings, and errors for the metadata node.
node_mgr Node
To view the log directory for the node_mgr node, use the command:
ps -ef|grep node_mgr
Log directory is at the same level as the conf directory:
cd /data/ha/kunlun/kunlun-node-manager-1.2.1/log
Example:
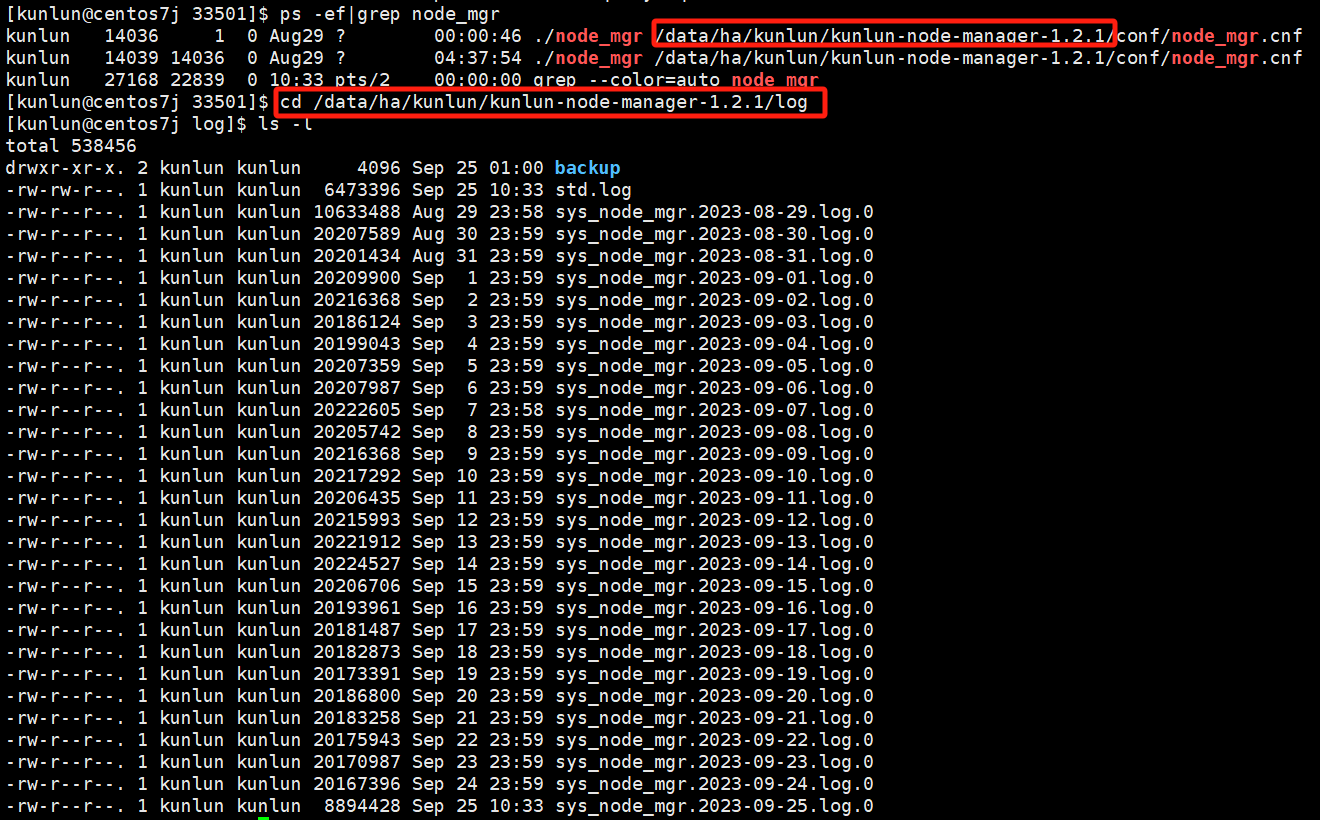
The main logs to check are sys_node_mgr.*.log.*, which record shell commands related to tasks issued by cluster_mgr for node_mgr to execute, such as cluster installation, node scaling, backup recovery, primary-secondary switching, etc.
2.2 Modifying Configuration Templates
Before creating a cluster, if there are specific requirements, modifications can be made in the configuration template, and then the cluster can be created.
Compute Node
Before Environment Deployment
Modification steps are as follows:
Navigate to the deployment tool directory, for example, using Klustron 1.2.1 cluster version commands:
cd setuptools-36.5.0/cloudnative/cluster/clustermgr

tar xf kunlun-server-1.2.1.tgz

cd kunlun-server-1.2.1/resources

vim postgresql.conf
Example:
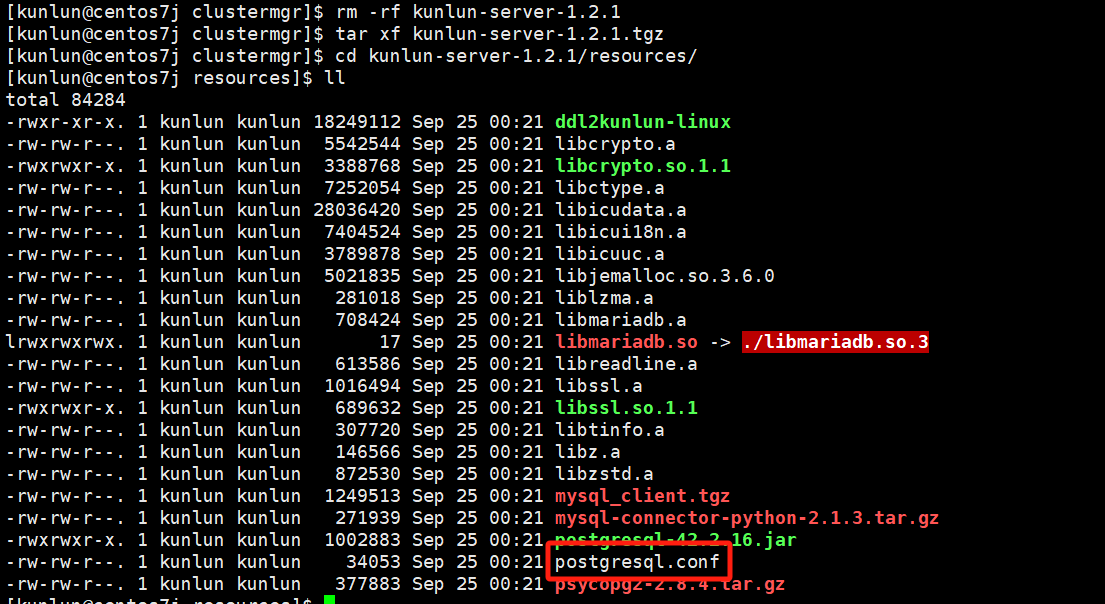
Edit the configuration template file to modify the corresponding configuration values. Important: Before making any changes, please consult with the Klustron database team to confirm that modifications are allowed and will not impact usage.
Finally, repackage and compress:
mv kunlun-server-1.2.1.tgz kunlun-server-1.2.1_bak.tgz

tar czf kunlun-server-1.2.1.tgz kunlun-server-1.2.1/
Then complete the deployment according to the deployment steps.
After Environment Deployment
Once the Klustron environment is deployed, create the cluster again using the new configuration file.
Modification steps:
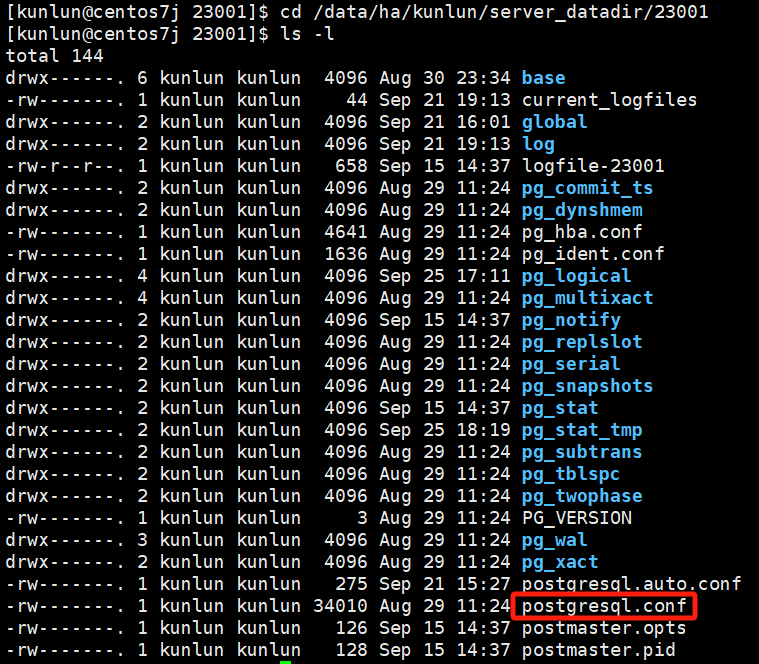
cd $base_dir/program_binaries/kunlun-server-1.2.1/resources

vim postgresql.conf
$base_dir refers to the installation base directory, which can be viewed in the topology file .json during deployment.
For example, using Klustron 1.2.1 cluster version commands:
cd /data/ha/kunlun/program_binaries/kunlun-server-1.2.1/resources

vim postgresql.conf
Example:
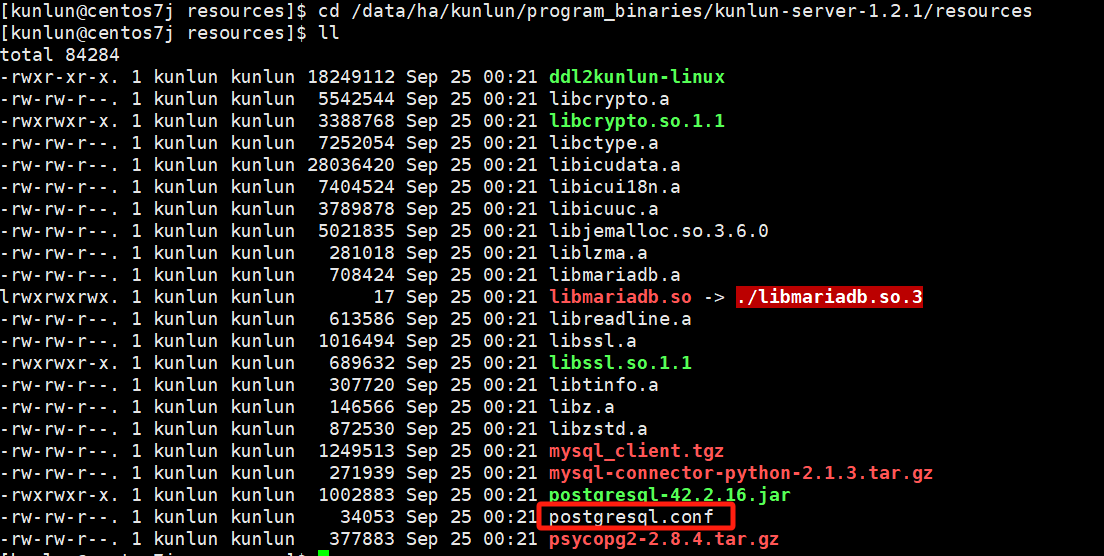
Edit the configuration template file to modify the corresponding configuration values. Important: Before making any changes, please consult with the Klustron database team to confirm that modifications are allowed and will not impact usage.
Storage Node
Before Environment Deployment
Modification steps:
Navigate to the deployment tool directory, for example, using Klustron 1.2.1 cluster version commands:
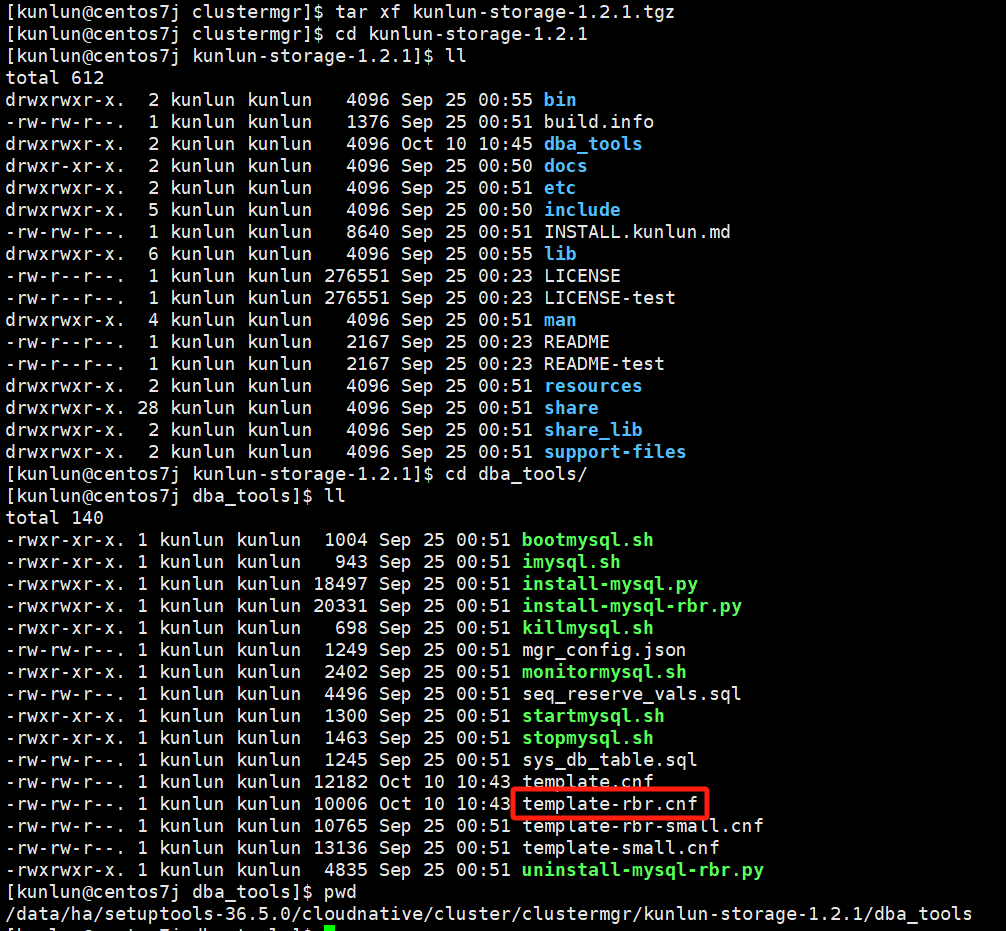
cd setuptools-36.5.0/cloudnative/cluster/clustermgr

tar xf kunlun-storage-1.2.1.tgz

cd kunlun-storage-1.2.1/dba_tools

vim template-rbr.cnf
Example:
Edit the configuration template file to modify the corresponding configuration values. Important: Before making any changes, please consult with the Klustron database team to confirm that modifications are allowed and will not impact usage.
Finally, repackage and compress:
mv kunlun-storage-1.2.1.tgz kunlun-storage-1.2.1_bak.tgz

tar czf kunlun-storage-1.2.1.tgz kunlun-storage-1.2.1/
After Environment Deployment
Once the Klustron environment is deployed, create the cluster again using the new configuration file.
Modification steps:
cd $base_dir/program_binaries/kunlun-storage-1.2.1/dba_tools

vim template-rbr.cnf
$base_dir refers to the installation base directory, which can be viewed in the topology file .json during deployment.
For example, using Klustron 1.2.1 cluster version commands:
cd /data/ha/kunlun/program_binaries/kunlun-storage-1.2.1/dba_tools

vim template-rbr.cnf
Example:

Edit the configuration template file to modify the corresponding configuration values. Important: Before making any changes, please consult with the Klustron database team to confirm that modifications are allowed and will not impact usage.
2.3 Configuration File Directory and Activation
Note: In many cases, users generally do not need to modify the configuration files of compute nodes, storage nodes, metadata clusters, cluster_mgr, or node_mgr, except under special circumstances. Here, we only introduce the paths of the configuration files for use in special situations.
Compute Node Configuration Files
To view the compute node kunlun-server log directory, use the command:
ps -ef|grep 23001

# Example uses compute node port number 23001
Example:
In the compute node, there are various types of system variables, and different system variables have different activation methods. To modify system variables and make them effective, see the compute node section in the following link:
http://doc.klustron.com/zh/Klustron_system_variable.html
Storage Node Configuration Files
To view the storage node storage-server log directory, use the command:
ps -ef|grep 33501

# Example uses storage node port number 33501
Example:

To modify system variables in the storage node and make them effective, see the storage node section in the following link:
http://doc.klustron.com/zh/Klustron_system_variable.html
Metadata Node Configuration Files
To view the metadata node log directory, use the command:
ps -ef|grep 23301

# Example uses metadata node port number 23301
Example:

cluster_mgr Node Configuration File Directory
To view the cluster_mgr node configuration file directory, use the command:
ps -ef|grep cluster_mgr
Example:

After modifying configuration files, the changes require restarting the cluster_mgr. Refer to section 1.3 for details.
node_mgr Node Configuration File Directory
To view the node_mgr node log directory, use the command:
ps -ef|grep node_mgr
Example:

2.4 Server Role Information
Access the metadata cluster to obtain relevant information.
03 Load Balancing Configuration
Klustron does not provide a load balancing component; it is up to users to provide and configure load balancing as needed. After creating the cluster, users can configure the compute nodes' IP and port into the load balancer, allowing access to Klustron through the IP provided by the load balancer.
04 Import and Export Tools
Klustron supports importing and exporting using the COPY command, as well as pg_dump and pg_restore, and also the myloader and mydumper tools.
COPY Command
COPY Command Method
After logging in via the PostgreSQL client, execute the command.
Tips: Before importing, ensure the table structure exists or import the table structure first.
Import: Ignore the first line, columns separated by a comma in a CSV file
copy t1 from '/data/ha/sbtest_sourcedata/sbtest_sourcedata/sbt1/t1.0001.csv' with delimiter ',' csv header;
Example:

Export: Full table data, without headers
copy t1 to '/data/ha/sbtest_sourcedata/sbtest_sourcedata/sbt1/t1.000.csv' with delimiter ',' csv;
Example:
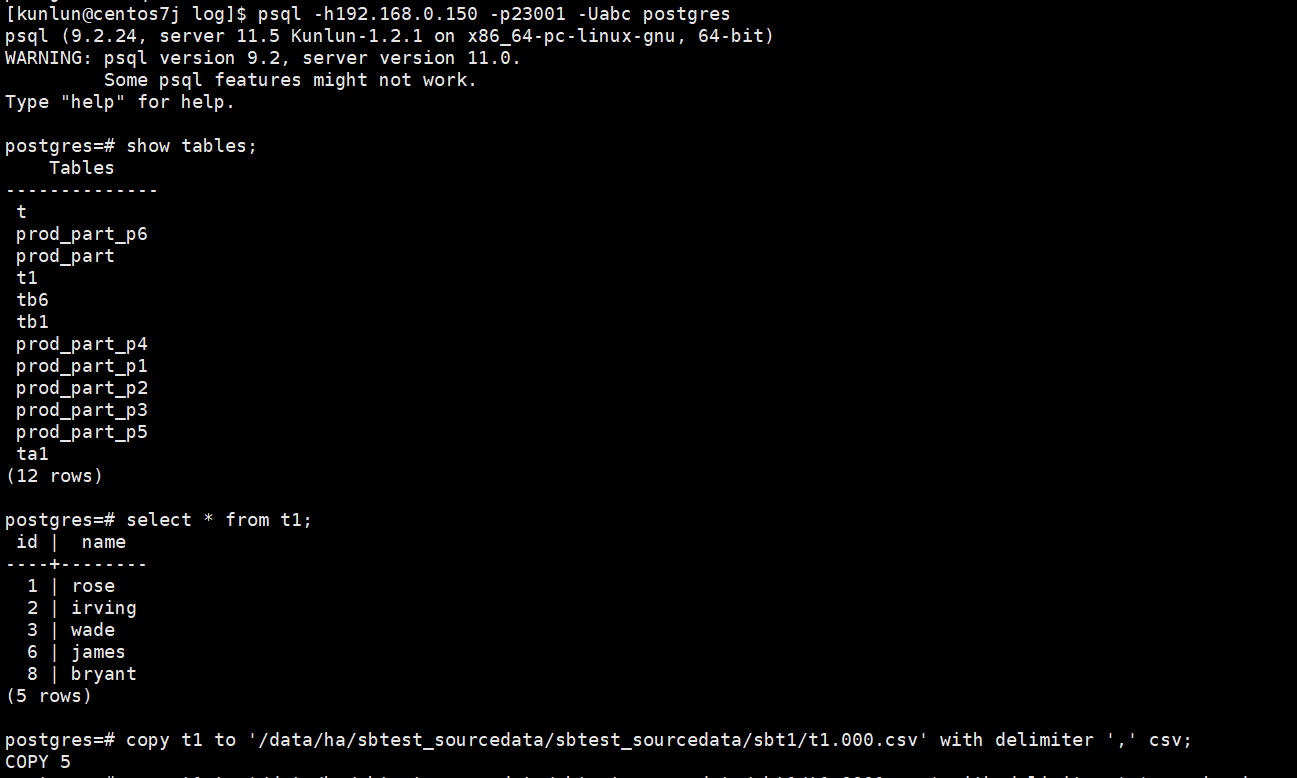
Example of exported CSV file:

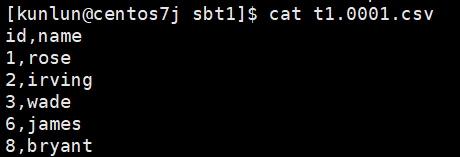
Export: Full table data, with headers
copy t1 to '/data/ha/sbtest_sourcedata/sbtest_sourcedata/sbt1/t1.0001.csv' with delimiter ',' csv header;
Example of exported CSV file:
Explanation of Common Parameters for the COPY Command:
csv: Indicates the file format.
header: Indicates the first line of the file contains field names; this line is ignored when importing into the database.
delimiter: Indicates how fields are separated, in this example by a comma.
encoding: Indicates the file's encoding method; the example uses GBK encoding (default is UTF-8).
quote: Specifies the character used to quote data values when necessary. The default is a double quote. This must be a single-byte character. This option is only allowed with CSV format.
force quote: Forces quoting for every non-NULL value in specified columns. NULL outputs are not quoted. If '*' is specified, all non-NULL values in all columns will be quoted. This option is only allowed in COPY TO with CSV format.
Example of using quote:
copy t1 to '/data/ha/sbtest_sourcedata/sbtest_sourcedata/sbt1/t1.csv' with delimiter ',' csv force quote name;
Example:

Example of exported CSV file:

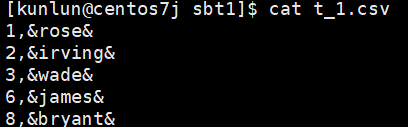
Example of using force quote:
copy t1 to '/data/ha/sbtest_sourcedata/sbtest_sourcedata/sbt1/t_1.csv' with delimiter ',' csv quote '&' force quote name;
Example:

Example of exported CSV file:
pg_dump and pg_restore
For detailed information on the parameters of the pg_dump and pg_restore commands, refer to the official documentation:
pg_dump:
http://www.postgres.cn/docs/11/app-pgdump.html
pg_restore:
http://www.postgres.cn/docs/11/app-pgrestore.html
Below is an introduction to commonly used pg_dump and pg_restore commands:
pg_dump Export
Due to the need for the import/export tool client to match the server version, it is necessary to use the corresponding tools.
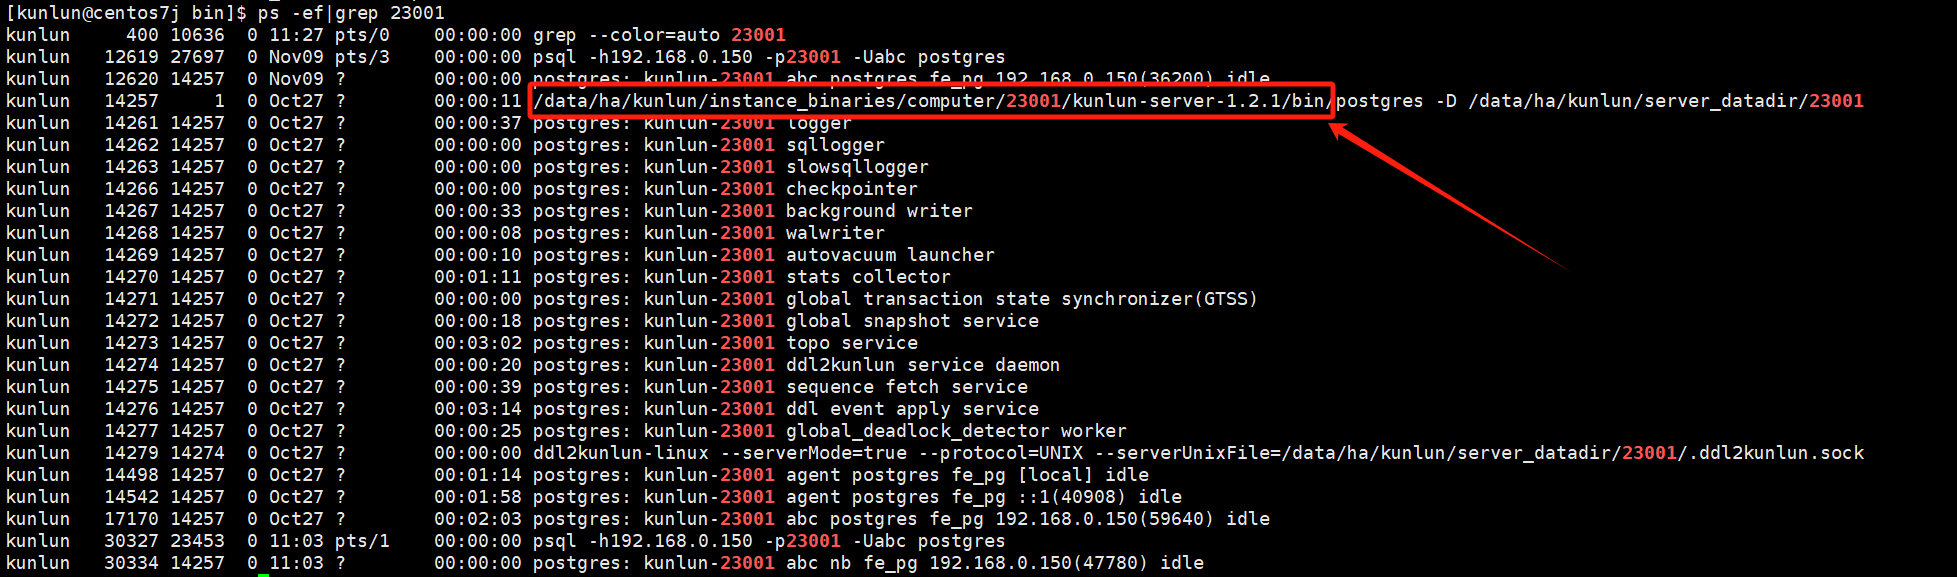
The pg_dump import and pg_restore export tools are located in the following directory of the compute node, using port number 23001 of kunlun-server as an example:
ps -ef|grep 23001
Example
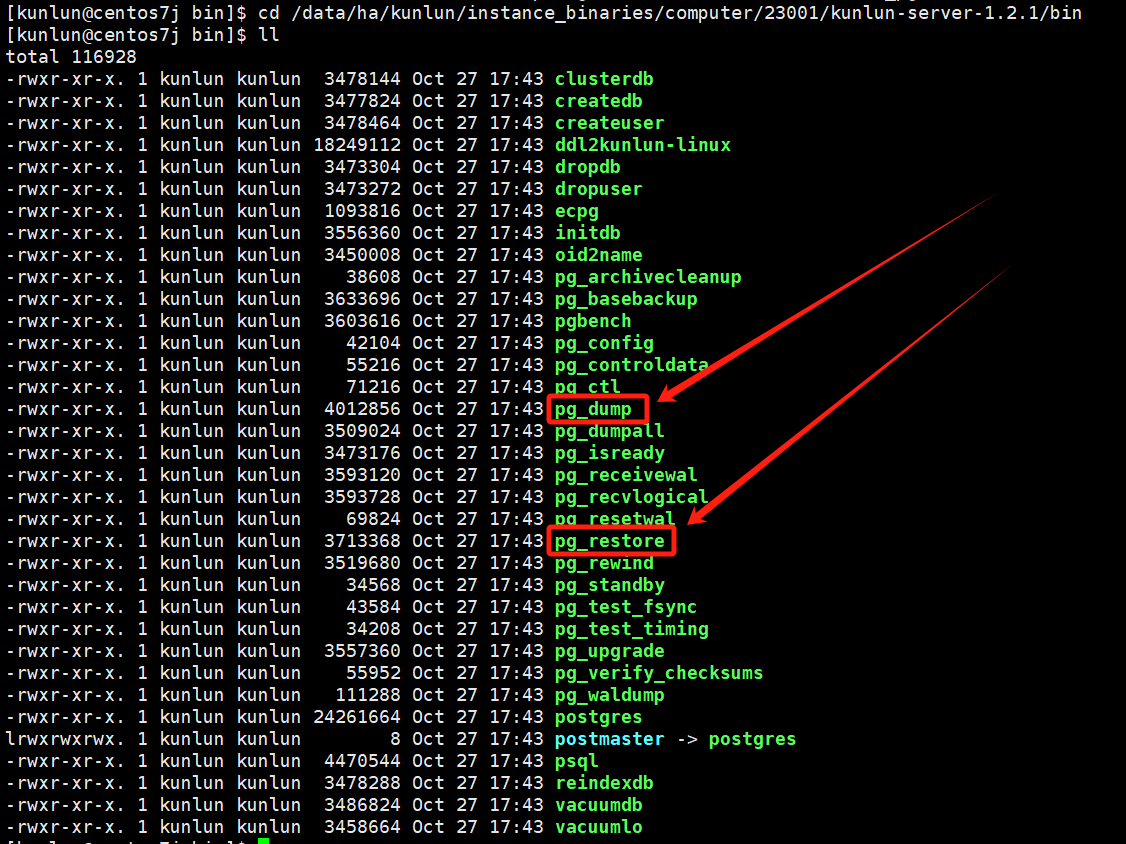
Locate the pg_dump and pg_restore directory:
cd /data/ha/kunlun/instance_binaries/computer/23001/kunlun-server-1.2.1/bin
ls -l
Example
Export a specific database (using the pgdb database as an example), the output file is a SQL text:
./pg_dump -h192.168.0.150 -p23001 -Uabc -d pgdb > pgdb.sql
Export a specific database (using the pgdb database as an example), the output file is a SQL text:
./pg_dump -h192.168.0.150 -p23001 -Uabc -d pgdb -t n1 > n1.sql
Export the structure of a specific table (using the table n1 as an example), the output file is a SQL text:
./pg_dump -h192.168.0.150 -p23001 -Uabc -d pgdb -t n1 -s > n1_s.sql
Export the data of a specific table (using the table n1 as an example), the output file is a SQL text:
./pg_dump -h192.168.0.150 -p23001 -Uabc -d pgdb -t n1 -a > n1_data.sql
Export multiple tables (using tables t1 and t2 as examples), the output file is a SQL text:
./pg_dump -h192.168.0.150 -p23001 -Uabc -d pgdb -t t1 -t t2 > t.sql
Note: The following formats differ from text format SQL files:
Export a specific database (dump a database to a custom format archive file, using the database nb as an example):
./pg_dump -h192.168.0.150 -p23001 -Uabc -d nb -Fc > nb.dump
Export a specific table (dump a table to a custom format archive file, using the table t1 as an example):
./pg_dump -h192.168.0.150 -p23001 -Uabc -d postgres -t t1 -Fc > t1.dump
psql Import
For SQL text files, you can use psql for importing:
Note: Pre-requisites for psql import
Pre-requisite: The nb database does not have tables that conflict with those in the SQL file.
Import the database (using the nb database as an example):
psql -h192.168.0.150 -p23001 -Uabc nb < nb.sql
Pre-requisite: The table n1 does not exist.
Import the table (using the table n1 as an example):
psql -h192.168.0.150 -p23001 -Uabc nb < n1.sql
Pre-requisite: The table n1 does not exist.
Import the table structure (using the table n1 as an example):
psql -h192.168.0.150 -p23001 -Uabc nb < n1.sql
Pre-requisite: The table n2 exists, it's up to the user to decide if n2 table has constraints.
Import table data (using the table n2 as an example):
psql -h192.168.0.150 -p23001 -Uabc nb < n2.sql
pg_restore Import
For custom format archive files, use pg_restore:
Pre-requisite: The nb database already exists.
Import the database (using the nb database as an example, the -c option deletes the tables under the nb database and then imports them):
./pg_restore -h192.168.0.150 -p23001 -Uabc -d nb -c -e nb.dump
Pre-requisite: The nb database does not exist.
Import the database (create the nb database before importing, using the -C option):
./pg_restore -h192.168.0.150 -p23001 -Uabc -d postgres -C nb.dump
Pre-requisite: In the nb database, the table n2 does not exist.
Import table structure (using the table n2 as an example):
./pg_restore -h192.168.0.150 -p23001 -Uabc -d nb -e n2.dump
Pre-requisite: The table n2 exists, it's up to the user to decide if n2 table has constraints.
Import table data (using the table n2 as an example):
./pg_restore -h192.168.0.150 -p23001 -Uabc -d nb -a -e n2.dump
myloader Exportmydumper Import
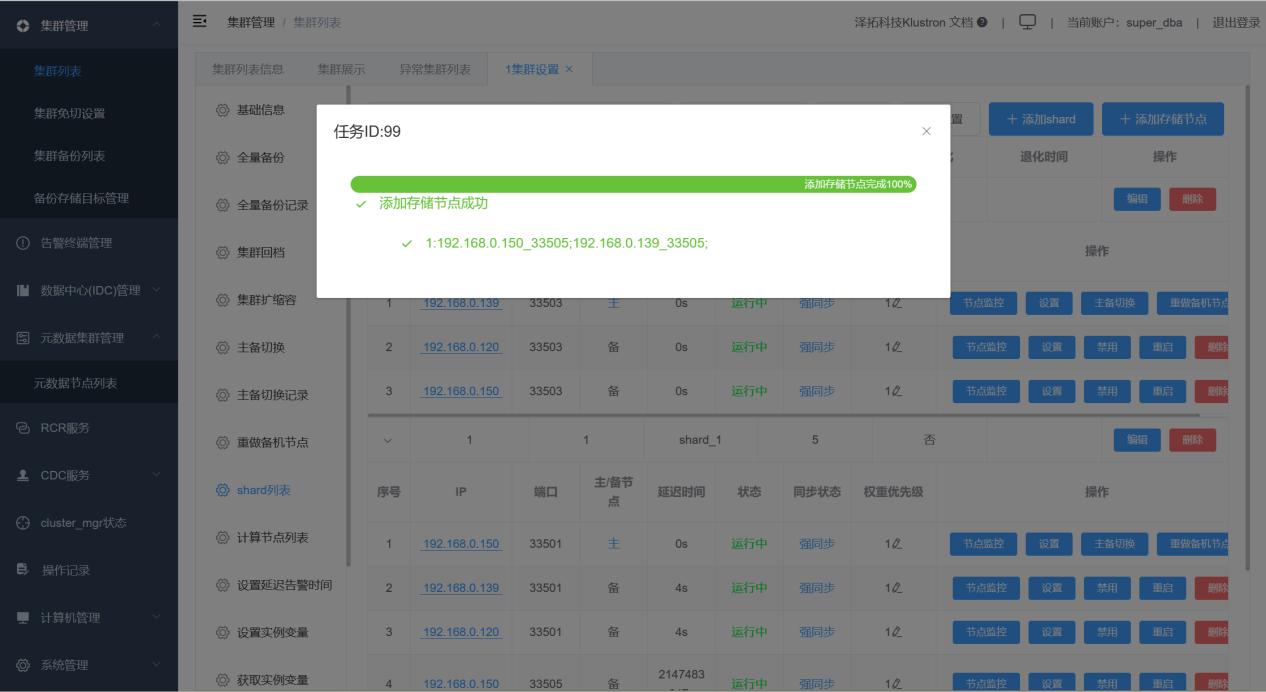
05 Adding Backup Nodes to a Shard
Add backup nodes to a shard via XPanel:
06 System Variable Management
For an introduction to Klustron-specific system variables, see the link:
http://doc.klustron.com/zh/Klustron_system_variable.html
enable_global_mvcc
When modifying the enable_global_mvcc parameter, a specific time window is required for the change. All compute nodes must be modified and restarted within this window to activate the parameter. Once verified successfully, application access to Klustron can be resumed.
Modification steps are as follows:
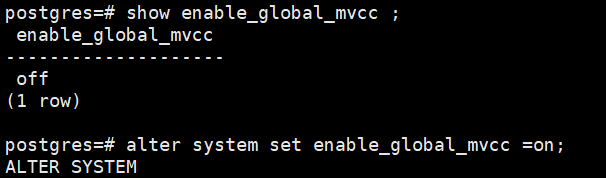
- Modifying the enable_global_mvcc parameter
Log in to the compute node using the PostgreSQL protocol, then execute the following commands:
show enable_global_mvcc ;

alter system set enable_global_mvcc =on;
Example:
- Restarting the compute node
First, check the compute node process:
ps -ef|grep $port # $port refers to the compute node's port number
Example:
ps -ef|grep 47001
Example:
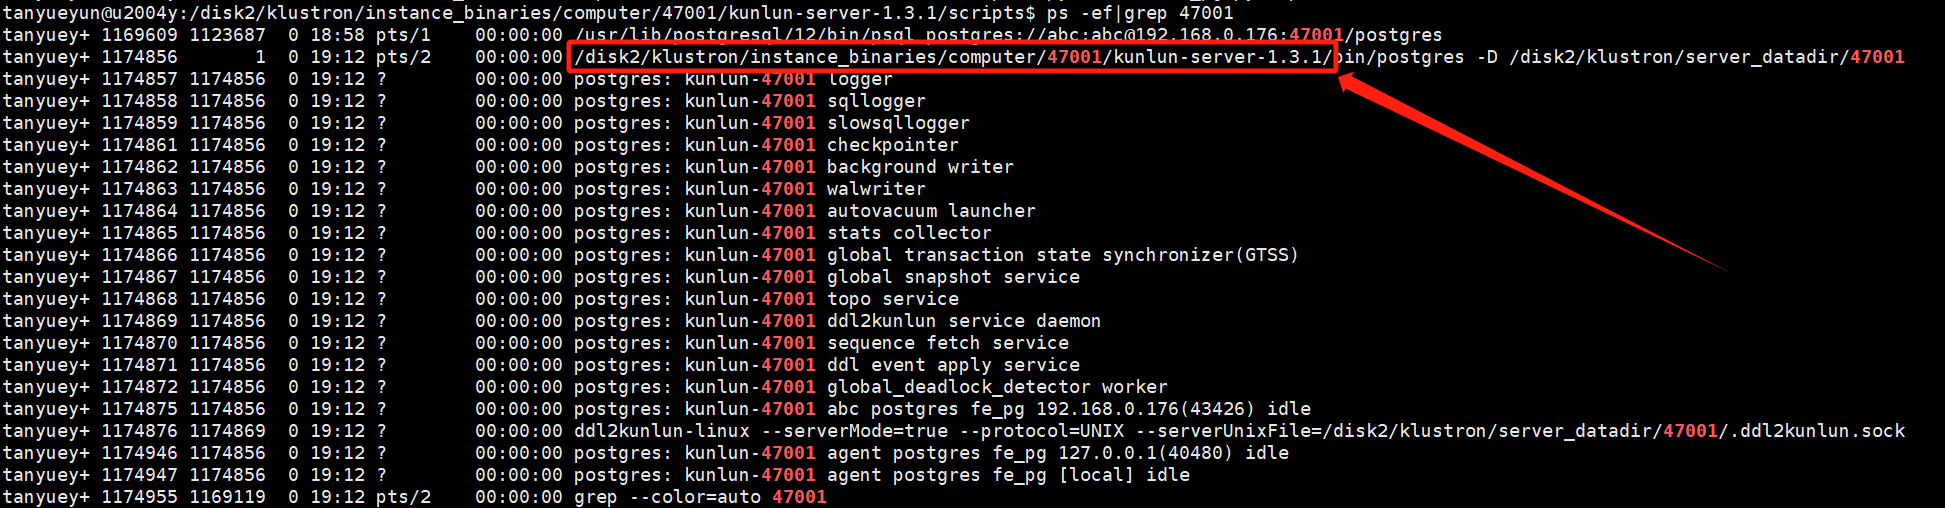
Navigate to the scripts directory at the same level as the bin directory in the compute node's installation directory:
cd /$install_dir/instance_binaries/computer/$port/kunlun-server-$version/scripts

# $install_dir refers to the compute node's installation directory
# $port refers to the compute node's port number
# $version refers to the compute node's version number, for example, 1.3.1
Example:
cd /disk2/klustron/instance_binaries/computer/47001/kunlun-server-1.3.1/scripts
To stop:
python2 stop_pg.py --port=$port
Example:
python2 stop_pg.py --port=47001
To start:
python2 start_pg.py --port=$port
Example:
python2 start_pg.py --port=47001
Example:

- Verifying the modification was successful
Log in to the compute node using the PostgreSQL protocol, then execute the following command:
show enable_global_mvcc ;
Example:

Note: Other compute nodes should follow the same modification steps!!!
07 Command Line Fallback Operations
Adding Compute Nodes
Adding shards
Adding backup nodes
Manual Redo of Backup Nodes
When XPanel is unavailable and there is an urgent need to recover and increase the high availability of backup nodes, manual methods can be used to redo backup nodes.
Below are the steps for redoing a backup node of the metadata cluster as an example.
Download the backup of the metadata cluster from HDFS to the local machine and copy it to the machine that needs to be redone.
Check:
hadoop fs -ls /kunlun/backup/xtrabackup/metacluster/metashard/

Place the full backup file downloaded from HDFS into a newly created directory:
Example:
mkdir -p /data/ha/backupfile/

# Here, /data/ha/backupfile/ is used as an example, directory name can be customized.
Important Note: The following operations should be adjusted based on the actual directories and port numbers! Variables are for illustration only, and should be adjusted according to the actual user environment!
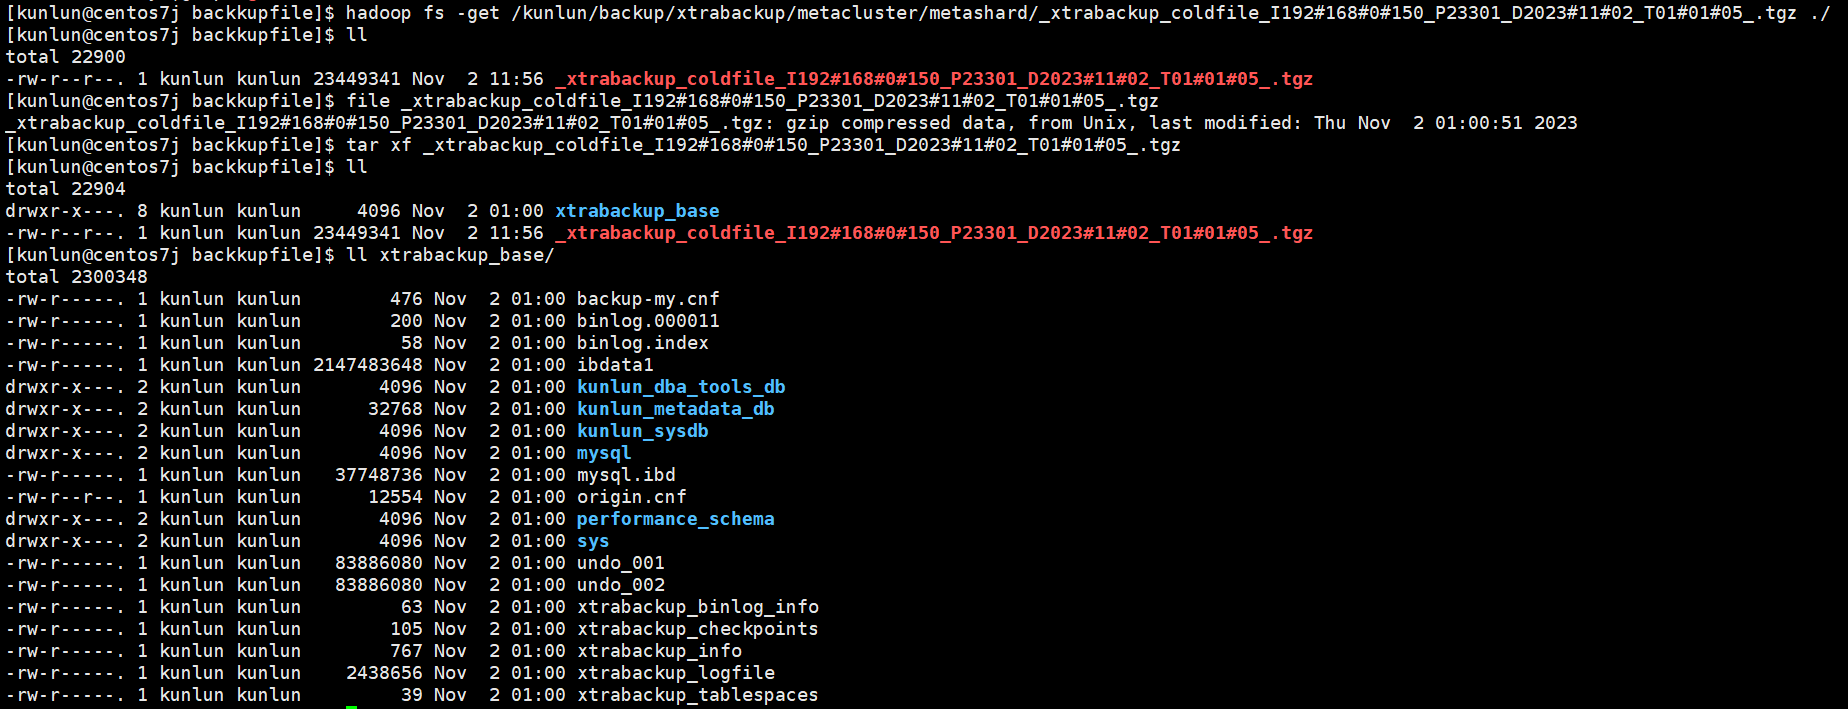
Download and unzip the full backup file (Note: The full backup file needs to be copied to the machine that is redoing the backup):
hadoop fs -get /kunlun/backup/xtrabackup/metacluster/metashard/**$coldfile**.tgz /data/ha/backupfile/

# **$coldfile** refers to the full backup file on HDFS, **actual file name will vary**.
Example:
hadoop fs -get /kunlun/backup/xtrabackup/metacluster/metashard/_xtrabackup_coldfile_I192#168#0#150_P23301_D2023#11#02_T01#01#05_.tgz /data/ha/backupfile/

tar xf $coldfile.tgz
Example:
tar xf _xtrabackup_coldfile_I192#168#0#150_P23301_D2023#11#02_T01#01#05_.tgz
Example:
After extraction, proceed with recovery, the steps are as follows:
- Apply redo logs to achieve data consistency.
cd /$install_dir/kunlun-node-manager-$version/bin/

# $install_dir refers to the node_mgr installation directory
# $version refers to the deployed version number, for example, 1.2.1
Example:
cd /data/ha/kunlun/kunlun-node-manager-1.2.1/bin/


./util/xtrabackup --prepare --apply-log-only --target-dir=**$fullbackup_base** >> /data/ha/log/rebuild_node_tool_37.log 2>&1

# $fullbackup_base refers to the directory where the full backup was unzipped
# /data/ha/log/rebuild_node_tool_37.log can be a custom log file
Example:
./util/xtrabackup --prepare --apply-log-only --target-dir=/data/ha/backupfile/xtrabackup_base >> ../log/rebuild_node_tool_37.log 2>&1
- Backup configuration files, which will be used in subsequent instance installations.
cp -a $install_dir/storage_datadir/$port/data/$port.cnf $install_dir/kunlun/storage_datadir/$port/

# $port refers to the storage node's port number
Example, for port 23301:
cp -a /data/ha/kunlun/storage_datadir/23301/data/23301.cnf /data/ha/kunlun/storage_datadir/23301/
- Stop the faulty mysqld process.
Note: node_mgr will initiate the mysqld process, so you need to be quick in deleting files to ensure you stop the mysqld process before deleting data and log files.
Example:
cd /data/ha/kunlun/instance_binaries/storage/23301/kunlun-storage-1.2.1/dba_tools; ./stopmysql.sh 23301
- Delete data and log files.
Note: Always adjust based on the actual installation directory and port number!
rm -rf $install_dir/storage_datadir/$port/data/*
rm -rf $install_dir/storage_datadir/$port/data/.*
rm -rf $install_dir/storage_waldir/$port/redolog/*
rm -rf $install_dir/storage_logdir/$port/relay/*
rm -rf $install_dir/storage_logdir/$port/binlog/*
Example:
rm -rf /data/ha/kunlun/storage_datadir/23301/data/*
rm -rf /data/ha/kunlun/storage_datadir/23301/data/.*
rm -rf /data/ha/kunlun/storage_waldir/23301/redolog/*
rm -rf /data/ha/kunlun/storage_logdir/23301/relay/*
rm -rf /data/ha/kunlun/storage_logdir/23301/binlog/*
- Copy the fully applied backup to the corresponding data directory.
cd $install_dir/kunlun-node-manager-$version/bin/
Example:
cd /data/ha/kunlun/kunlun-node-manager-1.2.1/bin/


./util/xtrabackup --defaults-file=$install_dir/storage_datadir/$port/$port.cnf --user=agent --pagent_pwd --copy-back --target-dir=$fullbackup_base >> ../log/rebuild_node_tool_37.log 2>&1
Example:
./util/xtrabackup --defaults-file=/data/ha/kunlun/storage_datadir/23301/23301.cnf --user=agent --pagent_pwd --copy-back --target-dir=/data/ha/kunlun/storage_datadir/23301/xtrabackup_tmp >> ../log/rebuild_node_tool_37.log 2>&1
- Delete all files in the full backup directory.
rm -rf $fullbackup_base/*
rm -rf $fullbackup_base/.rocksdb
Example:
rm -rf /data/ha/backupfile/xtrabackup_base/*
rm -rf /data/ha/backupfile/xtrabackup_base/.rocksdb
- Copy the configuration file to the corresponding data directory and start the instance.
cp -a $install_dir/storage_datadir/$port/$port.cnf $install_dir/storage_datadir/$port/data/
Example:
cp -a /data/ha/kunlun/storage_datadir/23301/23301.cnf /data/ha/kunlun/storage_datadir/23301/data/
Start MySQL Example:
cd $install_dir/instance_binaries/storage/$port/kunlun-storage-$version/dba_tools; ./startmysql.sh $port
Example:
cd /data/ha/kunlun/instance_binaries/storage/23301/kunlun-storage-1.2.1/dba_tools; ./startmysql.sh 23301
- Re-establish the primary-replica relationship based on the GTID from the xtrabackup_info file in the full backup.
Full backup information and GTID can be viewed in the xtrabackup_info file.
GTID Example:
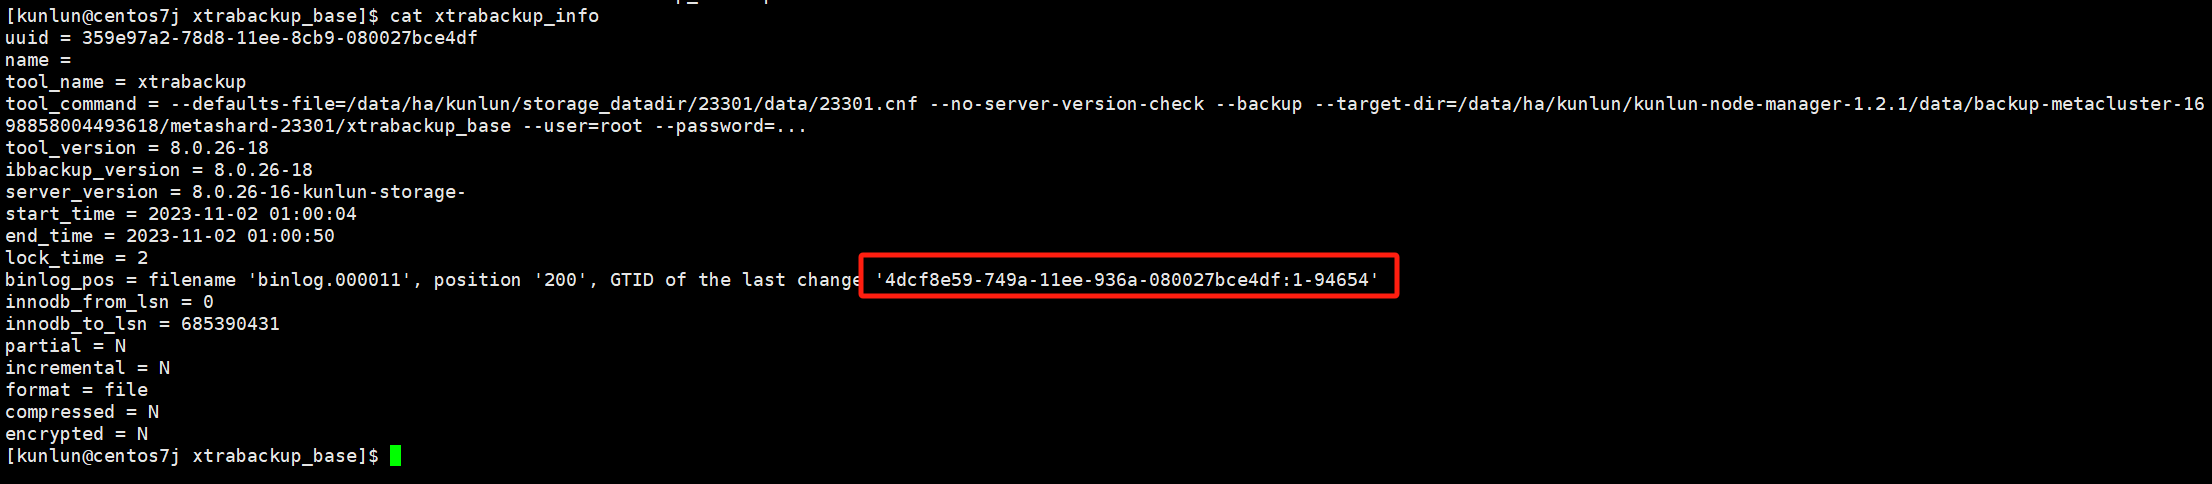
cd $fullbackup_base
cat xtrabackup_info

reset master; set global gtid_purged='$GTID'; stop slave; reset slave all; change master to  MASTER_AUTO_POSITION = 1,  MASTER_HOST='$master_host' , MASTER_PORT=$master_port, MASTER_USER='repl' , MASTER_PASSWORD='repl_pwd',MASTER_CONNECT_RETRY=1 ,MASTER_RETRY_COUNT=1000, MASTER_DELAY=0, MASTER_HEARTBEAT_PERIOD=10 for CHANNEL 'kunlun_repl'; start slave for CHANNEL 'kunlun_repl';

# $GTID is recorded in the full backup directory xtrabackup_info file
# $master_host is the IP of the current cluster's master node
# $master_port is the port number of the current cluster's master node
Example:
reset master; set global gtid_purged='4dcf8e59-749a-11ee-936a-080027bce4df:1-82129'; stop slave; reset slave all; change master to MASTER_AUTO_POSITION = 1, MASTER_HOST='192.168.0.150' , MASTER_PORT=23301, MASTER_USER='repl' , MASTER_PASSWORD='repl_pwd',MASTER_CONNECT_RETRY=1 ,MASTER_RETRY_COUNT=1000, MASTER_DELAY=0, MASTER_HEARTBEAT_PERIOD=10 for CHANNEL 'kunlun_repl'; start slave for CHANNEL 'kunlun_repl';
- Verify the primary-replica relationship is normal.
ps -ef|grep $port
Example:
ps -ef|grep 23301
Log into the newly redone backup node to check the primary-replica relationship:
cd $install_dir/instance_binaries/storage/$port/kunlun-storage-$version/dba_tools/
Example:
cd /data/ha/kunlun/instance_binaries/storage/23301/kunlun-storage-1.2.1/dba_tools/

./imysql.sh $port
Example:
./imysql.sh 23301

show slave status\G
Example:
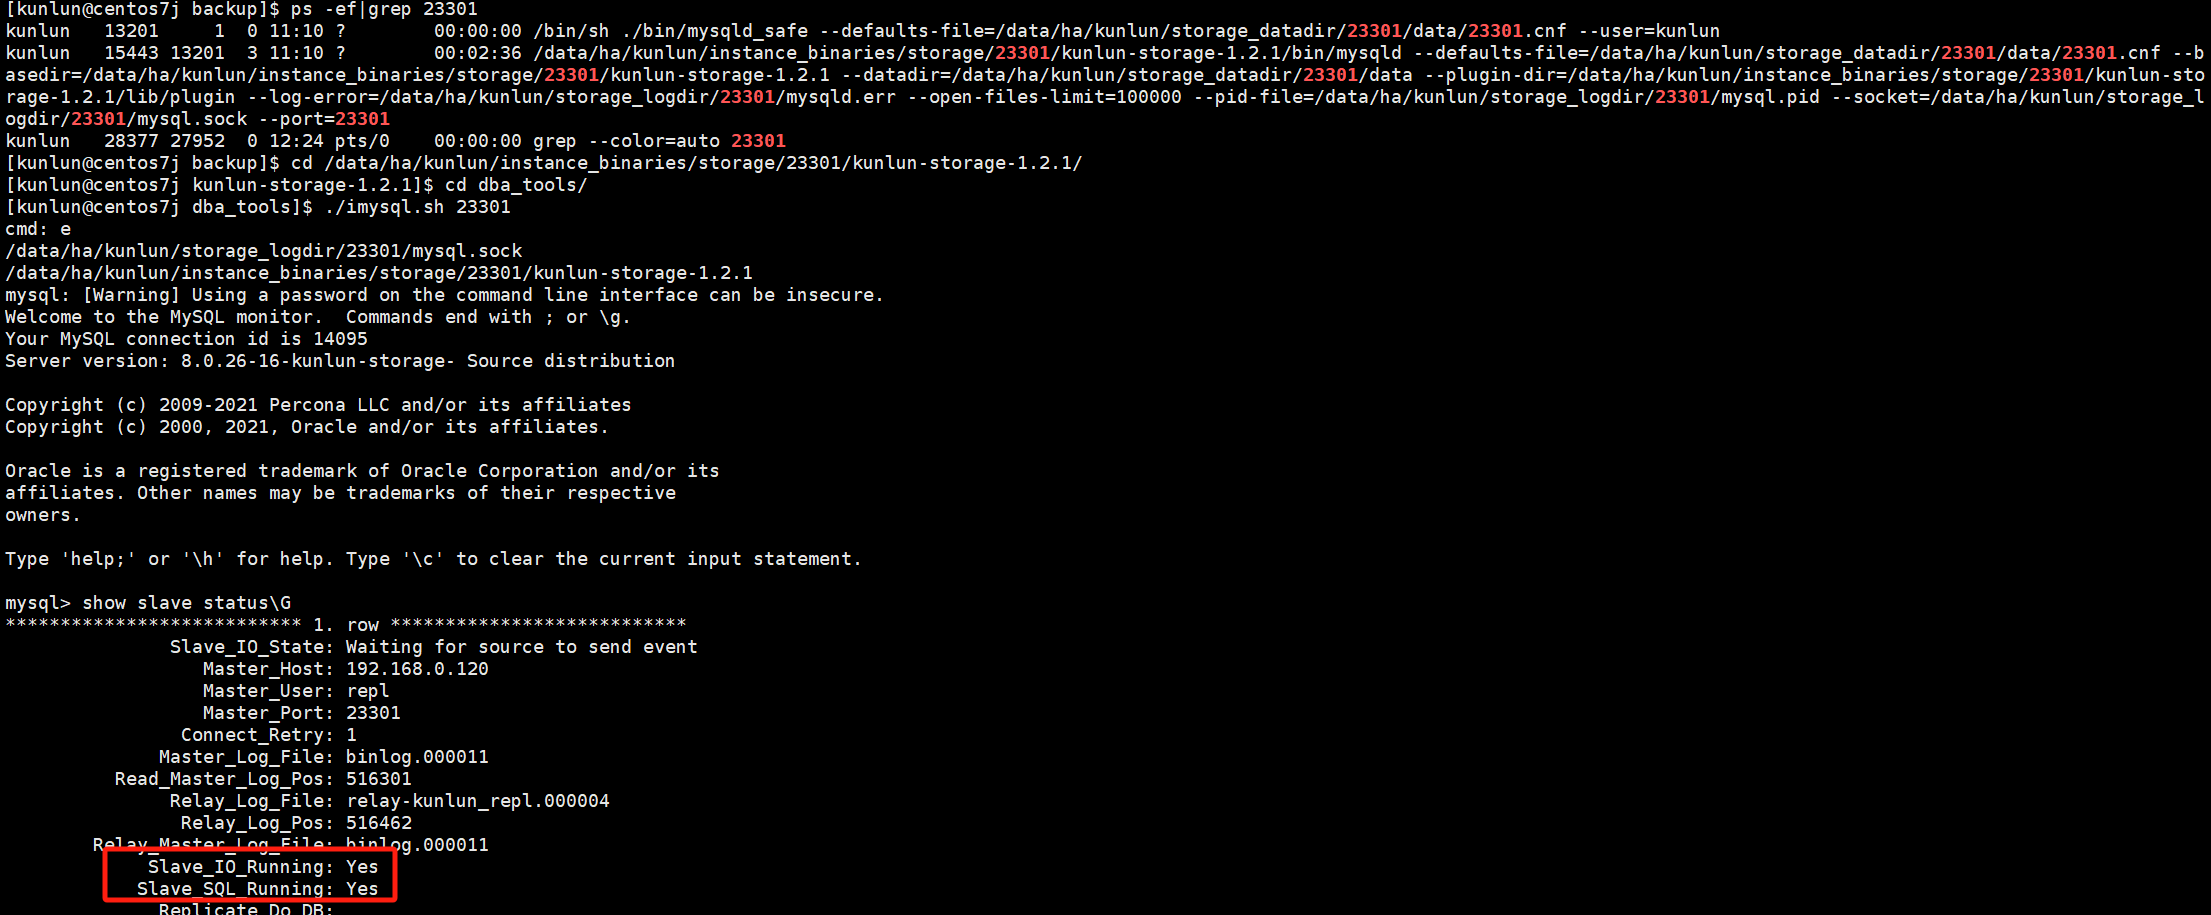
After redoing the backup node, the primary-replica relationship is normal.
08 Access Control for Compute Nodes
Access control for each compute node is managed by modifying the pg_hba.conf file.
Steps for each compute node:
- Modify pg_hba.conf:
Locate the file directory:
ps -ef|grep $port # $port refers to the port number of the compute node
Example:
ps -ef|grep 23001
Example:
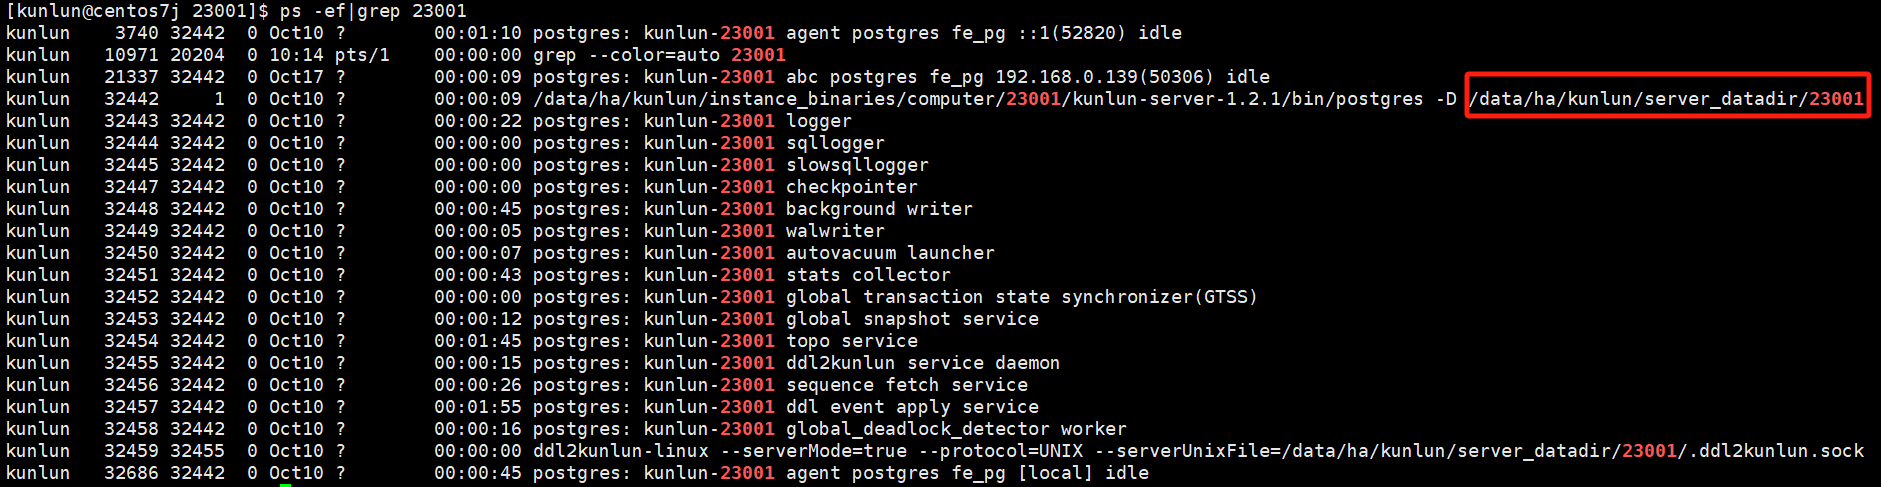
cd /$install_dir/server_datadir/$port
# $install_dir refers to the installation directory of the compute node
# $port refers to the port number of the compute node
Example:
cd /data/ha/kunlun/server_datadir/23001
Example:
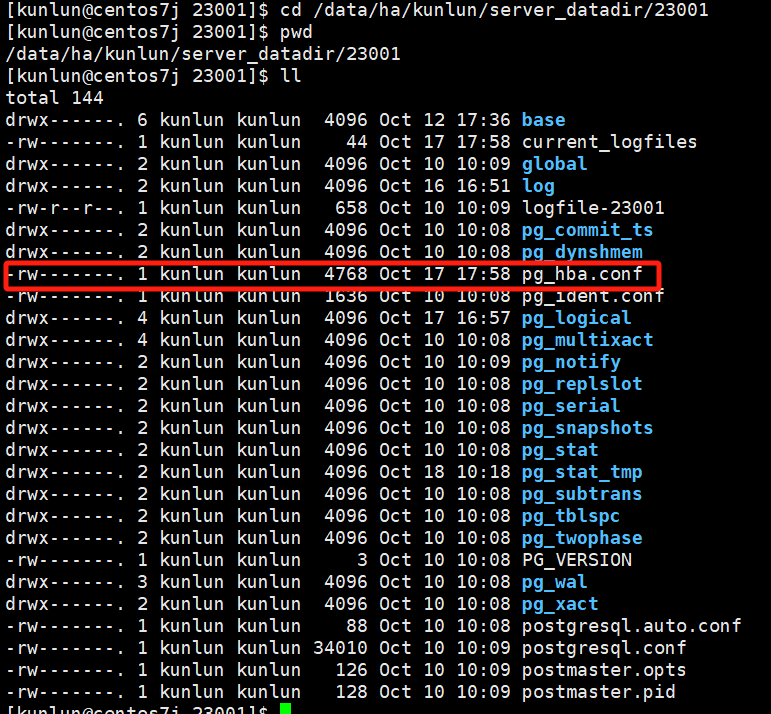
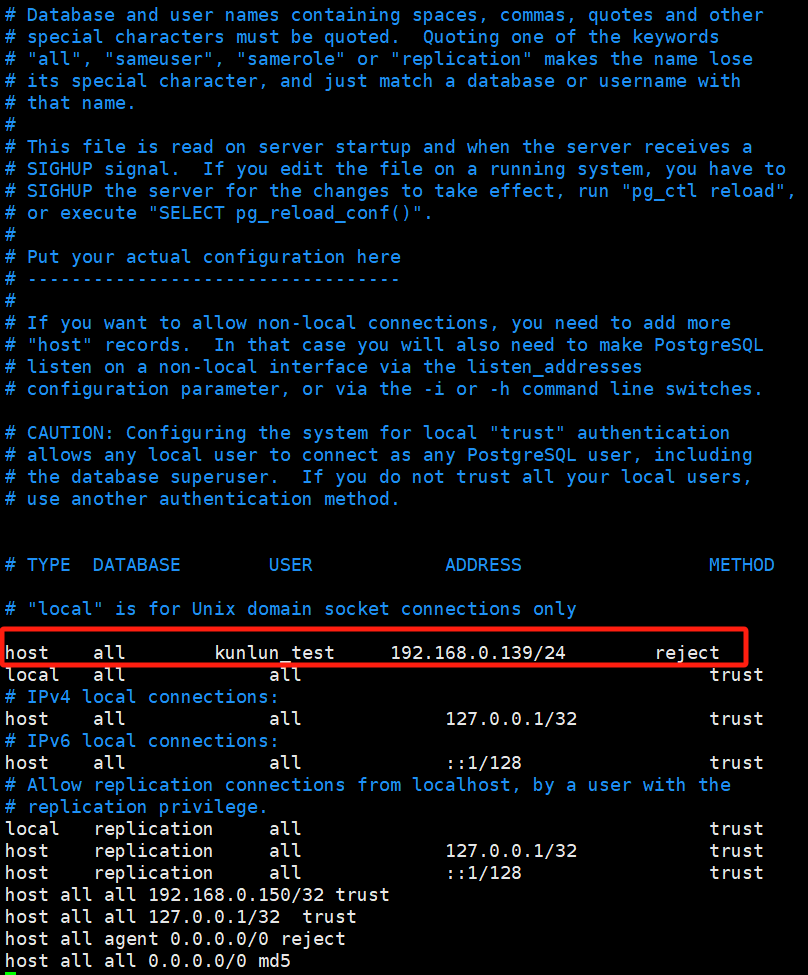
Add the following content at the first line of the configuration file:
host all kunlun_test 192.168.0.139/24 reject
This entry specifically denies all TCP/IP connection requests from the kunlun_test user originating from 192.168.0.139. Adding this at the first line is important because earlier configurations will override later ones. If there is a broader permission set earlier, subsequent denials will not be effective. For a detailed explanation of pg_hba.conf file parameters, see the PostgreSQL official link:
https://www.postgresql.org/docs/current/auth-pg-hba-conf.html
Example:
- Activate the configuration:
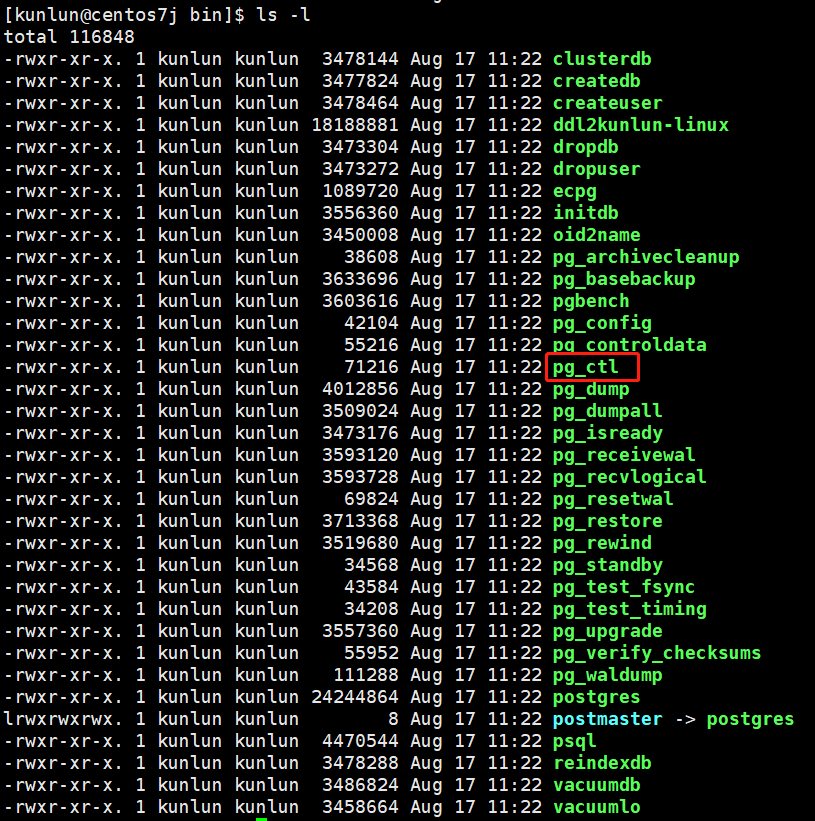
Check the kunlun-server process to confirm the directory where pg_ctl is located.
For port number 23001 of kunlun-server:
ps -ef|grep 23001
Example

cd /data/ha/kunlun/instance_binaries/computer/23001/kunlun-server-1.2.1/bin
cd /data/ha/kunlun/instance_binaries/computer/23001/kunlun-server-1.2.1/bin

ls -l
Example
Execute reload:
./pg_ctl -D /data/ha/kunlun/server_datadir/23001 reload
Example

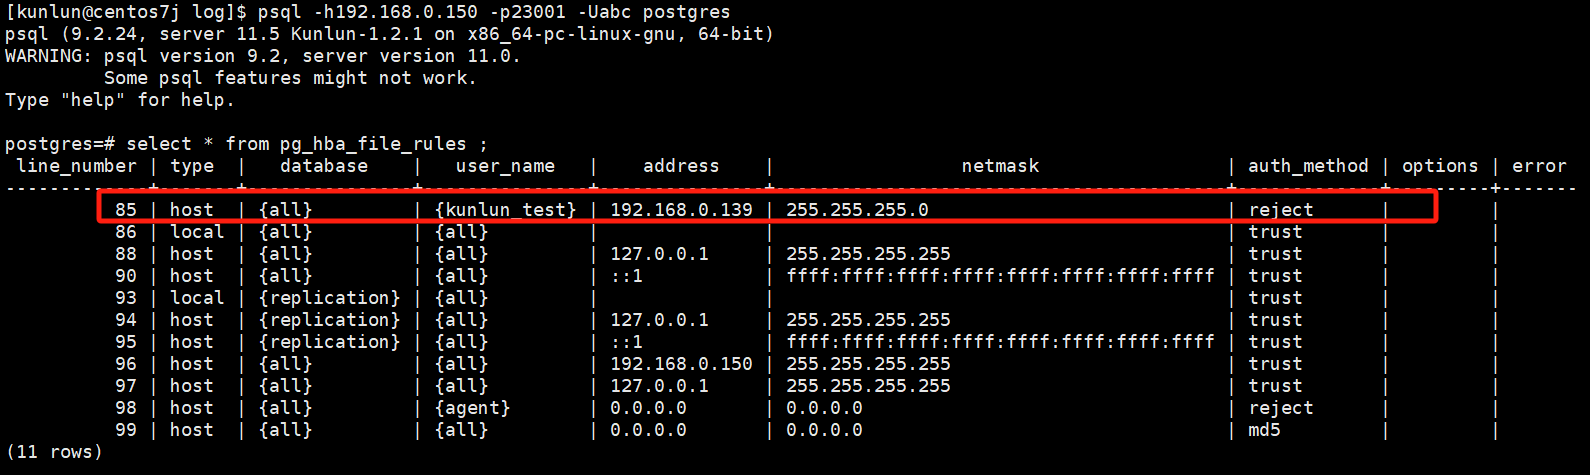
Verify activation:
Log into the compute node:
psql -h192.168.0.150 -p23001 -Uabc postgres
Execute SQL:
select * from pg_hba_file_rules ;
- Login verification:
Attempt to log in from the machine at 192.168.0.139:

Login fails, and the error message indicates that the pg_hba.conf configuration file has denied the connection.
09 Manual Configuration of cgroup for CPU Hard Isolation
cgroup for CPU hard isolation is automatically executed when creating clusters and does not require manual setup. This section is merely a guideline for troubleshooting or other needs when setting up cgroup.
- Storage Node
Execute the command:
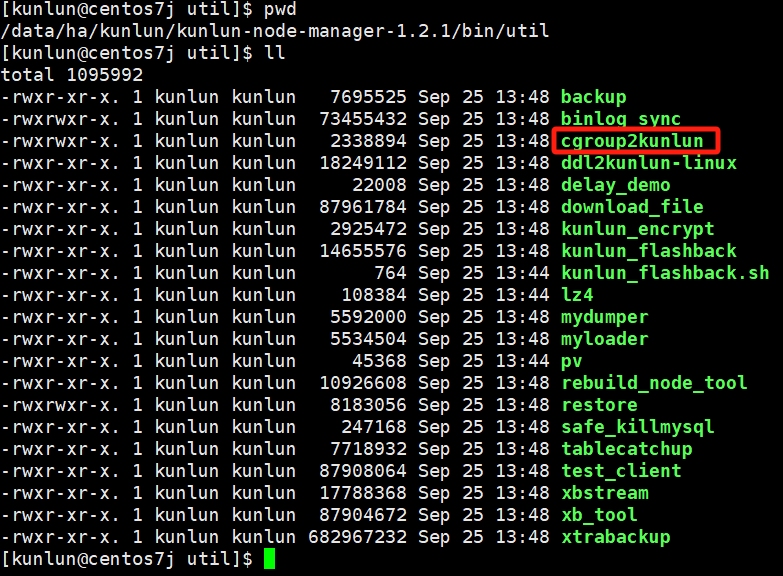
Navigate to the kunlun2cgroup tool directory, located under the node_mgr's bin/util directory:
cd $base_dir/kunlun-node-manager-1.2.1/bin/util

# $base_dir refers to the base installation directory, visible in the deployment topology file .json.
Example:
cd /data/ha/kunlun/kunlun-node-manager-1.2.1/bin/util
Example:
cgroup2kunlun tool parameter explanation:
Usage of ./cgroup2kunlun:
  -action string
    	'add' or 'delete' cgroup related to the port
  -control_mode string
    	resource control type, share or quota (default "quota")
  -cpu_nums int
    	cpu resources reserving account, 1 means one cpu cores (default 1)
  -pidFile string
    	instance pid file path
  -port string
    	instance port
  -resource_type string
    	resource controller type (default "cpu")
Add cgroup command, Example:
./cgroup2kunlun -resource_type=cpu -port=33503 -cpu_nums=8 -control_mode=quota -pidFile=/data/ha/kunlun/storage_logdir/33503/mysql.pid -action=add
resource_type: Defines the resource control type, defaulting to cpu.
port: Identifies the port number of the storage node.
cpu_nums: Sets the number of virtual CPU cores allocated to the storage node. The default is 1 core.
control_mode parameter: Resource allocation mode, defaulting to exclusive limit.
pidFile: Absolute path to the node's mysql.pid file.
action: Specifies whether to "add" or "delete" the cgroup configuration.
Example:
Add a limit of 8 vCPUs for storage node on port 33503:
./cgroup2kunlun -resource_type=cpu -port=33503 -cpu_nums=8 -control_mode=quota -pidFile=/data/ha/kunlun/storage_logdir/33503/mysql.pid -action=add
Delete cgroup configuration:
./cgroup2kunlun -resource_type=cpu -port=33503 -cpu_nums=8 -control_mode=quota -pidFile=/data/ha/kunlun/storage_logdir/33503/mysql.pid -action=delete
- Compute Node
Example:
Add a limit of 8 vCPUs for compute node on port 23001:
./util/cgroup2kunlun -resource_type=cpu -port=23001 -cpu_nums=8 -control_mode=quota -pidFile=/data/ha/kunlun/server_datadir/23001/postmaster.pid -action=add
Delete cgroup configuration:
./util/cgroup2kunlun -resource_type=cpu -port=23001 -cpu_nums=8 -control_mode=quota -pidFile=/data/ha/kunlun/server_datadir/23001/postmaster.pid -action=delete
10 Extension Management
Managing Extensions
- Adding Extensions to Compute Nodes (Note: When there is only one compute node in the cluster!)
Example: Adding the uuid-ossp extension.
Install dependencies:
sudo yum install -y e2fsprogs-devel uuid-devel libuuid-devel zlib-devel zlib-static
Download and compile the source code for PostgreSQL version 11.2:
wget https://ftp.postgresql.org/pub/source/v11.20/postgresql-11.20.tar.gz
Tip: If the wget command is slow, you can try downloading it on a PC and then uploading it to the server.
Unzip and compile:
Tar xf postgresql-11.20.tar.gz
cd postgresql-11.20
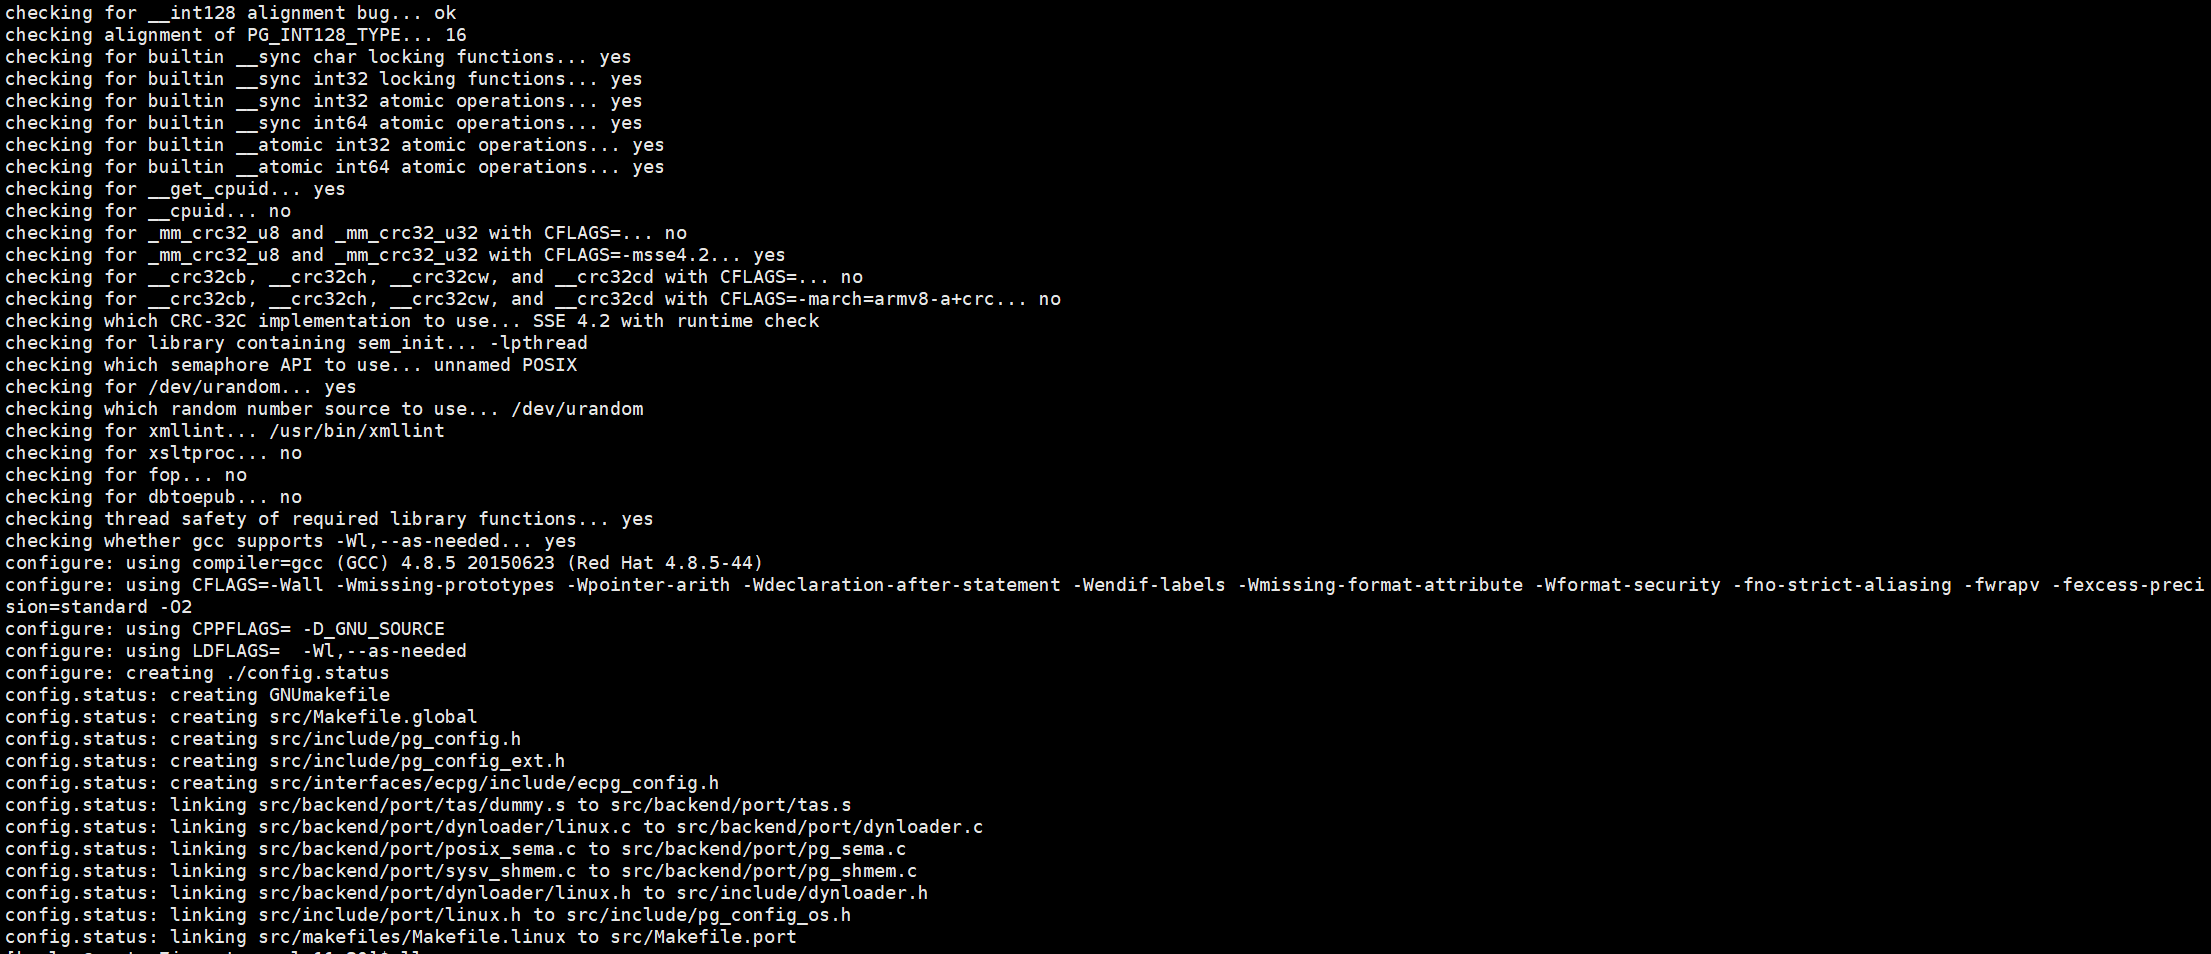
./configure --prefix=/opt/pgsql11.2 --with-uuid=ossp
After execution, the result is as follows, without errors (see figure):
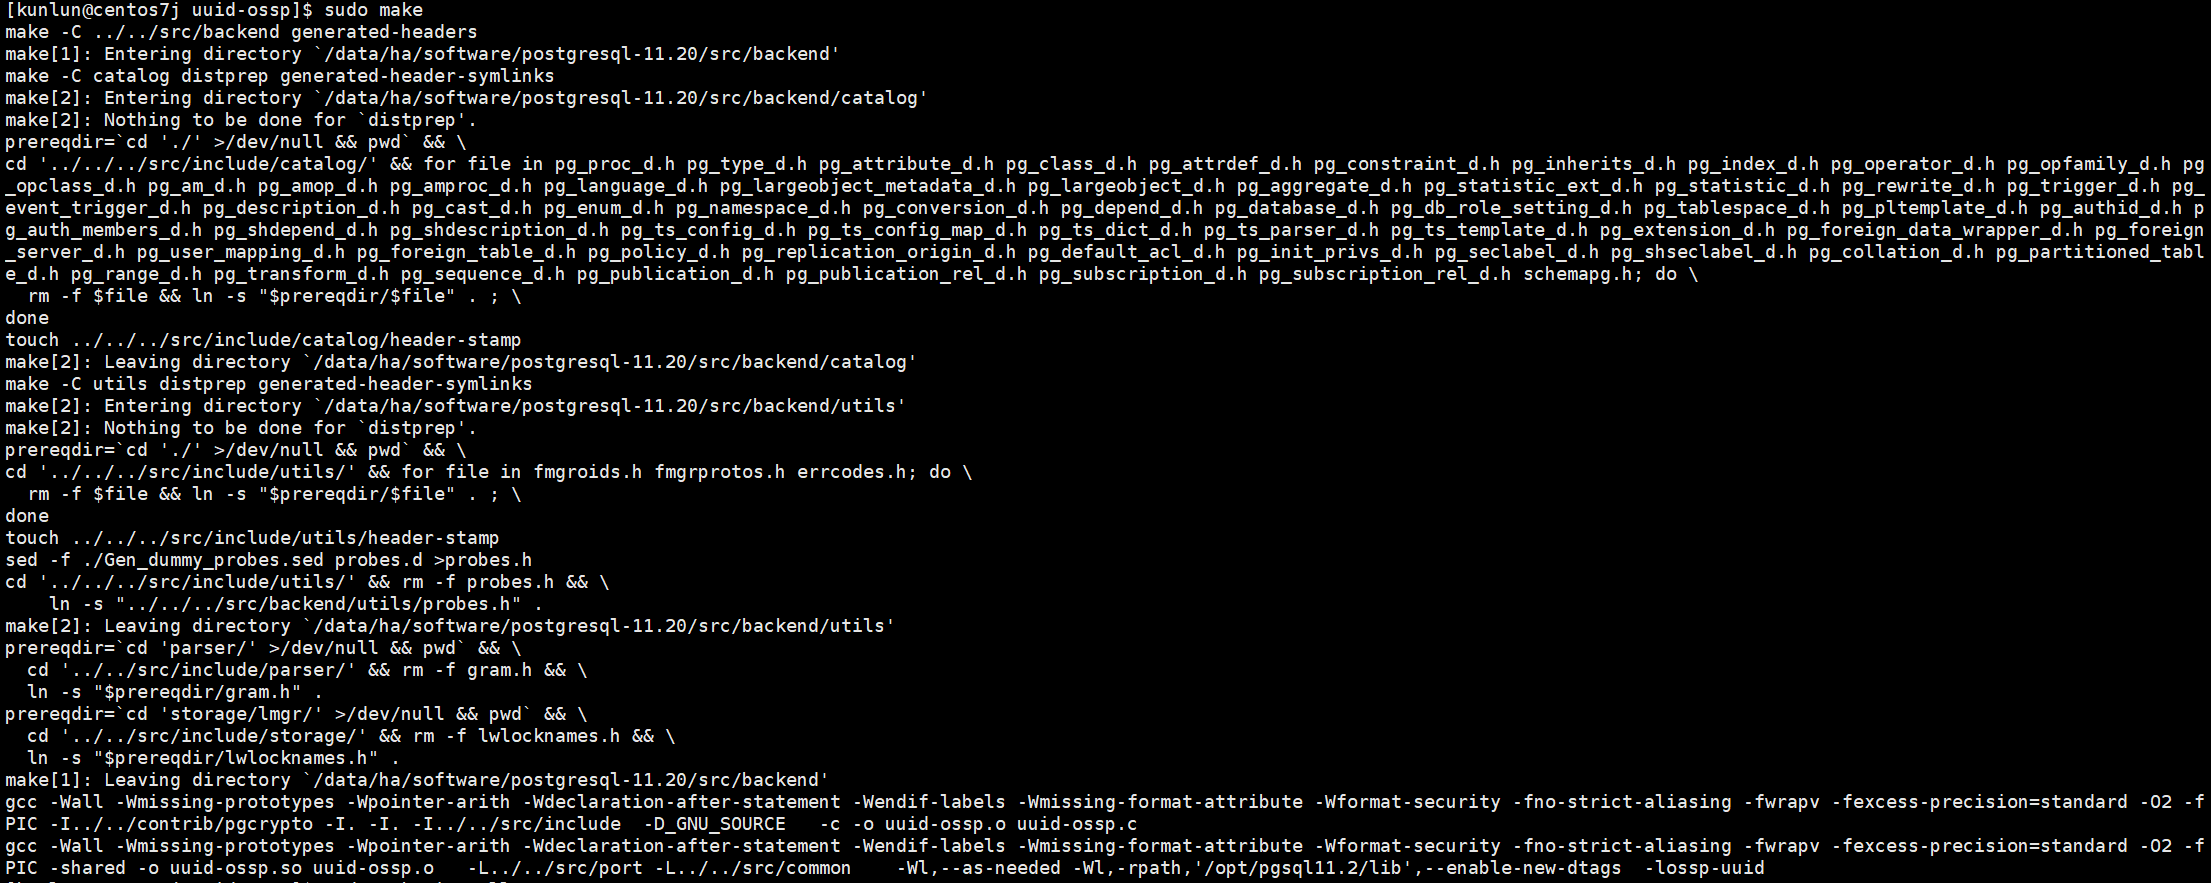
sudo make
Command execution example:
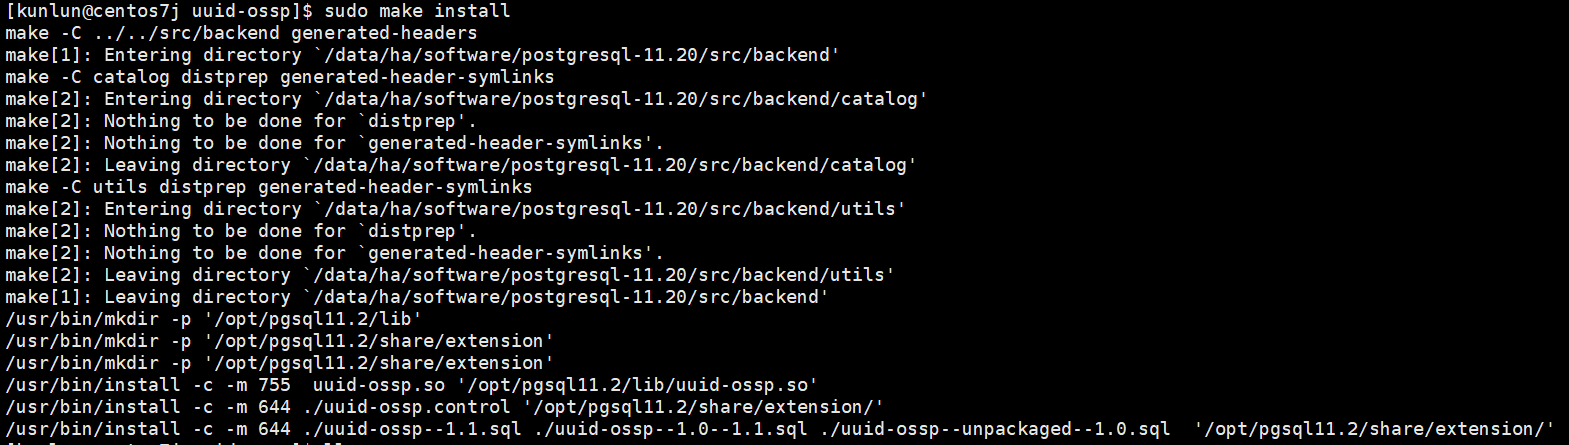
sudo make install
Command execution example:
Copy the compiled extension related files to the corresponding directory:
cd postgresql-11.20 && sudo chown kunlun:kunlun -R *
cd postgresql-11.20/contrib/uuid-ossp/
cp -a uuid-ossp.so /data/ha/kunlun/instance_binaries/computer/23001/kunlun-server-1.2.1/lib/postgresql/

cp -a uuid-ossp--1.0--1.1.sql uuid-ossp--1.1.sql uuid-ossp--unpackaged--1.0.sql uuid-ossp.control /data/ha/kunlun/instance_binaries/computer/23001/kunlun-server-1.2.1/share/postgresql/extension/
Directory introduction:
/data/ha/kunlun is the installation base directory, which can be viewed in the deployment topology file .json.
23001 is the compute node port number, which will vary depending on the actual configuration.
kunlun-server-1.2.1 is the directory where the compute node is installed, usually defined by the kunlun-server version number.
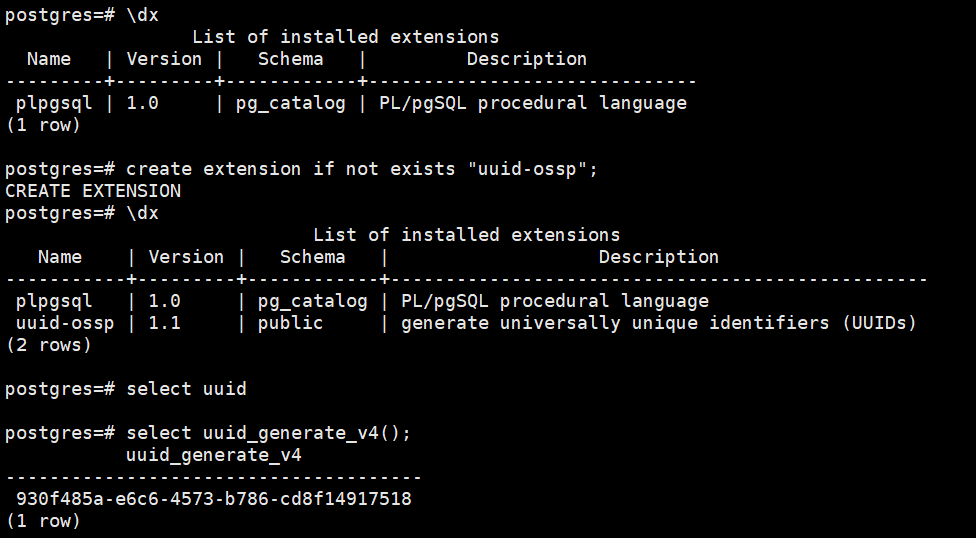
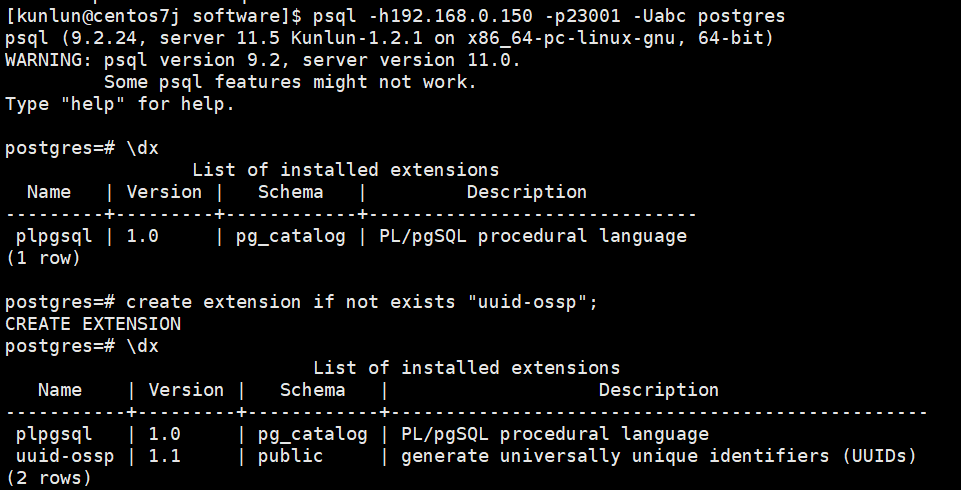
Log into the compute node and create the uuid-ossp extension:
First, check the existing extensions:
\dx

create extension if not exists "uuid-ossp";

\dx

select uuid_generate_v4();
As shown in the figure:
- Add the extension to compute nodes (Note: When there are multiple compute nodes in the cluster!!!)
Add extensions to other compute nodes within the same cluster, you will need to install necessary dependencies:
sudo yum install -y e2fsprogs-devel uuid-devel libuuid-devel zlib-devel zlib-static
Skip the compilation steps and follow the steps for a single compute node.
Then, copy the compiled extension files to the corresponding directories on all compute nodes.
For example, for the uuid-ossp extension, just copy the compiled uuid-ossp.so file to the /data/ha/kunlun/instance_binaries/computer/23001/kunlun-server-1.2.1/lib/postgresql/ directory; copy the files uuid-ossp--1.0--1.1.sql, uuid-ossp--1.1.sql, uuid-ossp--unpackaged--1.0.sql, and uuid-ossp.control to /data/ha/kunlun/instance_binaries/computer/23001/kunlun-server-1.2.1/share/postgresql/extension/.
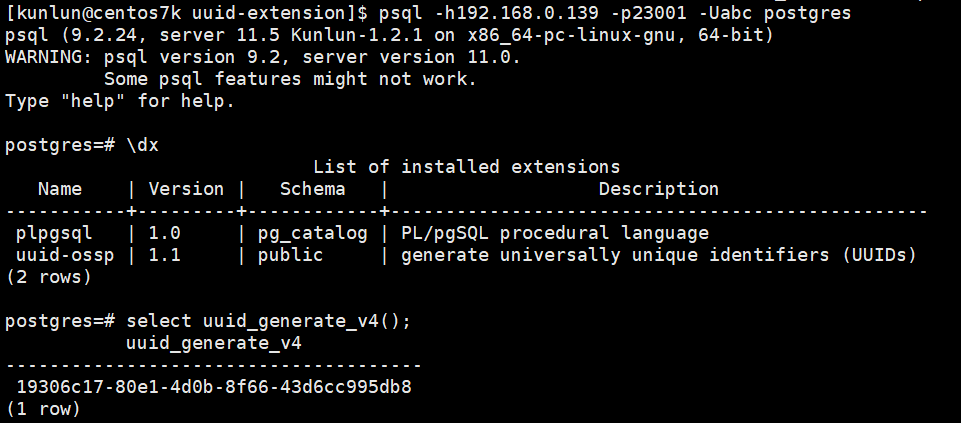
Finally, operate on a compute node to load the extension, and other compute nodes will be able to see the corresponding extension.
Log into the compute node and create the uuid-ossp extension:
First, check the existing extensions:
\dx

create extension if not exists "uuid-ossp";

\dx

select uuid_generate_v4();
As shown in the figure:
Compute Node 1:
Compute Node 2:
- Add the extension files to a common directory
To avoid repetitive operations of adding extensions when adding new compute nodes or creating new clusters, first install dependencies on the planned new compute node machines:
sudo yum install -y e2fsprogs-devel uuid-devel libuuid-devel zlib-devel zlib-static
Then copy the extension files to the corresponding common directory:
cd postgresql-11.20/contrib/uuid-ossp/
cp -a uuid-ossp.so $base_dir/program_binaries/kunlun-server-1.2.1/lib/postgresql/

cp -a uuid-ossp--1.0--1.1.sql uuid-ossp--1.1.sql uuid-ossp--unpackaged--1.0.sql uuid-ossp.control $base_dir/program_binaries/kunlun-server-1.2.1/share/postgresql/extension/
XPanel can initiate adding new machine nodes or creating clusters to see the extension.
Postgres_fdw Extension Usage
The postgres_fdw extension is provided by PostgreSQL, no need to manually download and install, just load the extension directly. For an introduction and operation example of postgres_fdw, refer to the official website link: http://postgres.cn/docs/11/postgres-fdw.html, to understand before proceeding.
Environment introduction:
- External server and related information:
- host: 192.168.0.150
- port: 23007
- user: abc
- password: omitted
- db_name: klustron
- schema_name: public
- table_name: k1
Internal mapping related information:
- server: foreign_server
- User mapping: abc
- Mapping table: foreign_table1
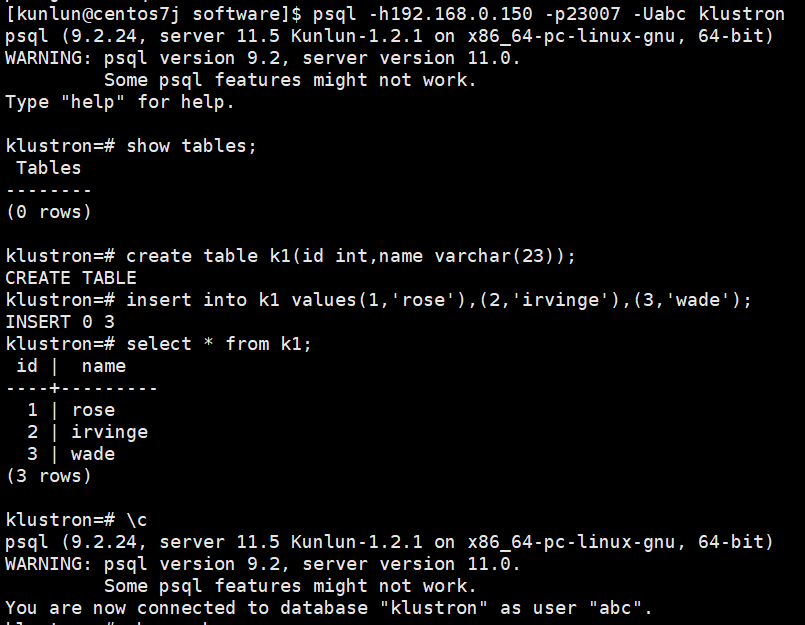
Actual operation steps:
- External table k1 information:
- Internal mapping and related configuration operations:
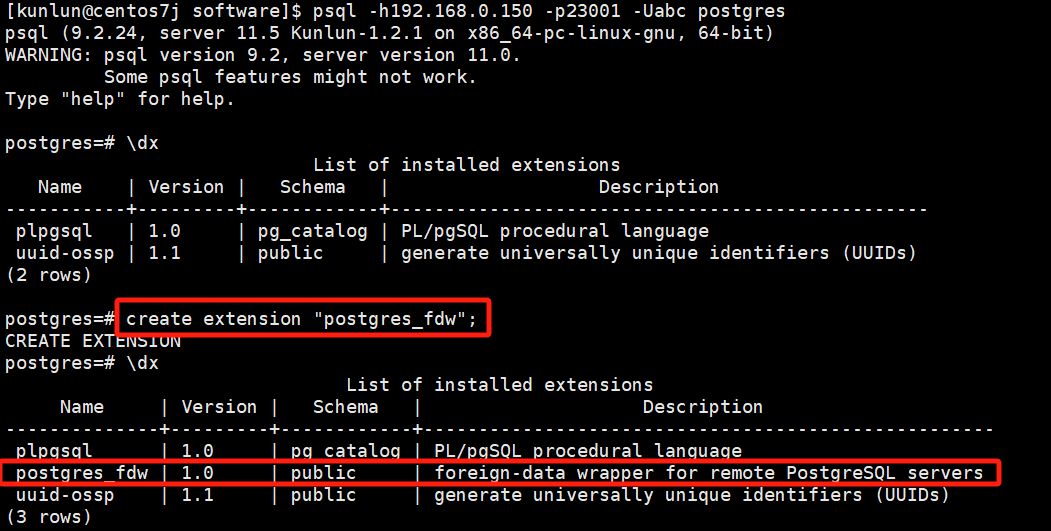
- Create extension:
\dx

create extension "postgres_fdw";

\dx
Example:
- Create server, create mapping, create foreign table:
create server foreign_server foreign data wrapper postgres_fdw options(host '192.168.0.150',port '23007',dbname 'klustron');

create user mapping for user server foreign_server options(user 'abc', password 'abc');

create foreign table foreign_table1(id int,name varchar(23)) server foreign_server options(schema_name 'public',table_name 'k1');
Example:


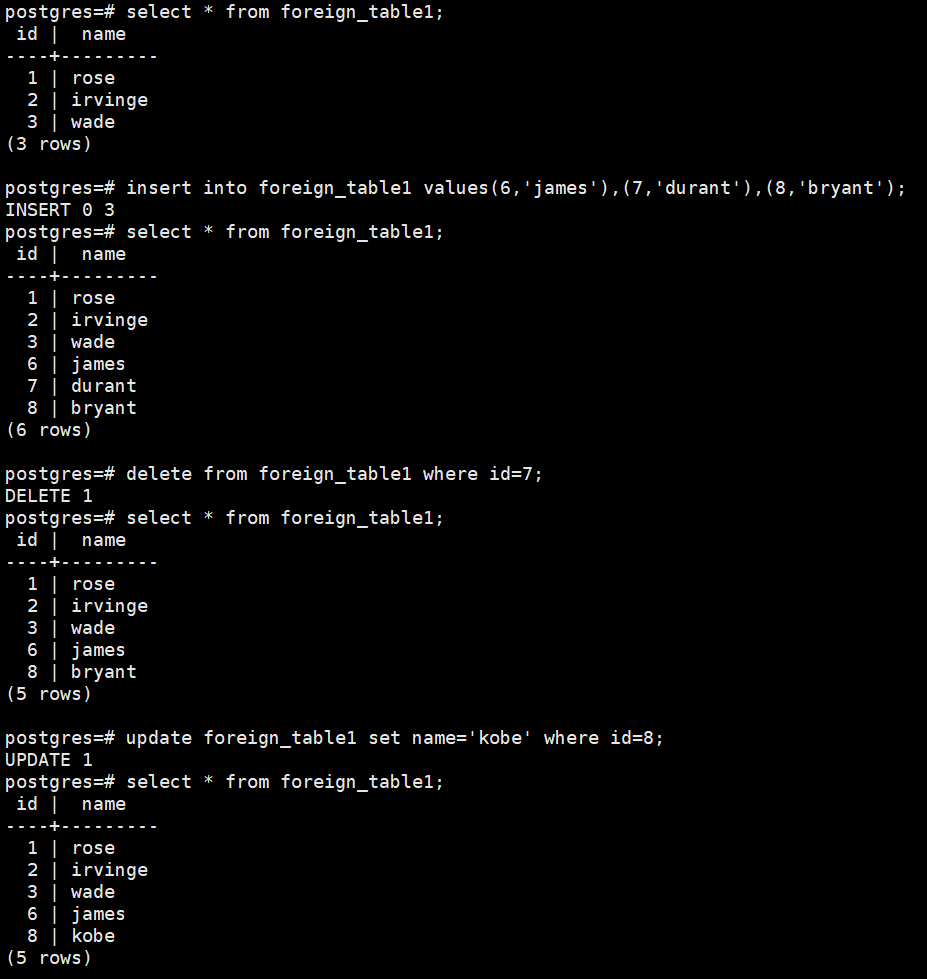
- Verify and operate the external table:
select * from foreign_table1;
insert into foreign_table1 values(6,'james'),(7,'durant'),(8,'bryant');
select * from foreign_table1;
delete from foreign_table1 where id=7;
select * from foreign_table1;
update foreign_table1 set name='kobe' where id=8;
select * from foreign_table1;
Example:
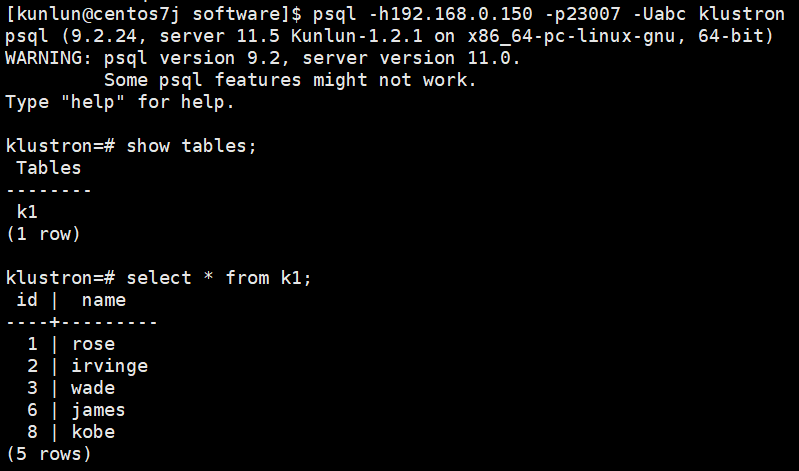
External table login verification:
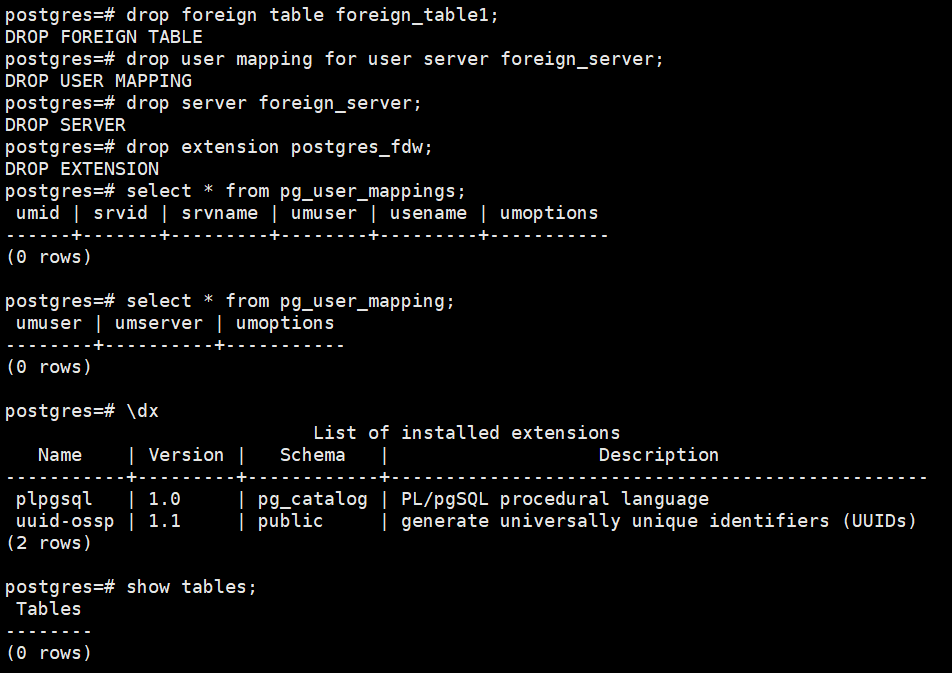
Environment cleanup:
drop foreign table foreign_table1;
drop user mapping for user server foreign_server;
drop server foreign_server;
drop extension postgres_fdw;
select * from pg_user_mappings;
select * from pg_user_mapping;
\dx
show tables;
Example:
11 SSL Authentication
Enabling SSL Unidirectionally
Environment preparation:
yum install -y openssl-devel openssl perl-ExtUtils*
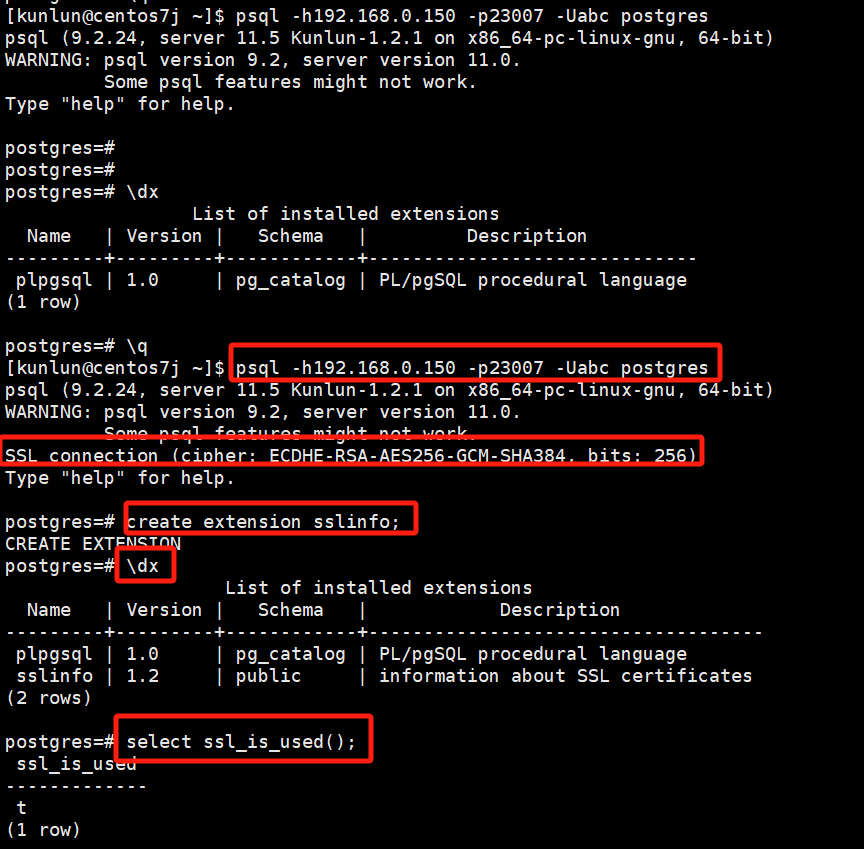
Before SSL is enabled, logging into the compute node shows no SSL information:

After enabling SSL, logging into the compute node shows SSL information:
Steps to enable SSL are as follows:
- Generate certificate and private key files
mkdir openssl
cd openssl/
openssl req -new -x509 -days 365 -nodes -text -out server.crt -keyout server.key -subj "/CN=centos7j"

# /CN= should follow the hostname, which can be determined using the hostname command
Modify the permissions of the server.key file:
chmod 600 server.key
Copy to the appropriate directory, here using port number 23007 of the compute node as an example:
cp -a server.* /data/ha/kunlun/server_datadir/23007/ # The specific directory depends on the actual setup, you can execute ps -ef|grep $port where $port represents the compute node port number.
- Modify the configuration file
vim postgresql.conf
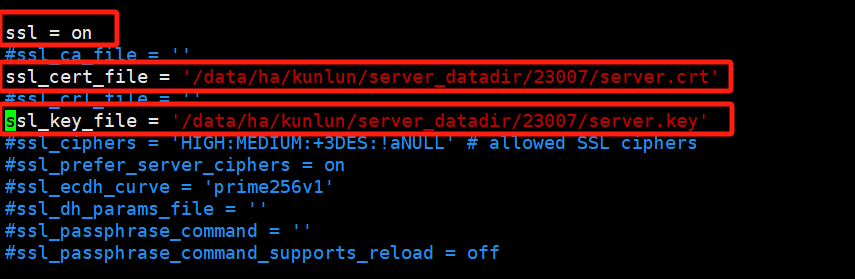
Fill in the absolute paths for ssl_cert_file and ssl_key_file, and enable SSL.
- Restart the compute node
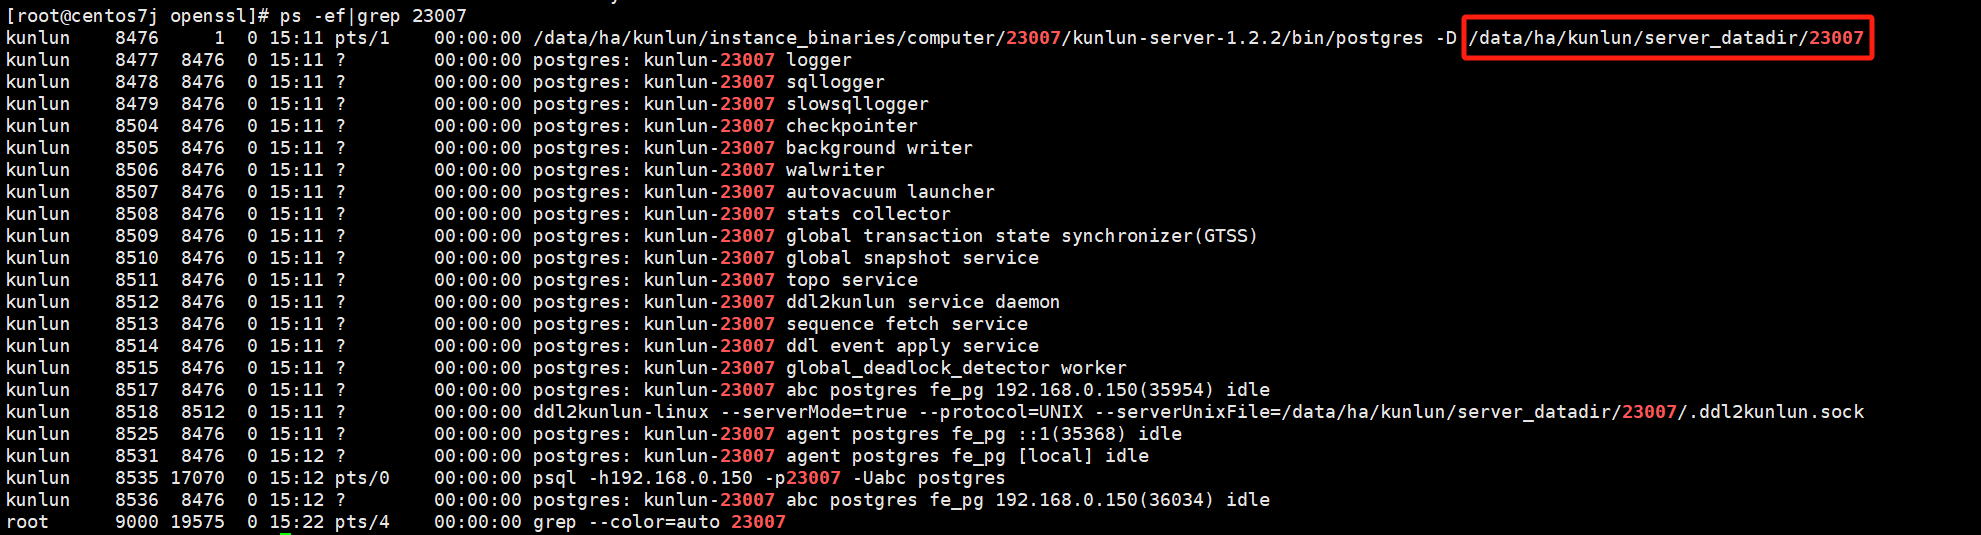
Check the compute node process:
ps -ef|grep $port # $port refers to the port number of the compute node
Example:
ps -ef|grep 23007
Navigate to the scripts directory at the same level as the bin directory in the compute node's installation directory:
cd /$install_dir/instance_binaries/computer/$port/kunlun-server-$version/scripts

# $install_dir refers to the compute node's installation directory
# $port refers to the port number of the compute node
# $version refers to the compute node's version number, e.g., 1.2.2
Example:
cd /data/ha/kunlun/instance_binaries/computer/23007/kunlun-server-1.2.2/scripts
To start:
python2 start_pg.py --port=$port
Example:
python2 start_pg.py --port=23007
To stop:
python2 stop_pg.py --port=$port
Example:
python2 stop_pg.py --port=23007
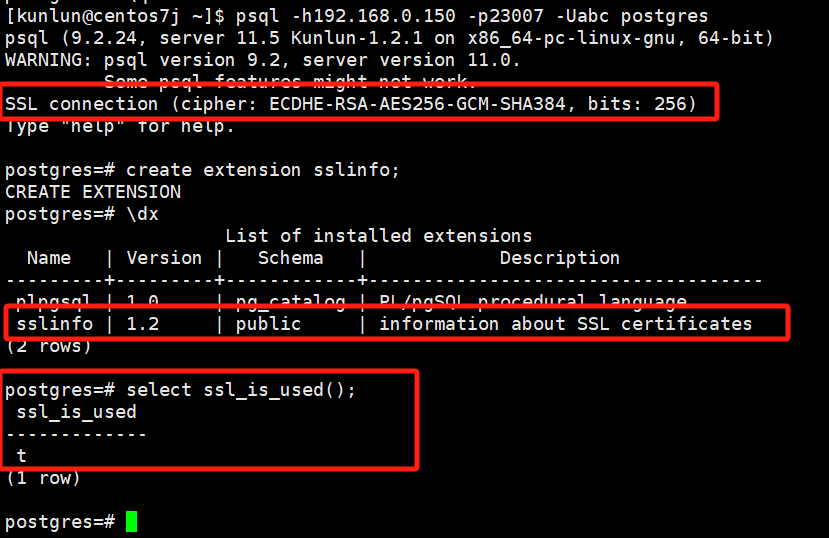
Log into the compute node, create the sslinfo extension, and verify:
psql -h192.168.0.150 -p23007 -Uabc postgres

create extension sslinfo;

\dx

select ssl_is_used();
12 Separation of Hot and Cold Data
Separation of hot and cold data refers to moving tables that are seldom read or accessed, such as archive tables and log tables, to shards with lower configurations and storing them using the RocksDB engine. The benefit of this approach is to free up more usable data space for hot data storage, thereby speeding up the query rate of hot data.
Steps are as follows:
Using the test1 table as an example, insert 10,000 test records,
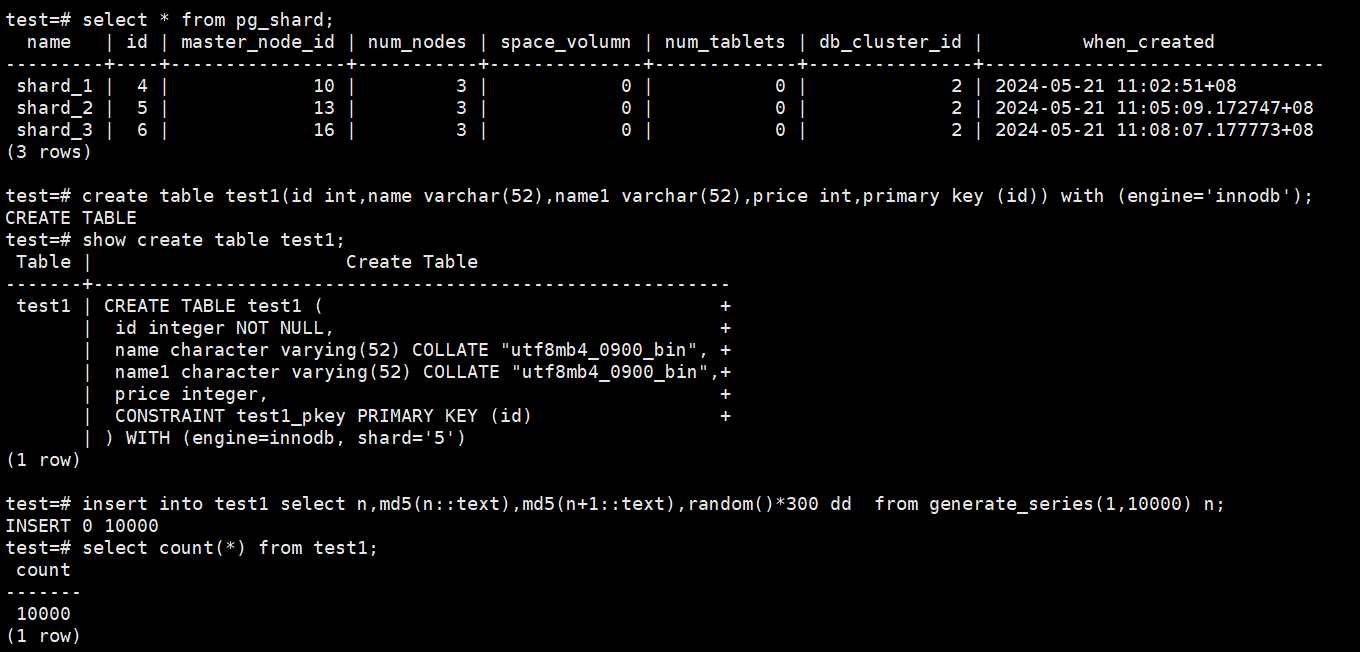
First, check the current shard distribution of the cluster, then create the test table test1 and insert data:
# select * from pg_shard;
# create table test1(id int,name varchar(52),name1 varchar(52),price int,primary key (id)) with (engine='innodb');
# show create table test1;
# insert into test1 select n,md5(n::text),md5(n+1::text),random()*300 dd  from generate_series(1,10000) n;
# select count(*) from test1;
Example:
Set shard_6 as a lower configuration cold shard.
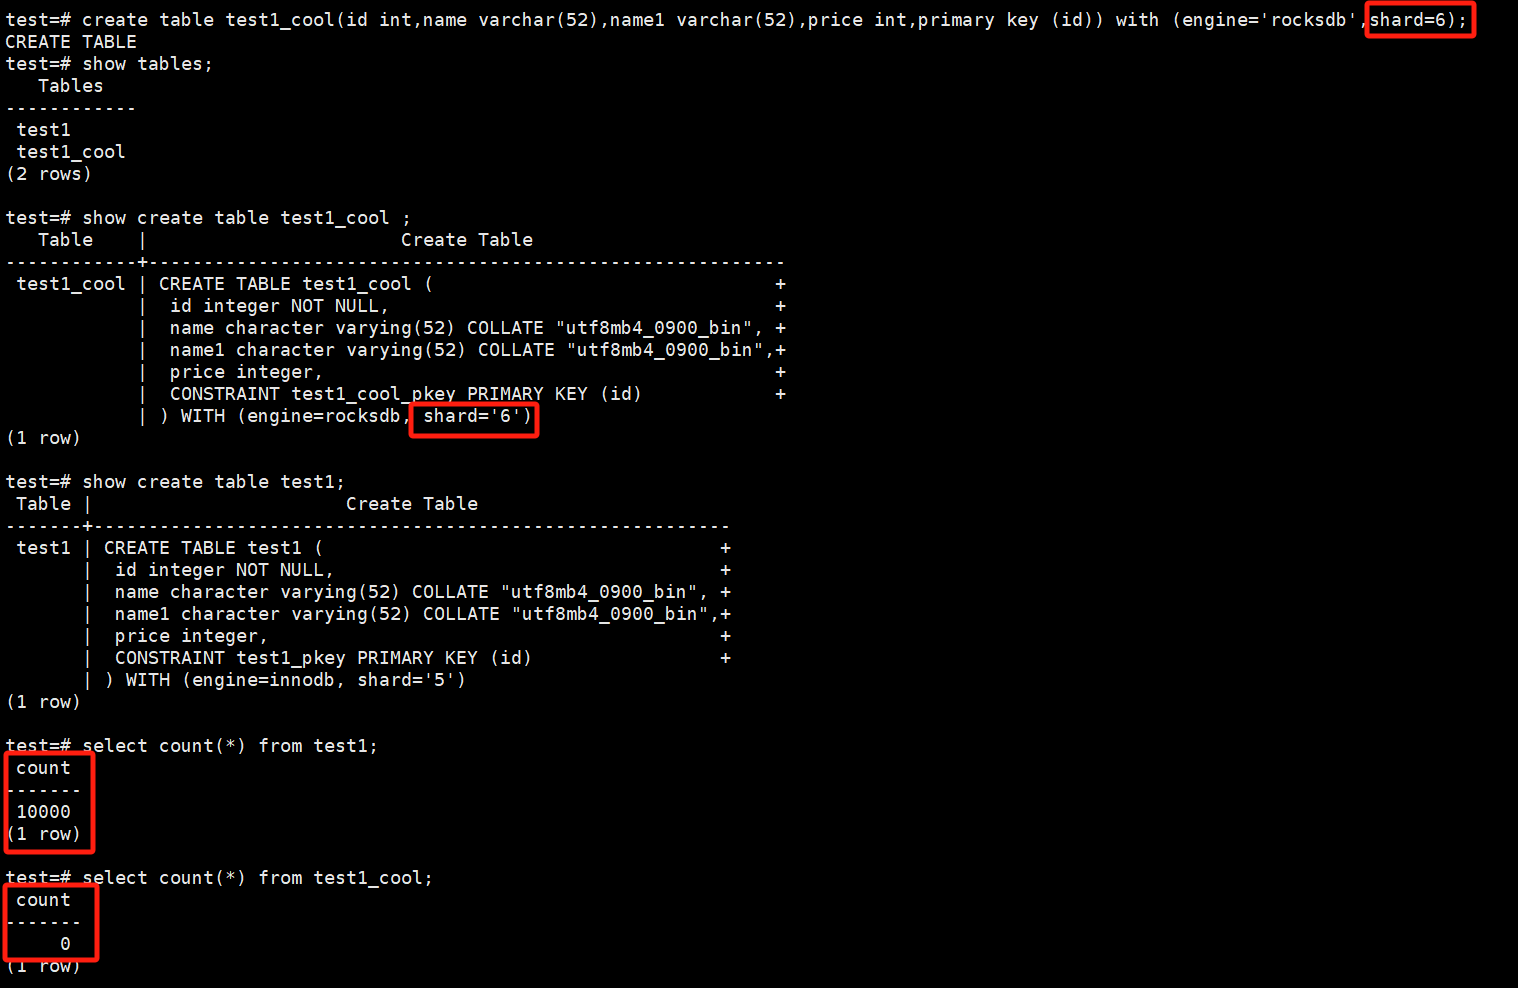
Create the table test1_cool, which has the same structure as test1 but specifies the storage engine as RocksDB, shard=6.
# create table test1_cool(id int,name varchar(52),name1 varchar(52),price int,primary key (id)) with (engine='rocksdb',shard=6);
# show tables;
# show create table test1_cool ;
# show create table test1;
# select count(*) from test1;
# select count(*) from test1_cool;
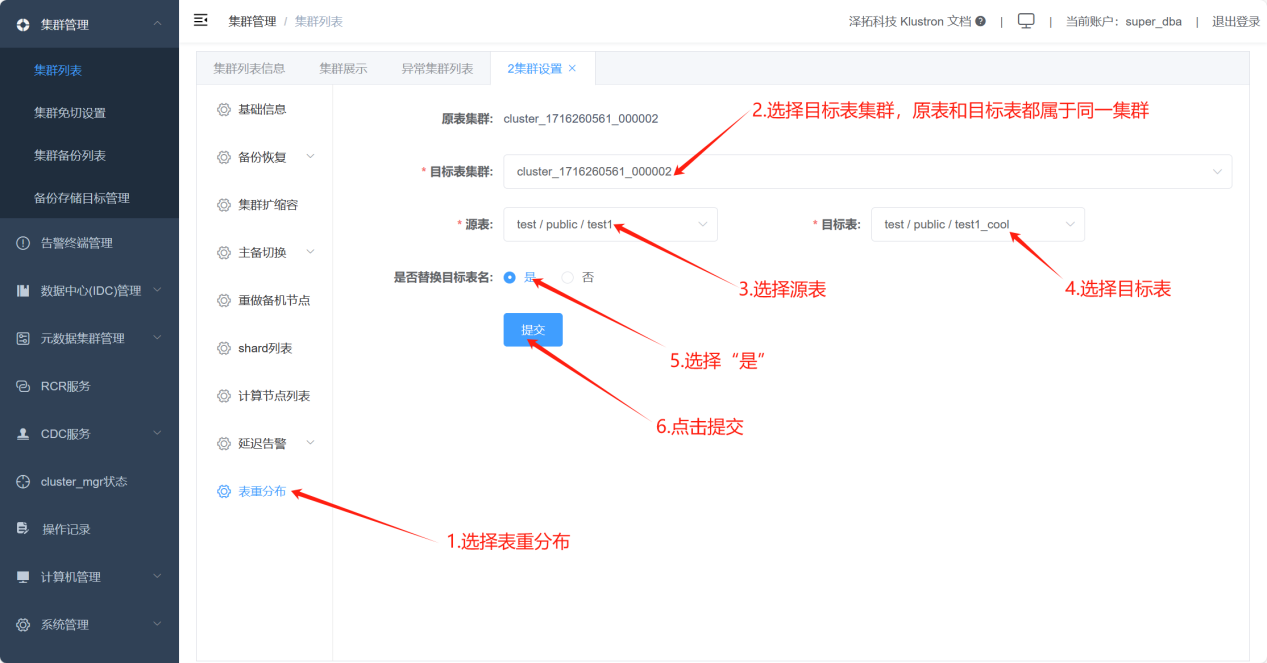
Execute table redistribution through XPanel, moving data from hot shard_5 to cold shard_6. Finally, rename the original test1 table to another table name, and rename the data-migrated test1_cool table back to test1. No changes are required in the business code, but it is important to note that the principle of table redistribution is logical backup, i.e., exporting data from the original table and then importing it into the target table, followed by renaming the original and target tables, so the time window for changes should be assessed based on the volume of data, and sufficient time should be reserved for changes.
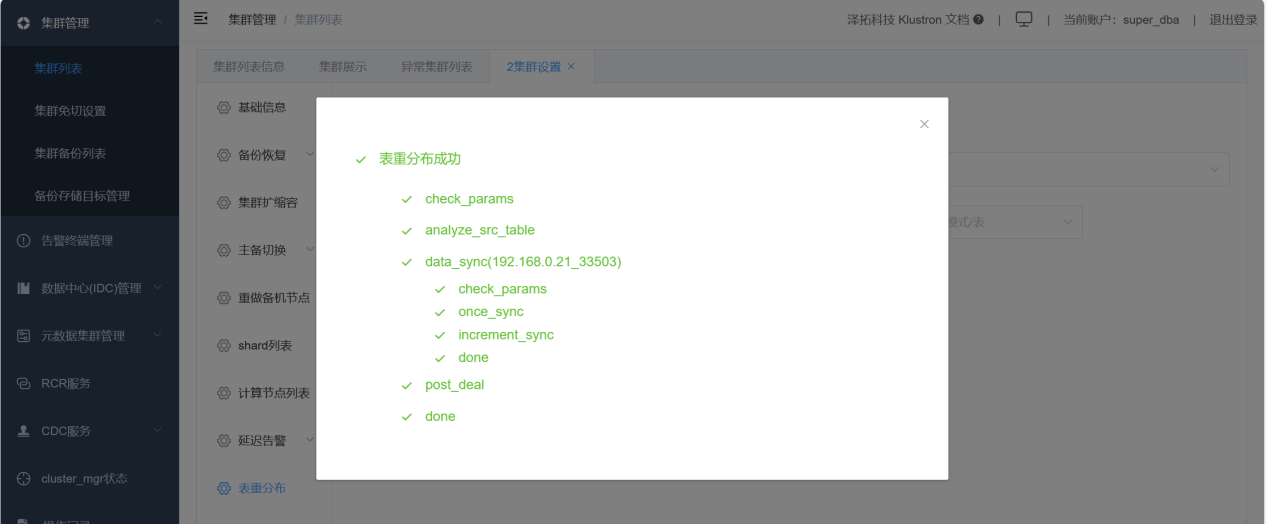
Verify that the migration is complete:
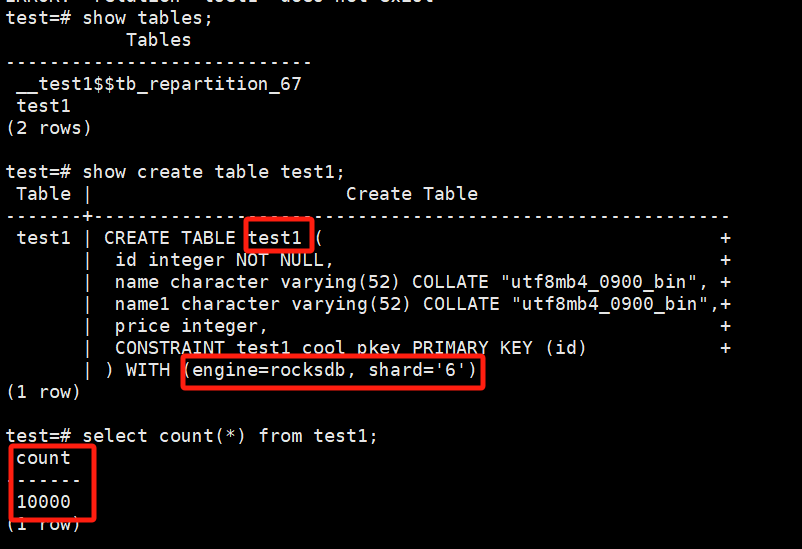
Confirm that the migration is finished.