
END
KlustronDB Single Shard Cluster Deployment Guide
1 Single Shard Architecture
For small and medium-sized applications, you can use KlustronDB's single shard architecture to reduce system software and hardware costs. Compared with MySQL master-slave architecture, KlustronDB single shard architecture not only improves system reliability but also utilizes KlustronDB's powerful computing and analysis capabilities to simultaneously meet OLTP & OLAP load requirements within one system.
_
Component Description
Klustron-server: OLAP & OLTP operations.
KunlunProxySQL: OLTP application access database routing, supporting load balancing, failover, and read-write separation.
Klustron-storage: Storage nodes, forming the primary shard.
Cluster manager: Cluster management and status monitoring.
MetaShard: Metadata cluster.
XPanel: Graphical management console
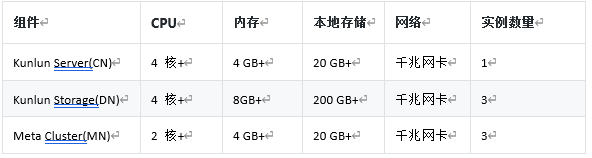
2 Installation Planning
Taking the deployment of a single shard architecture with three servers as an example, the resource plan is as follows:

3 Environment Preparation
3.1 Installation Environment & Configuration Requirements
3.1.1 Hardware Configuration
Development and testing environment (minimum requirements):
3.1.2 Linux Operating System Version Requirements

3.2 Installation Environment Preparation
Before installation, ensure that the server operating system environment meets the following requirements:
All nodes must be Linux, with bash, sed, gzip, python2, python2-dev, and other tools or libraries installed. The Python 2 executable program is set to python2.
All cluster nodes have correctly set up users, and the nodes will be started with this user, who can run sudo without a password.
Configure the firewall to open all ports involved in the install.json configuration file.
For machines where storage nodes are installed, the following libraries need to be pre-installed (here for Ubuntu 20.04): libncurses5 libaio-dev.
For machines where compute nodes are installed, the following libraries need to be pre-installed (here for Ubuntu 20.04): libncurses5 libicu66 python-setuptools gcc.
For installation on CentOS, refer to Appendix 2.
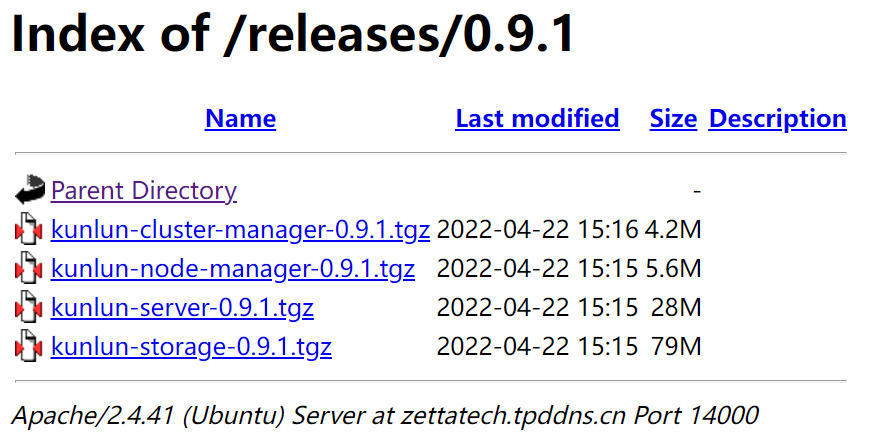
For the installation action, the binary release packages (kunlun-cluster-manager-0.9.1.tgz, Klustron-server-0.9.1.tgz, Klustron-storage-0.9.1.tgz) need to be pre-placed in the current directory. In addition, the network between the tool running machine and the node machines cannot be too slow, as the release packages need to be transferred to these machines.
For all machines to be installed, the automatic login authentication for the installation user and root user needs to be set up. After setting up, execute
ssh username@host.comUbuntu can refer to: ubuntu login automatic authentication; CentOS can refer to: centos login automatic authentication; If you are prompted with "sudo: password required" at this step, you can refer to:sudo nopasswd.
4 KlustronDB Installation Process
- Select a server, log in to the server, and download the KlustronDB cluster installation program
Use git clone to pull the kunlun-scripts package from gitee:
git clone https://github.com/zettadb/cloudnative.git
- Get the latest version of the installation program
Switch the current directory to cloudnative/cluster: cd cloudnative/cluster, here the command takes 1.3.3 as an example (if there are other latest versions, please use the latest version): git checkout -f 1.3.3
- Go to the KlustronDB download site to download the offline installation package
4.1 Fill in the configuration file for the one-click installation program
Prerequisite: Create a user named kunlun on the three servers and configure the trust relationship between the three hosts. If the database username is another username, modify the configuration file accordingly.
Log in to Server1, log in as the kunlun user, enter the cluster directory, and you can see the install.json file: 
Edit the install.json file and fill in the server IP, username, and other information. The example file in the appendix is configured according to the plan in Table 1-1 above, and can be modified according to the actual situation.
4.2 Execute Installation
The installation process will use generate_scripts.py to generate scripts, and its parameter descriptions are as follows:
- The
actionparameter for executing this script isinstall; - The
configparameter is the cluster configuration fileinstall.json(this configuration file can be generated by modifying theinstall_rbr.jsonfile in the installation directory); - The
defuserparameter is set to the default working user of the Klustron cluster. Most or all machines can use this user; if there is no such default user, theuserspecified in themachinesuser in the configuration file is used. defbaseMost or all machines can create this default working directory; if the default working directory cannot be created, thebasedirspecified in themachinesuser in the configuration file is used.
_
Step 1: $python2 generate_scripts.py --action=install --config=install.json --defuser=kunlun --defbase=/kunlun
Step 2: $bash install/commands.sh
Wait patiently for about 10 minutes. As long as there are no !!!FAILURES!!! or other errors, the installation is successful.
Other commands:
One-click stop cluster stop: defbase is the default working directory, Action is stop
$python2 generate_scripts.py --action=stop --config=install.json --defbase=/kunlun
$bash stop/commands.sh
One-click start cluster start: action is start
$python2 generate_scripts.py --action=start --config=install.json  --defbase=/kunlun
$bash start/commands.sh
One-click clean cluster clean: action is clean
$python2 generate_scripts.py --action=clean --config=install.json  --defbase=/kunlun --sudo
$bash clean/commands.sh
Before using this command, the working directory cannot be cleaned first, otherwise the script cannot find the working directory and cannot execute the command. After using it, then delete the working directory.
5 Install and Configure KunlunProxySQL
5.1 According to KunlunProxySQL
You must use Klustron's built-in KunlunProxySQL, which will work with other modules of KlustronDB to ensure that when the primary node of the storage shard fails, it can quickly switch to use the newly elected primary node to continue working.
5.2 After installation, configure KunlunProxySQL resources
5.2.1 Configure accounts required for KunlunProxySQL
-- proxysql monitoring account (execute in kunlun-storage)
create user 'monitor'@'%' identified by 'kunlunbasepwd';
grant all privileges on *.* to 'monitor'@'%' with grant option;

-- proxysql external access account (execute in kunlun-storage)
create user 'proxysql'@'%' identified by 'kunlunbasepwd';
grant all privileges on *.* to 'proxysql'@'%' with grant option;

flush privileges;
5.2.2 Configure KunlunProxySQL master-slave grouping information
Log in to the KunlunProxySQL management port and execute the following statements:
insert into mysql_replication_hostgroups ( writer_hostgroup, reader_hostgroup, comment) values (10,20,'proxy');

load mysql servers to runtime;
save mysql servers to disk;
Add master-slave server nodes:
insert into mysql_servers(hostgroup_id,hostname,port) values (10,'192.168.0.11',6004);
insert into mysql_servers(hostgroup_id,hostname,port) values (20,'192.168.0.12',6005);
insert into mysql_servers(hostgroup_id,hostname,port) values (20,'192.168.0.13',6006);

load mysql servers to runtime;
save mysql servers to disk;
5.2.3 KunlunProxySQL monitors MySQL backend nodes
admin@127.0.0.1 [monitor]>set mysql-monitor_username='monitor';
Query OK, 1 row affected (0.00 sec)

admin@127.0.0.1 [monitor]>set mysql-monitor_password='kunlunbasepwd';
Query OK, 1 row affected (0.00 sec)
5.2.4 Configure external access accounts for KunlunProxySQL:
insert into mysql_users (username,password,default_hostgroup) values ('proxysql','kunlunbasepwd',10);

load mysql users to runtime;
save mysql users to disk;
5.2.5 Configure read-write separation strategy: routing rules
insert into mysql_query_rules(rule_id,active,match_pattern,destination_hostgroup,apply) values (1,1,'^select.*for update$',10,1);

insert into mysql_query_rules(rule_id,active,match_pattern,destination_hostgroup,apply) values (2,1,'^select',20,1);
load mysql query rules to runtime;
save mysql query rules to disk;
6 Appendix 1: install.json
{
    "machines":[
        {
            "ip":"192.168.0.11",
            "basedir":"/kunlun",
            "user":"kunlun"
        },
        {
            "ip":"192.168.0.12",
            "basedir":"/kunlun",
            "user":"kunlun"
        },
        {
            "ip":"192.168.0.13",
            "basedir":"/kunlun",
            "user":"kunlun"
         }
    ],
    "cluster":{
        "name":"clust1",
"ha_mode": "rbr",
        "meta":{
            "nodes":[
                {
                    "is_primary":true,
                    "ip":"192.168.0.11",
                    "port":6001,
                    "xport":60010,
                    "mgr_port":60011,
                    "innodb_buffer_pool_size":"64MB",
                    "data_dir_path":"/data1",
                    "log_dir_path":"/data1/log",
                    "user":"kunlun",
                    "election_weight":50
                },
                {
                    "is_primary":false,
                    "ip":"192.168.0.12",
                    "port":6002,
                    "xport":60020,
                    "mgr_port":60021,
                    "innodb_buffer_pool_size":"64MB",
                    "data_dir_path":"/data2",
                    "log_dir_path":"/data2/log",
                    "user":"kunlun",
                    "election_weight":50
                },
                {
                    "is_primary":false,
                    "ip":"192.168.0.13",
                    "port":6003,
                    "xport":60030,
                    "mgr_port":60031,
                    "innodb_buffer_pool_size":"64MB",
                    "data_dir_path":"/data3",
                    "log_dir_path":"/data3/log",
                    "user":"kunlun",
                    "election_weight":50
                }
            ]
        },
        "comp":{
            "nodes":[
                {
                    "id":1,
                    "name":"comp1",
                    "ip":"192.168.0.11",
                    "port":5401,
                    "user":"abc",
                    "password":"abc",
                    "datadir":"/pgdatadir"
                }
            ]
        },
        "data":[
            {
                "nodes":[
                    {
                        "is_primary":true,
                        "ip":"192.168.0.11",
                        "port":6004,
                        "xport":60040,
                        "mgr_port":60041,
                        "innodb_buffer_pool_size":"4000MB",
                        "data_dir_path":"/data4",
                        "log_dir_path":"/data4/log",
                        "user":"kunlun",
                        "election_weight":50
                    },
                    {
                        "is_primary":false,
                        "ip":"192.168.0.12",
                        "port":6005,
                        "xport":60050,
                        "mgr_port":60051,
                        "innodb_buffer_pool_size":"3000MB",
                        "data_dir_path":"/data5",
                        "log_dir_path":"/data5/log",
                        "user":"kunlun",
                        "election_weight":50
                    },
                    {
                        "is_primary":false,
                        "ip":"192.168.0.13",
                        "port":6006,
                        "xport":60060,
                        "mgr_port":60061,
                        "innodb_buffer_pool_size":"3000MB",
                        "data_dir_path":"/data6",
                        "log_dir_path":"/data6/log",
                        "user":"kunlun",
                        "election_weight":50
                    }
                ]
            }
        ],
        "clustermgr":{
            "ip":"192.168.0.11"
        }
    }
}
7 Appendix 2: CentOS Supplementary Guide
7.1 Install necessary software packages and dependencies (all hosts)
yum install -y python-setuptools ncurses-libs icu libicu libaio readline python-psycopg2
wget --no-check-certificate https://klustron.cn:14443/thirdparty/mysql-connector-python.el7.x86_64.rpm
yum localinstall -y mysql-connector-python.el7.x86_64.rpm
7.2 User environment & network configuration
7.2.1 kunlun user SUDO password-free (all hosts)
Execute the shell command chmod u+w /etc/sudoers to add write permission to the sudoers file.
Then use vi to open this file
vi /etc/sudoers, find the following two lines and add the kunlun user and group
## Allow root to run any commands anywhere
root    ALL=(ALL)       ALL
kunlun  ALL=(ALL)      NOPASSWD:ALL


## Allows people in group wheel to run all commands
%wheel  ALL=(ALL)       ALL
kunlun ALL=(ALL)       NOPASSWD:ALL
Then execute the command chmod u-w /etc/sudoers to revoke write permission.
7.2.2 SSH password-free login
7.2.2.1 Configure hostnames for each host (modify as appropriate):
/etc/hosts

127.0.0.1   localhost localhost.localdomain localhost4 localhost4.localdomain4
::1         localhost localhost.localdomain localhost6 localhost6.localdomain6
192.168.0.130 centos7b
192.168.0.139 centos7c
192.168.0.142 centos7d
192.168.0.130 localhost
7.2.2.2 Configure remote SSH password-free (remote)
Execute the following operations on each server in the cluster:
chmod 755 ~/.ssh

cd /home/kunlun/.ssh
If the ".ssh" directory does not exist, please execute the mkdir ~/.ssh command in the /home/hadoop directory to create it.
After executing the following command, if prompted, keep pressing "Enter" until the public key is generated.
ssh-keygen -t rsa
Copy the public key to the server (the server to log in to)
scp id_rsa.pub kunlun@centos7c:/home/kunlun/.ssh/authorized_keys_from_centos7b
Log in to the server to be logged in, enter the ./ssh directory cd ~/.ssh
7.3 Merge the public key files sent by the client
cat authorized_keys_from_centos7b >> authorized_keys
Modify directory permissions:
chown kunlun: .ssh
chown kunlun: .ssh/*
chmod 700 .ssh
chmod 600 .ssh/*
7.3.1 Configure local SSH password-free (local - first server installed)
ssh-keygen -t dsa -P '' -f .ssh/id_dsa
cat .ssh/id_dsa.pub >> .ssh/authorized_keys
chmod 0600 .ssh/authorized_keys